
Contents
- Lesson Objectives
- Introducing Automated Transcription
- Prerequisites
- Setting up Azure Computer Vision
- Trying out various transcription projects
- Image requirements
- Project 1: Working with an image found online
- Project 2: Working with an image stored in your Python environment
- Project 3: Creating a function to transcribe multiple images stored in your Python environment
- Project 4: Transcribing all the images of a folder and saving the text in a file
- Summary
- Bibliography
Lesson Objectives
Tools for machine transcription of handwriting are practical and labour-saving if you need to analyse or present text in digital form. This lesson will explain how to write a Python program to transcribe handwritten documents using Microsoft’s Azure Cognitive Services, a commercially available service that has a cost-free option for low volumes of use.
Introducing Automated Transcription
Handwritten documents are appealing artifacts and a mainstay of research for many historians. Sources such as diaries, letters, logbooks and reports connect historians to writers not only through the writer’s words, but also through their individual writing style. However, research involving large amounts of these documents represents a significant challenge: transcription of documents into digital form makes them more searchable, but hand transcription is very time-consuming. While historians have been able to digitize physical typewritten documents using optical character recognition (OCR), handwriting, with its individual styles, has until recently resisted recognition by computers.
Digitally transcribing symbols, whether typed, printed or written, is a form of pattern matching. OCR for typed characters recognizes the patterns that make up a letter through a set of codified rules. In order to gain the ability to recognize handwriting using deep learning, the computer goes through a special training process. It is fed a large number of images of written letters – for example, the letter A – along with data telling the computer which letter it is being shown. Throughout this training, the computer learns to recognize various similar visual patterns of a written A and differentiates them from other letters. This training process requires carefully classifying a lot of data and demands a substantial amount of computer processing. This is a specialized and labour-intensive process. It is also important to note that a recognition model based on deep learning reflects the biases both from the data it was trained on and from the ways in which this data was selected.
Commercial Transcription Services
While training a customized handwriting recognition model is possible and sometimes required, it remains very difficult. Fortunately, ready-trained handwriting recognition services are available commercially. Microsoft, Google Cloud Platform and Amazon Web Services are companies that offer handwriting recognition services over the web. These services equip the historian who would like a faster means to transcribe handwritten documents, as long as these documents are legible and in a writing system that is recognizable by the service.
These commercially based services perform more reliably with legible handwriting in a standardized presentation, such as being written on straight lines. The services all recognize the roman alphabet, and certain services (but not all) also support other forms of writing, like the Arabic alphabet. You can check which languages each service supports on the following pages: Microsoft, Google Cloud Platform and Amazon Web Services. Automated transcription will also struggle to recognize handwriting that is only lightly visible, such as pencil, or otherwise poorly contrasted. Despite these limitations, however, handwriting recognition is now a useful and practical tool for historians who need to transcribe documents.
On Microsoft Azure’s Cognitive Services
For this lesson, we will use Microsoft’s Azure Cognitive Services to transcribe handwriting. Azure Cognitive Services is accessed only over the web – it is not a desktop application on your computer. Your computer connects to it and sends it images to process for handwriting recognition. Azure Cognitive Services replies with the text it detects in an image. Azure Cognitive Services performs reliably with handwritten documents and, based on personal usage, it performs as well as Google or Amazon Web Services on documents written in English and French. Microsoft Azure’s Cognitive Services has a free tier of service available.
Microsoft’s Azure Cognitive Services can be harnessed to transcribe typed text, handwriting, or a combination of both. It can transcribe diaries, letters, forms, logbooks and research notes. I have also used it to transcribe maps and diagrams. The potential uses for Digital History are numerous!
Transcription with Azure Cognitive Services is well documented, but does require some programming, hence this lesson.
Prerequisites
- Knowledge of Python is not required, since all of the code is provided in the lesson. That said, basic Python knowledge would be useful for users who wish to understand the code or to tweak it for their purposes.
- This lesson was written with Google Colab, a web-based virtual Python programming platform. If you choose to use Google Colab to program Python (which I recommend), you will need a Google account. If you choose to run the code in this tutorial locally on your own machine, you will need to install Python 3.x and pip.
- An internet connection.
- A credit card or debit card. (Though there is a free tier of service for Microsoft, you are required to put a credit or debit card on file. The card is not charged if the number of files processed is below 5,000 each month.)
- A telephone number. (This is to verify your identity.)
For further information on transcription, previous Programming Historian lessons which have demonstrated typed text recognition include: Andrew Akhlaghi’s OCR and Machine Translation, Moritz Mähr’s Working with batches of PDF files, Laura Turner O’Hara’s Cleaning OCR’d text with Regular Expressions and Jon Crump’s Generating an Ordered Data Set from an OCR Text File. Recent advances in artificial intelligence now allow historians to automatically transcribe handwritten documents, within the limits of the writing systems used, the language and the legibility of the handwriting. Indeed, with the advent of computer algorithms referred to as deep learning, computers have achieved a level of generalized pattern recognition that allows them to recognize handwritten characters, even across various writers’ handwriting styles. Another lesson to refer to is Isabelle Gribomont’s OCR with Google Vision API and Tesseract: it provides a method to combine Google Cloud Platform’s character recognition with Tesseract’s layout detection. Tesseract’s layout detection capability could possibly be combined with Microsoft Azure’s Cognitive Services’ handwriting recognition, to improve the structure of the transcribed text.
Setting up Azure Computer Vision
Step 1. Registering for a personal Microsoft account
To use Azure Computer Vision, you need to log in with a Microsoft account. If you already have a personal Microsoft or Github account, skip this section and start from Step 2. If you already have a Microsoft account for work or school, you may not be able to access Azure Cognitive Services from that account. If so, just register for a separate personal account using a different e-mail address.
a) Go to https://portal.azure.com/.
b) If you don’t have an account, register by clicking No account? Create one!.
c) Input your e-mail address and follow the prompts.
d) Check your e-mail inbox for a verification code and input this into the web browser.
Step 2. Creating a “Computer Vision” Resource in Azure
Azure Computer Vision uses a virtual computer resource to process the images you send it. In this step, we will create that resource.
a) Go to https://portal.azure.com/.
b) Click + Create a resource. You will need to do this twice. The first time is to set up your payment method as noted below.
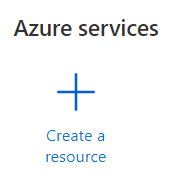
Figure 1. + Create a resource.
c) In the Search Services and Marketplace box, type “Computer Vision” and press Enter. When the search results open, click Create under the heading Computer Vision.
d) Click Start with an Azure free trial. (If your account is not eligible for an Azure free trial, you will have to use pay-as-you-go pricing. You will still have a free level of consumption, if you have not spent it already.)
e) Input a telephone number to verify your identity.
f) Input your contact information and credit card number. Microsoft will verify the information. Once this is done, return to the Azure portal. You can do this by clicking the Go to Azure portal button and then clicking the Home link.
g) Click + Create a resource for the second time (see Figure 1 above). This will create the instance of Computer Vision which you will use.
h) In the Search Services and Marketplace box, type “Computer Vision” and press Enter. When the search results open, click Create under the heading Computer Vision.
i) In the Create Computer Vision screen, Basics tab, Project Details section, set the Subscription field to an available choice, such as “Free Trial”. For Resource group, click Create new and name it resource_group_transcription. Click OK.
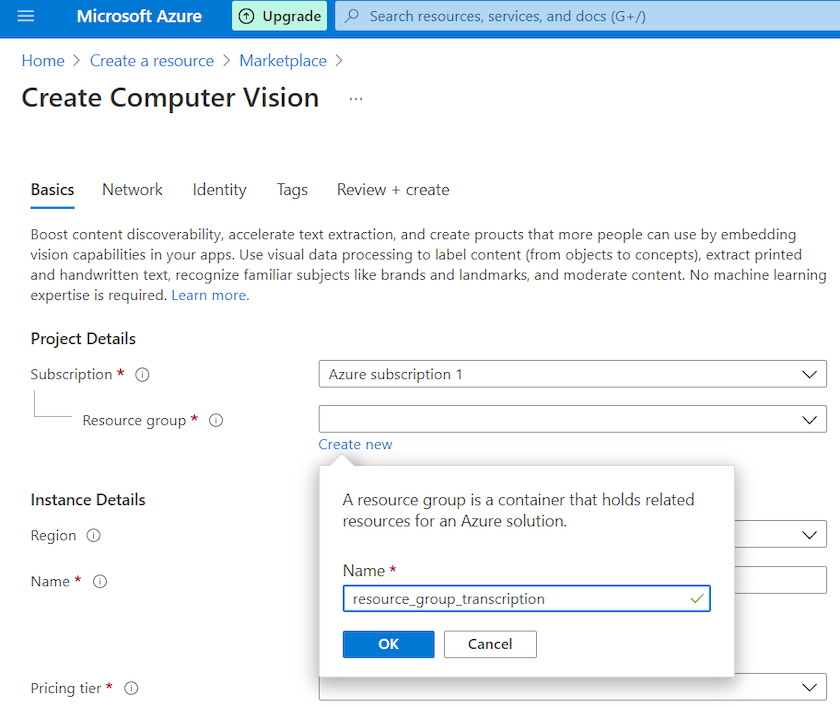
Figure 2. + Resource group | Create new.
j) In the Instance Details section, select a region, input a unique name and set Pricing tier to “Free F0”.
k) Read the Responsible AI Notice and check the box. The Identity and Tags tabs can be left with default values. They are relevant only if you are using this in combination with other Microsoft Azure services.
l) Click Review + create, then click Create.
m) When you see the message “Your deployment is complete”, you can click Go to resource and start on Step 3.
Step 3. Creating and storing a secret key and endpoint to access Computer Vision
To use the service, your computer program must send a password key to an endpoint URL at Microsoft Azure. The use of a URL to send and receive data is a standard method for using cloud-based services like Microsoft Azuew. Secret keys are a commonly used mechanism to protect cloud-based services from unauthorized users. As it says on Azure: “Do not share your keys. Store them securely…”. Keeping your keys secure reduces the risk of someone else improperly using your credits to transcribe documents.
To reduce the risk of inadvertently sharing your secret key, store it in a separate file, in a different folder from the program you are writing. This protects your key better than including it inside code you may share.
a) In the Azure Portal, open the Keys and Endpoint page of your resource.
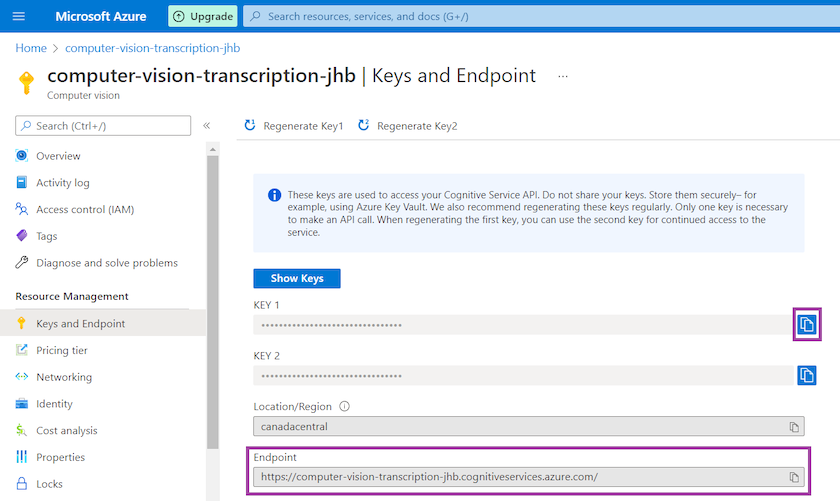
Figure 3. Keys and Endpoint.
b) Copy KEY 1 and paste it into a separate text file you can refer to. The key will look a bit like this b-f-9-7-0-8-4-8-b-7-a-6-6-8-1-9-. There are two keys, but you only need to use one of them for this lesson.
c) Copy the endpoint URL and paste it in your file for reference. The endpoint contains your unique resource name and will be similar to this https://computer-vision-transcription-jhb.cognitiveservices.azure.com/. This is the URL your Python program will use to communicate with Microsoft Azure Cognitive Services.
Regenerating your keys using the button on the Keys and Endpoint page is a good way to keep keys secure. When your key changes, just copy and paste it to where you store your key. If you are using this service constantly, logic can be added to your program to use the second key while the first key is being regenerated, which helps avoid any errors.
Step 4. Creating a Python notebook
In this step, we will create a Python notebook in which we will write our program. We will use Google Colab, a cloud-based environment to program Python notebooks. However, these programs may instead be written in another Python environment of your choice.
a) Go to: https://colab.research.google.com/ (Google Colab is recommended for this lesson, but you can use another Python environment of your choice, such as Anaconda. See the lesson by Quinn Dombrowski, Tassie Gniady, and David Kloster, Introduction to Jupyter Notebooks.)
b) Click New Notebook in the dialog box that opens. Clicking File > New Notebook in the menu will do the same thing.
c) When the notebook opens, give it a new title at the top: Transcribe handwriting and text with Microsoft Azure Cognitive Services.ipynb.
d) The code below will store your key and endpoint in an environment variable which will make it accessible by the program. In Google Colab, you should be able to see an empty text box or “cell” in which to write code. If not, click the + Code button to add a new code cell. Copy the code below into a cell in your notebook. Change https://computer-vision-transcription-jhb.cognitiveservices.azure.com/ to the endpoint URL you created in Step 3.
import os

print('Enter your secret computer vision key:')
cv_key = input()

# Change the cv_endpoint below to your endpoint.
cv_endpoint = "https://computer-vision-transcription-jhb.cognitiveservices.azure.com/"

# Store as enivonmental variables
os.environ['COMPUTER_VISION_SUBSCRIPTION_KEY'] = cv_key
os.environ['COMPUTER_VISION_ENDPOINT'] = cv_endpoint

# Do some basic validation
if len(os.environ['COMPUTER_VISION_SUBSCRIPTION_KEY']) == 32:
    print("Success, COMPUTER_VISION_SUBSCRIPTION_KEY is loaded.")
else:
    print("Error, The COMPUTER_VISION_SUBSCRIPTION_KEY is not the expected length, please check it.")
print("Delete this output")
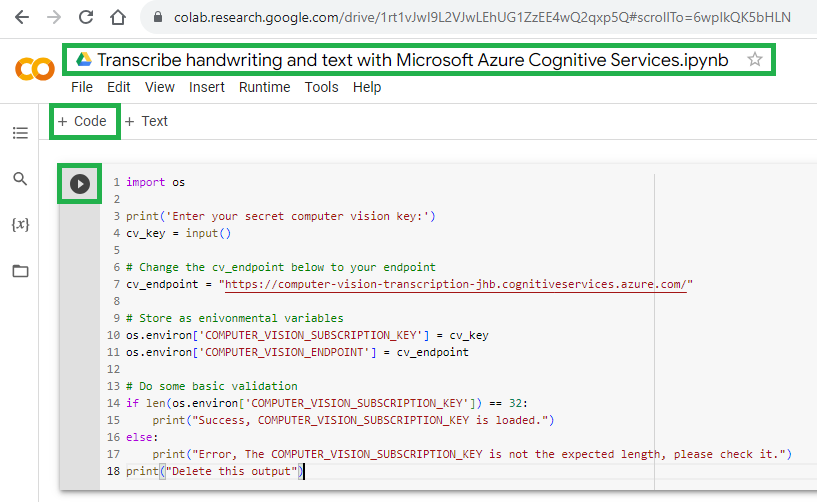
Figure 4. Create a Python notebook in Google Colab.
e) Run this cell by clicking the triangular “play” button. In the menu, Runtime > Run the focused cell will do the same thing. Input your key in the prompt below the cell, then press Enter.

Figure 5. Entering the Key when prompted.
Running the cell will store the key and endpoint URL as environment variables in memory using Python’s os library, which will allow Python to use these values to communicate with Azure. The expected printed result is this:
Success, COMPUTER_VISION_SUBSCRIPTION_KEY is loaded.
Delete this output
f) Click “x” in the notebook output to delete the text of your key. If you see an error message, check that you copied and input the key correctly.

Figure 6. Clear output below a cell in a Google Colab notebook.
Step 5. Installing Azure Computer Vision in your Python environment.
In this step, we will install the required program libraries your program will use to communicate with Azure Computer Vision.
This documentation by Microsoft is a helpful resource for this step.
a) Create a new cell in your notebook, paste in the code below and run it. It will install the Python library required to connect to Azure Cognitive Services Computer Vision. If you are using Google Colab, you will need to do this once per session. If you are using a local Python environment on your computer instead of Google Colab, you only need to do this once, but you may need to remove the exclamation mark to run the pip install command.
# Install what is required to connect to Azure Cognitive Services Computer Vision
# Run this once on your machine. If you are using Google Colab, run this once per session.
!pip install --upgrade azure-cognitiveservices-vision-computervision
b) Create another new cell in your notebook, paste in the code below and run it. It will:
- Import the required libraries.
- Get your Computer Vision subscription key from your environment variable.
- Get your Computer Vision endpoint from your environment variable.
- Authenticate with Azure Cognitive Services.
# Run this once per session

# Import the required libraries
from azure.cognitiveservices.vision.computervision import ComputerVisionClient
from azure.cognitiveservices.vision.computervision.models import OperationStatusCodes
from azure.cognitiveservices.vision.computervision.models import VisualFeatureTypes
from msrest.authentication import CognitiveServicesCredentials
import sys

# Get your Computer Vision subscription key from your environment variable.
if 'COMPUTER_VISION_SUBSCRIPTION_KEY' in os.environ:
    subscription_key = os.environ['COMPUTER_VISION_SUBSCRIPTION_KEY']
else:
    print("\nSet the COMPUTER_VISION_SUBSCRIPTION_KEY environment variable.\n**Restart your shell or IDE for changes to take effect.**")
    sys.exit()

# Get your Computer Vision endpoint from your environment variable.
if 'COMPUTER_VISION_ENDPOINT' in os.environ:
    endpoint = os.environ['COMPUTER_VISION_ENDPOINT']
else:
    print("\nSet the COMPUTER_VISION_ENDPOINT environment variable.\n**Restart your shell or IDE for changes to take effect.**")
    sys.exit()

# Authenticate with Azure Cognitive Services.
computervision_client = ComputerVisionClient(endpoint, CognitiveServicesCredentials(subscription_key))
Trying out various transcription projects
Image requirements
Acceptable formats include
jpeg,png,gif, orbmp. Images must have a minimum size of 50 x 50 pixels, and a maximum size of 4 MB. Images with higher contrast and clear handwriting work better than images that are difficult to read or contain fragments of letters.Try a sample of images before starting a large transcription project. Azure Cognitive services will send the image to Microsoft for processing, so remember to respect any restrictions on use or transmission when working with images or text.
Project 1: Working with an image found online
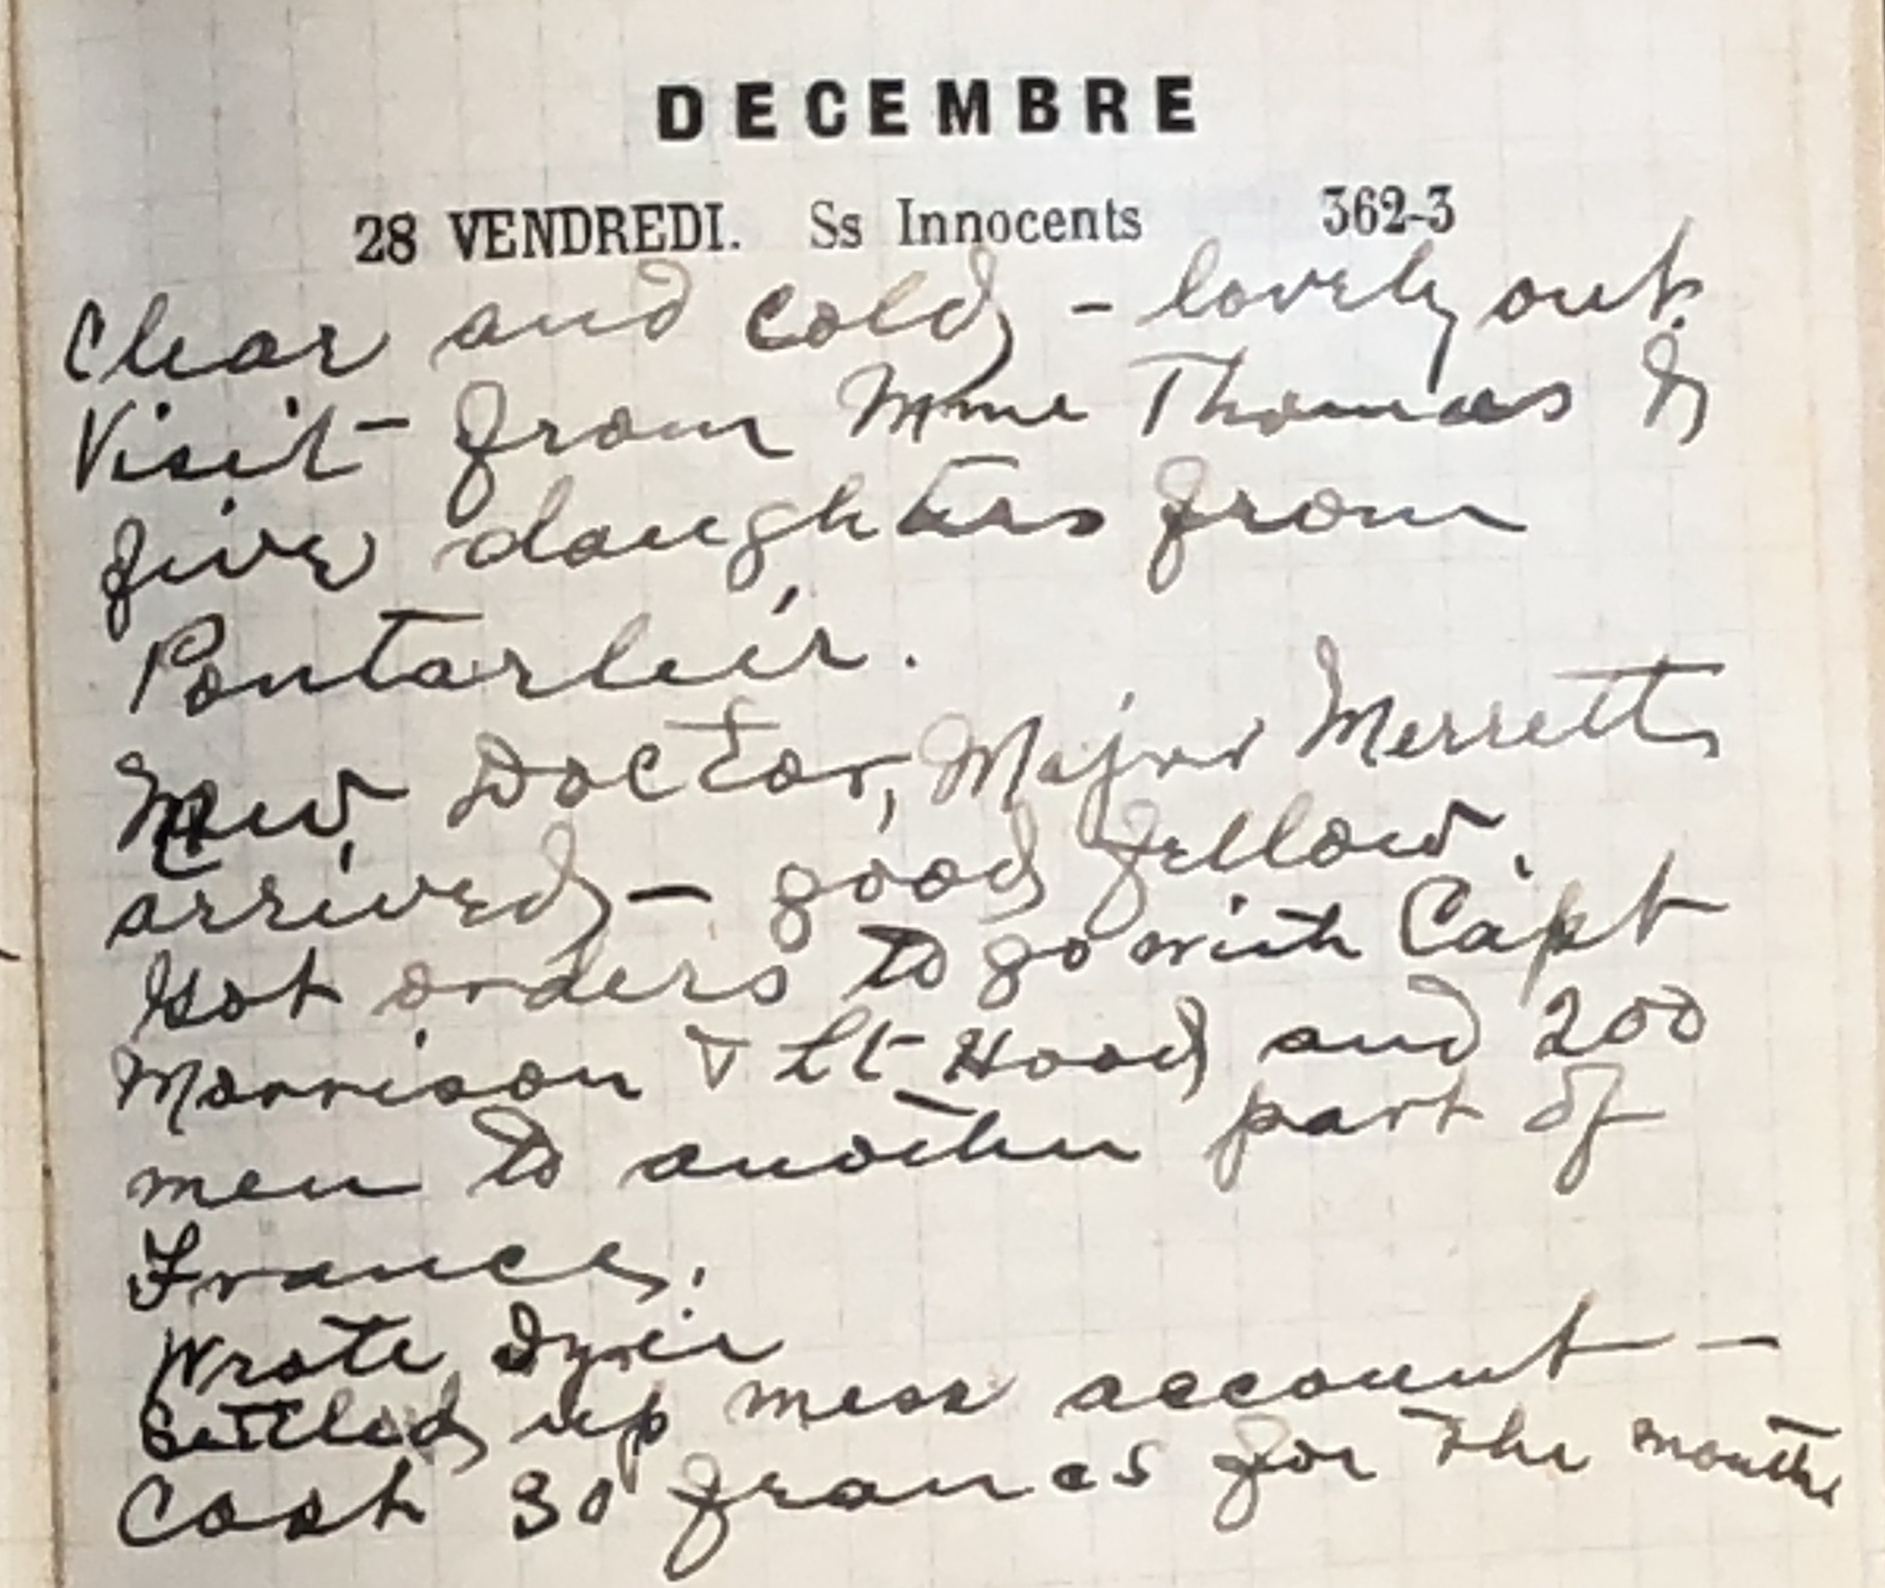
This section will allow you to transcribe handwriting from an image found online, which requires the image’s URL. For this example, we’ll use https://github.com/programminghistorian/ph-submissions/blob/gh-pages/assets/transcribing-handwritten-text-with-python-and-azure/td_00044_b2.jpeg. This is an image from the 1917 wartime diary of Captain William Andrew White photographed during research. This research involved text analysis with natural language processing to extract, catalog and relate the names of the people, locations and organizations that appeared in the diary, for which it was necessary to transcribe the writing into digital form.
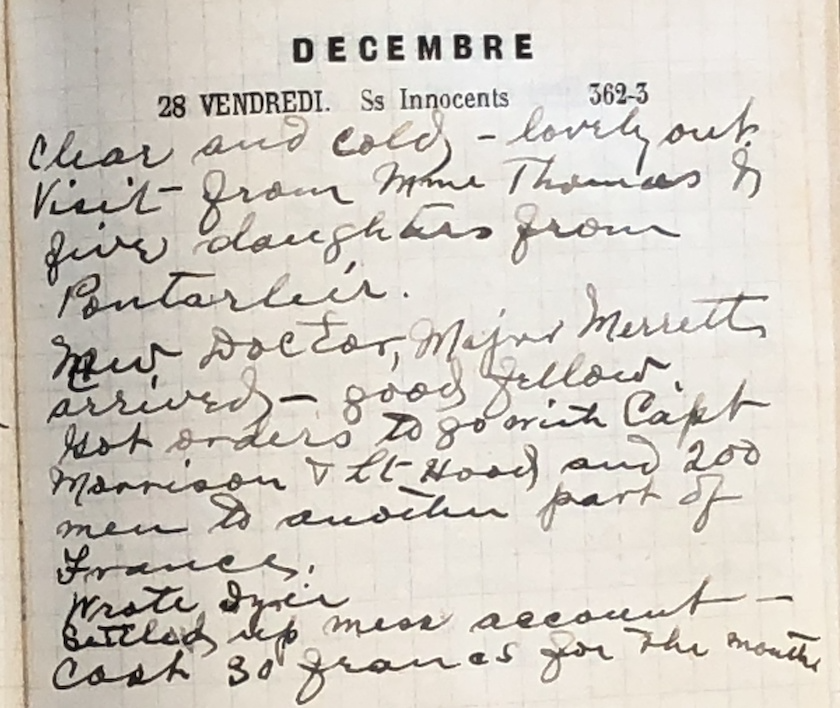
Figure 7. A page from Captain White’s diary
Create another new cell in your notebook, paste in the code below and run it. It will:
- Set the URL of the image to transcribe. To transcribe a different image found online (which you have permission to use), change the URL inside the
" "to the URL of that image. - Call Azure using
computervision_clientwith the URL of the image. The URL is passed to Azure’s Application Programming Interface (API) to tell Azure to download the image and process it for handwriting recognition. - Read the results line by line.
- If successful, print the text of each line, as well as the coordinates for the box in which the text is located in the image.
import time
# This section is taken directly from:
# https://github.com/Azure-Samples/cognitive-services-quickstart-code/blob/master/python/ComputerVision/ComputerVisionQuickstart.py


# <snippet_read_call>
print("===== Read File - remote =====")
# Get an image with text. Set the url of the image to transcribe.
read_image_url = "http://jeffblackadar.ca/captain_white_diary/page_images/td_00044_b2.jpg"

# Call API with URL and raw response (allows you to get the operation location). Call Azure using computervision_client with the URL.
read_response = computervision_client.read(read_image_url,  raw=True)
# </snippet_read_call>

# <snippet_read_response>
# Get the operation location (URL with an ID at the end) from the response
read_operation_location = read_response.headers["Operation-Location"]
# Grab the ID from the URL
operation_id = read_operation_location.split("/")[-1]

# Call the "GET" API and wait for it to retrieve the results
while True:
    read_result = computervision_client.get_read_result(operation_id)
    if read_result.status not in ['notStarted', 'running']:
        break
        time.sleep(1)

# Print the detected text, line by line
if read_result.status == OperationStatusCodes.succeeded:
    for text_result in read_result.analyze_result.read_results:
        for line in text_result.lines:
            print(line.text)
            print(line.bounding_box)
print()

# </snippet_read_response>
When you run the cell, you should see lines of recognized text printed along with their pixel coordinates in the image, as shown below.
===== Read File - remote =====
DECEMBRE
[647.0, 75.0, 1198.0, 63.0, 1199.0, 136.0, 647.0, 151.0]
28 VENDREDI. Ss Innocents
[347.0, 202.0, 1146.0, 190.0, 1148.0, 248.0, 347.0, 269.0]
362-3
[1316.0, 179.0, 1456.0, 179.0, 1459.0, 239.0, 1315.0, 236.0]
clear and cold, - lovely out.
[60.0, 286.0, 1711.0, 236.0, 1712.0, 333.0, 63.0, 396.0]
Visit from mme Thomas D
[66.0, 395.0, 1717.0, 349.0, 1718.0, 437.0, 66.0, 500.0]
five daughters from
[91.0, 499.0, 1523.0, 448.0, 1529.0, 569.0, 96.0, 628.0]
Pontarleír.
[127.0, 614.0, 919.0, 577.0, 925.0, 689.0, 131.0, 716.0]
your Doctor, Major merletti
[105.0, 744.0, 1722.0, 628.0, 1729.0, 761.0, 114.0, 872.0]
arrived- good fellow
[98.0, 871.0, 1509.0, 770.0, 1511.0, 875.0, 103.0, 952.0]
Not orders to go with Capt
[133.0, 945.0, 1716.0, 847.0, 1723.0, 952.0, 137.0, 1036.0]
Marrison Vit Road and 200
[99.0, 1042.0, 1709.0, 964.0, 1714.0, 1057.0, 102.0, 1127.0]
men to another part of
[118.0, 1130.0, 1649.0, 1065.0, 1651.0, 1166.0, 119.0, 1221.0]
France
[123.0, 1224.0, 655.0, 1222.0, 655.0, 1304.0, 123.0, 1306.0]
prote Inier
[135.0, 1316.0, 784.0, 1284.0, 788.0, 1365.0, 139.0, 1395.0]
Sittley wip mess account
[131.0, 1385.0, 1786.0, 1280.0, 1792.0, 1379.0, 136.0, 1469.0]
Cash so francs you the mouth
[113.0, 1467.0, 1853.0, 1398.0, 1854.0, 1495.0, 117.0, 1560.0]
The comparison of the recognized text with the image above indicates where the handwriting was transcribed correctly, and where errors occurred. For example, in the third line from the bottom, the program has transcribed “prote Inier” instead of “wrote Izie”. A blot of ink may have affected the recognition process.
When planning a handwriting transcription project, start with a sample to determine if the results are accurate enough for your purposes. For the transcription of Captain White’s diary used here, using handwriting recognition saved time compared to retyping the text, but it still required some editing to fix the errors made by Azure.
Project 2: Working with an image stored in your Python environment
This section will allow you to transcribe handwriting in an image stored in your Python environment. It’s a lot like working with an image found online but, this time, you must have an image saved on the same computer you are running Python from. For Google Colab, we are using a virtual computer. For this example, you can download an image and save it. Here is an example image to download.
a) Select or create a directory for your image. If you are working on Google Colab, you may use the working directory /content/.
b) Download an example image and move it to your directory. In Google Colab, open the Files pane by clicking the Files icon on the left of the window. Click the Upload to session storage button to upload the file:
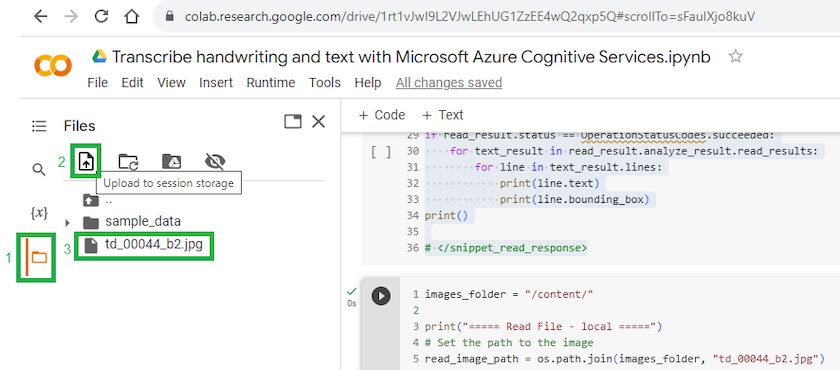
Figure 8. The Files pane in Google Colab with (1) The Files icon to open it, (2) The ‘Upload to session storage’ button used to upload the file and (3) The uploaded file.
c) Create another new cell in your notebook and paste in the code below. You may have to edit the code to work with the folder or filenames you are using. The code will:
- Set the path to the folder this image is in. The
/content/folder is the default folder in Google Colab. If you are using a different folder, change this in the line. - Set the filename for the image to be read. You can change this as needed.
- Open the image to be read.
- Call Azure using
computervision_client. - Read the results line by line.
- If successful, print the text of each line as well as the coordinates for the box in which the text is found on the image.
images_folder = "/content/"

print("===== Read File - local =====")
# Set the path to the image.
read_image_path = os.path.join(images_folder, "td_00044_b2.jpg")

# Open the image.
read_image = open(read_image_path, "rb")


# Call API with image and raw response (allows you to get the operation location). Call Azure using computervision_client with the image.
read_response = computervision_client.read_in_stream(read_image, raw=True)

# Get the operation location (URL with ID as last appendage)
read_operation_location = read_response.headers["Operation-Location"]

# Take the ID off and use to get results
operation_id = read_operation_location.split("/")[-1]

# Call the "GET" API and wait for the retrieval of the results.
while True:
    read_result = computervision_client.get_read_result(operation_id)
    if read_result.status.lower() not in ['notstarted', 'running']:
        break
        print('Waiting for result...')
        time.sleep(10)

# Print results, line by line
if read_result.status == OperationStatusCodes.succeeded:
    for text_result in read_result.analyze_result.read_results:
        for line in text_result.lines:
            print(line.text)
            print(line.bounding_box)
print()
d) Run the cell to read the handwriting in the image. You should see the lines of recognized text printed along with their location coordinates.
===== Read File - local =====
DECEMBRE
28 VENDREDI. Ss Innocents
362-3
clear and cold, - lovely out.
Visit from mme Thomas D
five daughters from
Pontarleír.
your Doctor, Major merletti
arrived- good fellow
Not orders to go with Capt
Marrison Vit Road and 200
men to another part of
France
prote Inier
Sittley wip mess account
Cash so francs you the mouth
Project 3: Creating a function to transcribe multiple images stored in your Python environment
This section will allow you to transcribe handwriting of an image stored in your Python environment in the same way as in Project 2. You must have an image saved on the computer you are running Python from. If you do not, complete a) and b) of Project 2 to store an image in your Python environment.
The purpose of this section is to reorganize the code used in Project 2 into a function. A function is a block of code that can be called repeatedly, which becomes useful when processing multiple images. This function requires the path to the image as input, and it returns the text of the image as output.
a) Create another new cell in your notebook, paste in the code for the function below. The code will:
- Define the name of the function and the path it uses as input.
- Check the image path exists.
- Open the image to be read.
- Call Azure using
computervision_clientwith the image. - Read the results line by line.
- If successful, store each line of text in the variable
text_in_image. - The last line returns the value of
text_in_imageto the program which called the function.
def read_handwriting_in_stored_image(read_image_path):
    # If the path to the image does not exist, print an error and return an empty string.
    if not os.path.exists(read_image_path):
        print("Image not found. Path", read_image_path, " does not exist.")
        return("")

    # The text_in_image will be returned. Set it to an empty string to start.
    text_in_image = ""

    read_image = open(read_image_path, "rb")

    # Call API with image and raw response (allows you to get the operation location). Call Azure using computervision_client with the image.
    read_response = computervision_client.read_in_stream(read_image, raw=True)

    # Get the operation location (URL with ID as last appendage)
    read_operation_location = read_response.headers["Operation-Location"]

    # Take the ID off and use to get results
    operation_id = read_operation_location.split("/")[-1]

    # Call the "GET" API and wait for the retrieval of the results.
    while True:
        read_result = computervision_client.get_read_result(operation_id)
        if read_result.status.lower() not in ['notstarted', 'running']:
            break
            print('Waiting for result...')
            time.sleep(10)

    # Print results, line by line.
    if read_result.status == OperationStatusCodes.succeeded:
        for text_result in read_result.analyze_result.read_results:
            for line in text_result.lines:
                text_in_image = text_in_image + "\n"+ line.text

    # return the text
    return(text_in_image)
b) Run the cell to load the function. Nothing else will happen until the function is called in the step c).
c) Create another new cell in your notebook and paste in the code below to call the function. The code will:
- Set the path to the folder this image is in. The
/content/folder is the default folder in Google Colab. If you are using a different folder, change this in the line. - Set the filename of the image to be read. You can change this as needed.
- Call the
read_handwriting_in_stored_imagefunction defined in a).
images_folder = "/content/"

# Set the path to the image.
read_image_path = os.path.join(images_folder, "td_00044_b2.jpg")

# call the read_handwriting_in_stored_image function defined above with the read_image_path variable.
image_text = read_handwriting_in_stored_image(read_image_path)

print(image_text)
d) Run the cell to call the function. You should see lines of recognized text printed similar to those in Project 2 above. Now that we have a working function, we can use it for multiple purposes.
Project 4: Transcribing all the images of a folder and saving the text in a file
This section will allow you to transcribe handwriting found in all the images in a single folder. You must have a folder containing images saved on the same computer you are running Python from. For Google Colab, we are using a virtual computer. For this example, you can download these images and save them.
a) Download the example images and move them to your directory. In Google Colab, open the Files pane by clicking the Files icon on the left of the window. Click the Upload to session storage button to upload the file. (See Figure 8 above.)
b) Create another new cell in your notebook and paste in the code below. You may have to edit the code to work with the folder or filenames you are using. The code will:
- Set the path to the folder this image is in. The
/content/folder is the default folder in Google Colab. If you are using a different folder, change this in the line. - Open a text file to write to it.
- Loop through the files in the folder.
- Check that the file has an image extension.
- Call the
read_handwriting_in_stored_imagefunction. - Write the text returned from the function to the text file.
- Wait 10 seconds before processing the next file, to avoid causing an error by sending too many requests at once.
- Close the text file.
# The os library is used by Python for operations with directories and files on the operating system
import os

# set the folder where the images are.
images_folder = "/content/"

# Set the path to file containing recognized text.
text_file_path = os.path.join(images_folder, "a_text_file.txt")

# Open a text file to write to it.
f = open(text_file_path, "w")

# store a list of allowed image extensions.
image_extensions = (".bmp", ".gif",".jpg", ".jpeg", ".png")

# loop through each file in the folder.
for root, dirs, files in os.walk(images_folder):
    for file in files:
        # check the file ends with an extension for an image.
        if file.lower().endswith(image_extensions):
             print(os.path.join(root, file))
             # write a header for each text file.
             f.write("\n------------------------------\n" + os.path.join(root, file) + "\n")
             # store the path into the read_image_path variable.
             read_image_path = os.path.join(root, file)
             # call the function to read_handwriting_in_stored_image.
             image_text = read_handwriting_in_stored_image(read_image_path)
             # write the text to the file.
             f.writelines(image_text)
             # wait 10 seconds before processing the next file to avoid an error caused by too many requests.
             time.sleep(10)
# close the text file.
f.close()
c) Run the cell. This will take a few minutes to complete. During this time, you should see the name of each file printed as it is processed. When the program is finished, look in the folder, click the Refresh button and double-click on the file named a_text_file.txt to view it. You should see the text from all the images.
Summary
You have connected to Azure Cognitive Services Computer Vision and transcribed the text from both an image found online and an image stored on your computer. In Projects 3 and 4, you added steps to process multiple images and store the transcribed text in a file. With Python, you can use a loop to transcribe all the images in a directory or on a series of web pages. You have also learned to use a function in Python to better organize your code. With what you have learned here, you are able to transcribe a collection of images of handwriting into digital text. Automated handwriting transcription makes possible further digital text analysis of documents such as letters, diaries, logbooks and reports, when manual transcription would be too time consuming.
The coordinate positions of the transcribed text returned by Azure Cognitive Services allow you to further explore the use of handwriting transcription by transcribing written forms, lists or logs into structured data, like a spreadsheet or database. It is even possible to translate these coordinates into geographic coordinates, when the text is found on a map.
As capabilities grow, so the potential uses of this type of transcription for Digital History will continue to grow as well. Additional documentation about Azure Cognitive Services is available on the Microsoft Learn website.
Bibliography
Cahill, Barry. “White, William Andrew,” in Dictionary of Canadian Biography, vol. 16, University of Toronto/Université Laval, 2003–, http://www.biographi.ca/en/bio/white_william_andrew_16E.html. Accessed August 18, 2023.
Dombrowski, Quinn, Tassie Gniady, and David Kloster, “Introduction to Jupyter Notebooks,” Programming Historian 8 (2019), https://doi.org/10.46430/phen0087.
Graham, Shawn. Detecting and Extracting Hand-written text. Jan 28, 2020. https://shawngraham.github.io/dhmuse/detecting-handwriting/. Accessed 25 December, 2021.
White, William. 1917. William Andrew White fonds, R15535-0-8-E, “1917 Diary”, Item ID number 4818067. Library and Archives Canada. http://central.bac-lac.gc.ca/.redirect?app=fonandcol&id=4818067&lang=eng. Accessed August 18, 2023.
Cognitive-services-quickstart-code, June 22, 2021, https://docs.microsoft.com/en-us/azure/cognitive-services/computer-vision/quickstarts-sdk/python-sdk. Accessed 25 December, 2021.