Contents
- Objectives
- Philosophy
- Principles
- Software Requirements
- Markdown Basics
- Getting in touch with your inner terminal
- Using Pandoc to convert Markdown to an MS Word document
- Working with Bibliographies
- Changing citation styles
- Summary
- Useful Resources

Objectives
In this tutorial, you will first learn the basics of Markdown—an easy to read and write markup syntax for plain text—as well as Pandoc, a command line tool that converts plain text into a number of beautifully formatted file types: PDF, .docx, HTML, LaTeX, slide decks, and more.1 With Pandoc as your digital typesetting tool, you can use Markdown syntax to add figures, a bibliography, formatting, and easily change citation styles from Chicago to MLA (for instance), all using plain text.
The tutorial assumes no prior technical knowledge, but it scales with experience, as we often suggest more advanced techniques towards the end of each section. These are clearly marked and can be revisited after some practice and experimentation.
Instead of following this tutorial in a mechanical way, we recommend you strive to understand the solutions offered here as a methodology, which may need to be tailored further to fit your environment and workflow. The installation of the necessary tools presents perhaps the biggest barrier to participation. Allot yourself enough time and patience to install everything properly, or do it with a colleague who has a similar set-up and help each other out. Consult the Useful Resources section below if you get stuck.2
Philosophy
Writing, storing, and retrieving documents are activities central to the humanities research workflow. And yet, many authors base their practice on proprietary tools and formats that sometimes fall short of even the most basic requirements of scholarly writing. Perhaps you can relate to being frustrated by the fragility of footnotes, bibliographies, figures, and book drafts authored in Microsoft Word or Google Docs. Nevertheless, most journals still insist on submissions in .docx format.
More than causing personal frustration, this reliance on proprietary tools and formats has long-term negative implications for the academic community. In such an environment, journals must outsource typesetting, alienating authors from the material contexts of publication and adding further unnecessary barriers to the unfettered circulation of knowledge.3
When you use MS Word, Google Docs, or Open Office to write documents, what you see is not what you get. Beneath the visible layer of words, sentences, and paragraphs lies a complicated layer of code understandable only to machines. Because of that hidden layer, your .docx and .pdf files depend on proprietary tools to be rendered correctly. Such documents are difficult to search, to print, and to convert into other file formats.
Moreover, time spent formatting your document in MS Word or Open Office is wasted, because all that formatting is removed by the publisher during submission. Both authors and publishers would benefit from exchanging files with minimal formatting, leaving the typesetting to the final typesetting stage of the publishing process.
This is where Markdown shines. Markdown is a syntax for marking semantic elements within a document explicitly, not in some hidden layer. The idea is to identify units that are meaningful to humans, like titles, sections, subsections, footnotes, and illustrations. At the very least, your files will always remain comprehensible to you, even if the editor you are currently using stops working or “goes out of business.”
Writing in this way liberates the author from the tool. Markdown can be written in any plain text editor and offers a rich ecosystem of software that can render that text into beautiful looking documents. For this reason, Markdown is currently enjoying a period of growth, not just as as means for writing scholarly papers but as a convention for online editing in general.
Popular general purpose plain text editors include Atom (all platforms) and Notepad++ (Windows only).
It is important to understand that Markdown is merely a convention. Markdown files are stored as plain text, further adding to the flexibility of the format. Plain text files have been around since the electronic typewriter. The longevity of this standard inherently makes plain text more sustainable and stable than proprietary formats. While files produced even ten years ago in Microsoft Word and Apple’s Pages can cause significant problems when opened with the latest version, it is still possible to open a file written in any number of “dead” plain text editors from the past several decades: AlphaPlus, Perfect Writer, Text Wizard, Spellbinder, WordStar, or Isaac Asimov’s favorite SCRIPSIT 2.0, made by Radio Shack. Writing in plain text guarantees that your files will remain readable ten, fifteen, twenty years from now. In this tutorial, we outline a workflow that frees the researcher from proprietary word processing software and fragile file formats.
It is now possible to write a wide range of documents in one format—articles, blog posts, wikis, syllabi, and recommendation letters—using the same set of tools and techniques to search, discover, backup, and distribute our materials. Your notes, blog entries, code documentation, and wikis can all be authored in Markdown. Increasingly, many platforms like WordPress, Reddit, and GitHub support Markdown authorship natively. In the long term, your research will benefit from such unified workflows, making it easier to save, search, share, and organize your materials.
Principles
Inspired by best practices in a variety of disciplines, we were guided by the following principles:
-
Sustainability. Plain text both ensures transparency and answers the standards of long-term preservation. MS Word may go the way of Word Perfect in the future, but plain text will always remain easy to read, catalog, mine, and transform. Furthermore, plain text enables easy and powerful versioning of the document, which is useful in collaboration and organizing drafts. Your plain text files will be accessible on cell phones, tablets, or, perhaps, on a low-powered terminal in some remote library. Plain text is backwards compatible and future-proof. Whatever software or hardware comes along next, it will be able to understand your plain text files.
-
Preference for human-readable formats. When writing in Word or Google Docs, what you see is not what you get. The .doc file contains hidden, automatically-generated formatting characters, creating an obfuscated typesetting layer that is difficult for the user to troubleshoot. Something as simple as pasting an image or text from the browser can have unpredictable effects on your document’s formatting.
-
Separation of form and content. Writing and formatting at the same time is distracting. The idea is to write first, and format later, as close as possible to the time of publication. A task like switching from Chicago to MLA formatting should be painless. Journal editors who want to save time on needless formatting and copy editing should be able to provide their authors with a formatting template which takes care of the typesetting minutia.
-
Support for the academic apparatus. The workflow needs to handle footnotes, figures, international characters, and bibliographies gracefully.
-
Platform independence. As the vectors of publication multiply, we need to be able to generate a multiplicity of formats including for slide projection, print, web, and mobile. Ideally, we would like to be able to generate the most common formats without breaking bibliographic dependencies. Our workflow needs to be portable as well–it would be nice to be able to copy a folder to a thumbdrive and know that it contains everything needed for publication. Writing in plain text means you can easily share, edit, and archive your documents in virtually any environment. For example, a syllabus written in Markdown can be saved as a PDF, printed as a handout, and converted into HTML for the web, all from the same file. Both web and print documents should be published from the same source and look similar, preserving the logical layout of the material.
Markdown and LaTeX answer all of these requirements. We chose Markdown (and not LaTeX) because it offers the most light-weight and clutter free syntax (hence, mark down) and because when coupled with Pandoc it allows for the greatest flexibility in outputs (including .docx and .tex files).4
Software Requirements
We purposefully omit some of the granular, platform- or operating system-bound details of installing the software listed below. For example, it makes no sense to provide installation instructions for LaTeX, when the canonical online instructions for your operating system will always remain more current and more complete. Similarly, the mechanics of Pandoc installation are best explored by searching for “installing Pandoc” on Google, with the likely first result being Pandoc’s homepage.
-
Plain text editor. Entering the world of plain-text editing expands your choice of innovative authoring tools dramatically. Search online for “markdown text editor” and experiment with your options. It does not matter what you use as long as it is explicitly a plain text editor, such as Atom or Notepad++. Remember, since we are not tied to the tool, you can change editors at any time.
-
Command line terminal. Working “in the command line” is equivalent to typing commands into the terminal. On a Mac you simply need to use your finder for “Terminal”. On Windows, use PowerShell. Linux users are likely to be familiar with their terminals already. We will cover the basics of how to find and use the command line below.
-
Pandoc. Detailed, platform-specific installation instructions are available at the Pandoc website. Installation of Pandoc on your machine is crucial for this tutorial, so be sure to take your time and click through the instructions. Pandoc was created and is maintained by John MacFarlane, Professor of Philosophy at the University of California, Berkeley. This is humanities computing at its best and will serve as the engine of our workflow. With Pandoc, you will be able to compile text and bibliography into beautifully formatted and flexible documents. Once you’ve followed the installation instructions, verify that Pandoc is installed by entering
pandoc --versioninto the command line. We assume that you have at least version 1.12.3, released in January 2014.
The following two pieces of software are recommended, but not required to complete this tutorial.
-
Zotero or Endnote. Bibliographic reference software like Zotero and Endnote are indispensable tools for organizing and formatting citations in a research paper. These programs can export your libraries as a BibTeX file (which you will learn more about in Case 2 below). This file, itself a formatted plain text document of all your citations, will allow you to quickly and easily cite references using
@tags. It should be noted that it’s also possible to type all of your bibliographic references by hand, using our bibliography as a template. -
LaTeX. Detailed, platform-specific installation instructions available at the Pandoc website. Although LaTeX is not covered in this tutorial, it is used by Pandoc for .pdf creation. Advanced users will often convert into LaTeX directly to have more granular control over the typesetting of the .pdf. Beginners may want to consider skipping this step. Otherwise, type
latex -vto see if LaTeX was installed correctly (you will get an error if it was not and some information on the version if it was).
Markdown Basics
Markdown is a convention for structuring your plain-text documents semantically. The idea is to identify logical structures in your document (a title, sections, subsections, footnotes, etc.), mark them with some unobtrusive characters, and then “compile” the resulting text with a typesetting interpreter which will format the document consistently, according to a specified style.
Markdown conventions come in several “flavors” designed for use in particular contexts, such as blogs, wikis, or code repositories. The flavor of Markdown used by Pandoc is geared for academic use. Its conventions are described on the Pandoc’s Markdown page. Its conventions include the “YAML” block, which contains some useful metadata.5
Let’s now create a simple document in Markdown. Open a plain-text editor of your choice and begin typing. It should look like this:
---
title: Plain Text Workflow
author: Dennis Tenen, Grant Wythoff
date: January 20, 2014
fontfamily: times
---
Pandoc-flavored Markdown stores each of the above values, and “prints” them in the appropriate location of your outputted document once you are ready to typeset. We will later learn to add other, more powerful fields to the YAML block. For now, let’s pretend we are writing a paper that contains three sections, each subdivided into two subsections. Leave a blank line after last three dashes in the YAML block and paste the following:
# Section 1

## Subsection 1.1

Lorem ipsum dolor sit amet, consectetur adipisicing elit, sed do eiusmod tempor incididunt ut labore et dolore magna aliqua. Ut enim ad minim veniam, quis nostrud exercitation ullamco laboris nisi ut aliquip ex ea commodo consequat.

Next paragraph should start like this. Do not indent.

## Subsection 1.2

Sed ut perspiciatis unde omnis iste natus error sit voluptatem accusantium doloremque laudantium, totam rem aperiam, eaque  ipsa quae ab illo inventore veritatis et quasi architecto beatae vitae dicta sunt explicabo.

# Section 2

## Subsection 2.1
Go ahead and enter some dummy text as well. Empty space is meaningful in Markdown: do not indent your paragraphs. Instead, separate paragraphs by using an blank line. Blank lines must also precede section headers.
You can use asterisks to add bold or italicized emphasis to your words,
like this: *italics* and **bold**. We should also add a link and a
footnote to our text to cover the basic components of an average paper.
Type:
A sentence that needs a note.[^1]

[^1]: my first footnote! And a [link](https://www.eff.org/).
When the text of the link and the address are the same it is faster to
write <www.eff.org> instead of [www.eff.org](www.eff.org).
Let’s save our file before advancing any further. Create a new folder
that will house this project. You are likely to have some system of
organizing your documents, projects, illustrations, and bibliographies.
But often, your document, its illustrations, and bibliography live in
different folders, which makes them hard to track. Our goal is to create
a single folder for each project, with all relevant materials included.
The general rule of thumb is one project, one paper, one folder. Name
your file something like main.md, where “md” stands for markdown.
Once your file is saved, let’s add an illustration. Copy an image (any
small image) to your folder, and add the following somewhere in the body
of the text: .
At this point, your main.md should look something like the following.
You can download this sample Markdown file from the Programming Historian repository.
---
title: Plain Text Workflow
author: Dennis Tenen, Grant Wythoff
date: January 20, 2014
---
# Section 1
## Subsection 1.1
Lorem *ipsum* dolor sit amet, **consectetur** adipisicing elit, sed do eiusmod tempor incididunt ut labore et dolore magna aliqua. Ut enim ad minim veniam, quis nostrud exercitation ullamco laboris nisi ut aliquip ex ea commodo consequat.
## Subsection 1.2
Sed ut perspiciatis unde omnis iste natus error sit voluptatem accusantium doloremque laudantium, totam rem aperiam, eaque ipsa quae ab illo inventore veritatis et quasi architecto beatae vitae dicta sunt explicabo.
Next paragraph should start like this. Do not indent.
# Section 2
## Subsection 2.1

## Subsection 2.2
A sentence that needs a note.[^1]
[^1]: my first footnote! And a [link](https://www.eff.org/)
As we shall do shortly, this plain text file can be rendered as a very nice PDF:
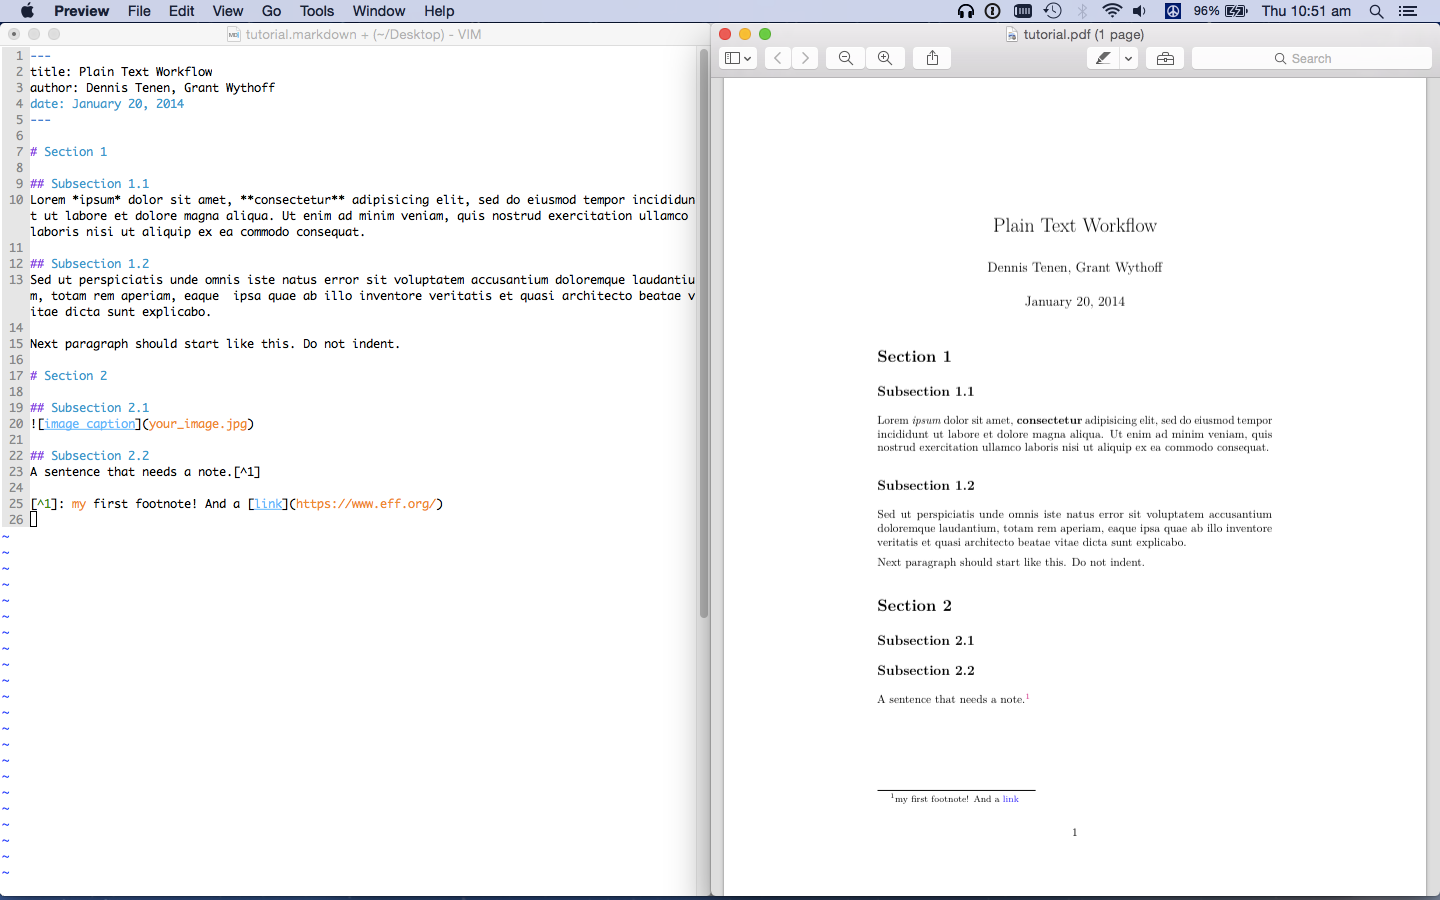
Screen shot of PDF rendered by Pandoc
If you’d like to get an idea of how this kind of markup will be interpreted as HTML formatting, try this online sandbox and play around with various kinds of syntax. Remember that certain elements of Pandoc-flavored Markdown (such as the title block and footnotes) will not work in this web form, which only accepts the basics.
At this point, you should spend some time exploring some of other
features of Markdown like quotations (referenced by > symbol), bullet
lists which start with * or -, verbatim line breaks which start with
| (useful for poetry), tables, and a few of the other functions listed
on Pandoc’s markdown page.
Pay particular attention to empty space and the flow of paragraphs. The documentation puts it succinctly when it defines a paragraph to be “one or more lines of text followed by one or more blank line.” Note that “newlines are treated as spaces” and that “if you need a hard line break, put two or more spaces at the end of a line.” The best way to understand what that means is to experiment freely. Use your editor’s preview mode or just run Pandoc to see the results of your experiments.
Above all, avoid the urge to format. Remember that you are identifying
semantic units: sections, subsections, emphasis, footnotes, and
figures. Even *italics* and **bold** in Markdown are not really
formatting marks, but indicate different level of emphasis. The
formatting will happen later, once you know the venue and the
requirements of publication.
There are programs that allow you to watch a live preview of Markdown output as you edit your plain text file, which we detail below in the Useful Resources section. Few of them support footnotes, figures, and bibliographies however. To take full advantage of Pandoc, we recommend that you stick with simple, plain text files stored locally, on your computer.
Getting in touch with your inner terminal
Before we can start publishing our main.md file into other formats, we
need to get oriented with working on the command line using your
computer’s terminal program, which is the only (and best) way to use
Pandoc.
The command line is a friendly place, once you get used to it. If you are already familiar with using the command line, feel free to skip this section. For others, it is important to understand that being able to use your terminal program directly will all you to use a broad range of powerful research tools that you couldn’t use otherwise, and can serve as a basis for more advanced work. For the purposes of this tutorial, you need to learn only a few, very simple commands.
First, open a command line window. If you are using macOS, open the Terminal application in the ‘Applications/Utilities’ directory. On Windows, we recommend you use PowerShell or, for a more robust solution, install the Windows Subsystem for Linux and use the terminal that comes with your favorite Linux distribution. For an excellent introduction to the command line, consult “Introduction to the Bash Command Line” by Ian Milligan and James Baker.
In the terminal, you should see a text window and a prompt that looks
something like this: computer-name:~username$. The tilde indicates your
“home” directory, and in fact you can type $ cd ~ at any point to return to
your home directory. Don’t type the dollar sign, it just symbolizes the
command prompt of your terminal, prompting you to type something into your
terminal (as opposed to typing it into your document); remember to hit enter
after every command.
It is very likely that your “Documents” folder is located here. Type
$ pwd (= print working directory) and press enter to display the name
of the current directory). Use $ pwd whenever you feel lost.
The command $ ls (= list), which simply lists the files in the current
directory. Finally, you can use $ cd> (= change directory) like
$ cd DIRECTORY_NAME (where DIRECTORY_NAME is the name of the
directory you’d like to navigate to). You can use $ cd .. to
automatically move up one level in the directory structure (the parent
directory of the directory you are currently in). Once you start typing
the directory name, use the Tab key to auto complete the
text—particularly useful for long directory names, or directories names
that contain spaces.6
These three terminal commands: pwd, ls, and cd are all you need
for this tutorial. Practice them for a few minutes to navigate your
documents folder and think about they way you have organized your files.
If you’d like, follow along with your regular graphical file manager to
keep your bearings.
Using Pandoc to convert Markdown to an MS Word document
We are now ready to typeset! Open your terminal window, use $ pwd and
$ cd DIRECTORY-NAME to navigate to the correct folder for your project. Once you are
there, type $ ls in the terminal to list the files. If you see your
.md file and your images, you are in the right place. To convert .md
into .docx type:
$ pandoc main.md -o main.docx
Open the file with MS Word to check your results. Alternatively, if you use Open- or LibreOffice you can run:
$ pandoc main.md -o project.odt
If you are new to the command line, imagine reading the above command as saying something like:
“Pandoc, create an MS Word file out of my Markdown file.” The -o part is a “flag,” which in
this case says something like “instead of me explicitly telling you the source and the target
file formats, just guess by looking at the file extension” or simply “output.” Many options are
available through such flags in Pandoc. You can see the complete list on Pandoc’s
website or by typing $ man pandoc in the
terminal.
Try running the command
$ pandoc main.md -o project.html
Now navigate back to your project directory. Can you tell what happened?
More advanced users who have LaTeX installed may want to experiment by converting Markdown into .tex or specially formatted .pdf files. Once LaTeX is installed, a beautifully formatted PDF file can be created using the same command structure:
$ pandoc main.md -o main.pdf
If your document is written in languages other than English, you will likely need to use the XeLaTeX engine instead of plain LaTeX for .pdf conversion:
pandoc main.md --pdf-engine=xelatex -o main.pdf
Make sure your text editor supports the UTF-8 encoding. When using XeLaTeX for
conversion into .pdf, instead of the fontfamily attribute in YAML to change
fonts, specify the mainfont attribute, to produce something like the
following:
    ---
    title: Plain Text Workflow
    author: Dennis Tenen, Grant Wythoff
    date: January 20, 2014
    mainfont: times
    ---
command line argument (flag) functionality. For example, font styles could
be passed to Pandoc in the form of pandoc main.md --mainfont=times -o
target.pdf. However, we prefer to use the YAML header options whenever
possible, since it makes our command line incantations easier to type and to
remember. Using a version control tool such as Git will preserve your YAML
changes, where what you type in the terminal is rather more ephemeral. Consult
the Templates section in the Pandoc manual (man pandoc) for the list of
available YAML variables.
Working with Bibliographies
In this section, we will add a bibliography to our document and then convert from Chicago to MLA formats.
If you are not using a reference manger like Endnote or Zotero, you should. We prefer Zotero, because, like Pandoc, it was created by the academic community and like other open-source projects it is released under the GNU General Public License. Most importantly for us, your reference manager must have the ability to generate bibliographies in plain text format, to keep in line with our “everything in plain text” principle. Go ahead and open a reference manager of your choice and add some sample entries. When you are ready, find the option to export your bibliography in BibTeX (.bib) format. Save your .bib file in your project directory, and give it a reasonable title like “project.bib”.
The general idea is to keep your sources organized under one centralized bibliographic database, while generating specific and much smaller .bib files that will live in the same directory as your project. Go ahead and open your .bib file with the plain-text editor of your choice.7
Your .bib file should contain multiple entries that look something like this:
@article{fyfe_digital_2011,
    title = {Digital Pedagogy Unplugged},
    volume = {5},
    url = {http://digitalhumanities.org/dhq/vol/5/3/000106/000106.html},
    number = {3},
    urldate = {2013-09-28},
    author = {Fyfe, Paul},
    year = {2011},
    file = {fyfe_digital_pedagogy_unplugged_2011.pdf}
}
You will rarely have to edit these by hand (although you can). In most
cases, you will simply “export” the .bib file from Zotero or from a
similar reference manager. Take a moment to orient yourself here. Each
entry consists of a document type, “article” in our case, a unique
identifier (fyfe_digital_2011), and the relevant meta-data on title,
volume, author, and so on. The thing we care most about is the unique ID
which immediately follows the curly bracket in the first line of each
entry. The unique ID is what allows us to connect the bibliography with
the main document. Leave this file open for now and go back to your
main.md file.
Edit the footnote in the first line of your main.md file to look
something like the following examples, where @name_title_date can be replaced with one of
the unique IDs from your project.bib file.
A reference formatted like this will render properly as inline- or footnote- style citation [@name_title_date, 67].8"For citations within quotes, put the comma outside the quotation mark" [@name_title_2011, 67].
Once we run the markdown through Pandoc, “@fyfe_digital_2011” will be
expanded to a full citation in the style of your choice. You can use the
@citation syntax in any way you see fit: in-line with your text or in
the footnotes. To generate a bibliography simply include a section
called # Bibliography at the end of document.
Now, go back to your metadata header at the top of your .md document, and specify the bibliography file to be used, like so:
---
title: Plain Text Workflow
author: Dennis Tenen, Grant Wythoff
date: January 20, 2014
bibliography: project.bib
---
This tells Pandoc to look for your bibliography in the project.bib
file, under the same directory as your main.md. Let’s see if this
works. Save your file, switch to the terminal window and run:
$ pandoc main.md --citeproc -o main.docx
The “citeproc” filter will parse any citation tags found in your document. The result should be a decently formatted MS Word file. If you have LaTeX installed, convert into .pdf using the same syntax for prettier results. Do not worry if things are not exactly the way you like them—remember, you are going to fine-tune the formatting all at once and at later time, as close as possible to the time of publication. For now we are just creating drafts based on reasonable defaults.
Changing citation styles
The default citation style in Pandoc is Chicago Author-date. We can
specify a different style by using stylesheet, written in the “Citation
Style Language” (yet another plain-text convention, in this case for
describing citation styles) and denoted by the .csl file extension.
Luckily, the CSL project maintains a repository of common citation
styles, some even tailored for specific journals. Visit
http://editor.citationstyles.org/about/ to find the .csl file for
Modern Language Association, download modern-language-association.csl,
and save to your project directory as mla.csl. Now we need to tell
Pandoc to use the MLA stylesheet instead of the default Chicago. We do
this by updating the YAML header:
---
title: Plain Text Workflow
author: Dennis Tenen, Grant Wythoff
date: January 20, 2014
bibliography: project.bib
csl: mla.csl
---
You then repeat the pandoc incantation to cast your markdown file into your target format (.pdf or .docx):
$ pandoc main.md --citeproc -o main.pdf
Parse the command into English as you are typing. In my head, I translate the above into something like: “Pandoc, take the my markdown file, run it through a citation filter, and output a Markdown file.” As you get more familiar with citation stylesheets, consider adding your custom-tailored .csl files for journals in your field to the archive as a service to the community.
Summary
You should now be able to write papers in Markdown, to create drafts in
multiple formats, to add bibliographies, and to easily change citation
styles. A final look at the project directory will reveal a number of
“source” files: your main.md file, project.bib file, your mla.csl
file, and some images. Besides the source files you should see some some
“target” files that we created during the tutorial: main.docx or
main.pdf. Your folder should look something like this:
    Pandoc-tutorial/
        main.md
        project.bib
        mla.csl
        image.jpg
        main.docx
Treat you source files as an authoritative version of your text, and you
target files as disposable “print outs” that you can easily generate
with Pandoc on the fly. All revisions should go into main.md. The
main.docx file is there for final-stage clean up and formatting. For
example, if the journal requires double-spaced manuscripts, you can
quickly double-space in Open Office or Microsoft Word. But don’t spend
too much time formatting. Remember, it all gets stripped out when your
manuscript goes to print. The time spent on needless formatting can be
put to better use in polishing the prose of your draft.
Useful Resources
Should you run into trouble, there is no better place to start looking for support than John MacFarlane’s Pandoc site and the affiliated mailing list. At least two “Question and Answer” type sites can field questions on Pandoc: Stack Overflow and Digital Humanities Q&A. Questions may also be asked live, on Freenode IRC, #Pandoc channel, frequented by a friendly group of regulars. As you learn more about Pandoc, you can also explore one of its most powerful features: filters.
Although we suggest starting out with a simple editor, many (70+, according to this blog post) other, Markdown-specific alternatives to MS Word are available online, and often free of cost. From the standalone ones, we liked Mou, Write Monkey, and Sublime Text. Several web-based platforms have recently emerged that provide slick, graphic interfaces for collaborative writing and version tracking using Markdown. These include: prose.io, Authorea, Draft, and StackEdit.
But the ecosystem is not limited to editors. Gitit and Ikiwiki support authoring in Markdown with Pandoc as parser. To this list we may a range of tools that generate fast, static webpages, Yst, Jekyll, Hakyll, and bash shell script by the historian Caleb McDaniel.
Finally, whole publishing platforms are forming around the use of Markdown. Markdown to marketplace platform Leanpub could be an interesting alternative to the traditional publishing model. And we ourselves are experimenting with academic journal design based on GitHub and readthedocs.org (tools usually used for technical documentation).
-
Don’t worry if you don’t understand some of of this terminology yet! ↩
-
The source files for this document can be downloaded from GitHub. Use the “raw” option when viewing in GitHub to see the source Markdown. The authors would like to thank Alex Gil and his colleagues from Columbia’s Digital Humanities Center, and the participants of openLab at the Studio in the Butler library for testing the code in this tutorial on a variety of platforms. ↩
-
See Charlie Stross’s excellent discussion of this topic in Why Microsoft Word Must Die. ↩
-
There are no good solutions for directly arriving at MS Word from LaTeX. ↩
-
Note that YAML often replicates some, although not all, of the ↩
-
It is a good idea to get into the habit of not using spaces in folder or file names. Dashes or underscores instead of spaces in your filenames ensure lasting cross-platform compatibility. ↩
-
Note that the .bib extension may be “registered” to Zotero in your operating system. That means when you click on a .bib file it is likely that Zotero will be called to open it, whereas we want to open it within a text editor. Eventually, you may want to associate the .bib extension with your text editor. ↩
-
Thanks to @njbart for the correction. In response to our original suggestion,
Some sentence that needs citation.^[@fyfe_digital_2011 argues that too.]he writes: “This is not recommended since it keeps you from switching easily between footnote and author-date styles. Better use the [corrected] (no circumflex, no final period inside the square braces, and the final punctuation of the text sentence after the square braces; with footnote styles, pandoc automatically adjusts the position of the final punctuation).” ↩