Contents
- Lesson Goals
- For Whom is this Useful?
- Familiarising yourself with the data
- Build your gazetteer
- Loading your texts
- Write your Python program
- Finished Code
- Refining the Gazetteer
- Printing the Results Back to the CSV File Using Python
- Creating a new CSV file
- Suggested Further Reading
Lesson Goals
If you have a copy of a text in electronic format stored on your computer, it is relatively easy to keyword search for a single term. Often you can do this by using the built-in search features in your favourite text editor. However, scholars are increasingly needing to find instances of many terms within a text or texts. For example, a scholar may want to use a gazetteer to extract all mentions of English placenames within a collection of texts so that those places can later be plotted on a map. Alternatively, they may want to extract all male given names, all pronouns, stop words, or any other set of words. Using those same built-in search features to achieve this more complex goal is time consuming and clunky. This lesson will teach you how to use Python to extract a set of keywords very quickly and systematically from a set of texts.
It is expected that once you have completed this lesson, you will be able to generalise the skills to extract custom sets of keywords from any set of locally saved files.
For Whom is this Useful?
This lesson is useful for anyone who works with historical sources that are stored locally on their own computer, and that are transcribed into mutable electronic text (eg, .txt, .xml, .rtf, .md). It is particularly useful for people interested in identifying subsets of documents containing one or more of a fairly large number of keywords. This might be useful for identifying a relevant subset for closer reading, or for extracting and structuring the keywords in a format that can be used in another tool: as input for a mapping exercise, for example.
The present tutorial will show users how to extract all mentions of English and Welsh county names from a series of 6,692 mini-biographies of individuals who began their studies at the University of Oxford during the reign of James I of England (1603-1625). These records were transcribed by British History Online, from the printed version of Alumni Oxonienses, 1500-1714. These biographies contain information about each graduate, which includes the date of their studies and the college(s) they attended. Often entries contain additional information when known, including date or birth and death, the name or occupation of their father, where they originated, and what they went on to do in later life. The biographies are a rich resource, providing reasonably comparable data about a large number of similar individuals (rich men who went to Oxford). The 6,692 entries have been pre-processed by the author and saved to a CSV file with one entry per row.
In this tutorial, the dataset involves geographical keywords. Once extracted, these placenames could be geo-referenced to their place on the globe and then mapped using digital mapping. This might make it possible to discern which colleges attracted students from what parts of the country, or to determine if these patterns changed over time. For a practical tutorial on taking this next step, see the lesson by Fred Gibbs mentioned at the end of this lesson. Readers may also be interested in georeferencing in QGIS 2.0, also available from the Programming Historian.
This approach is not limited to geographical keywords, however. It could also be used to extract given names, prepositions, food words, or any other set of terms defined by the user. This process could therefore be useful for someone seeking to isolate individual entries containing any of these keywords, or for someone looking to calculate the frequency of their keywords within a corpus of texts. This tutorial provides pathways into textual or geospatial analyses, rather than research answers in its own right.
Data management skills are increasingly crucial for historians and textual scholars, and anyone working with particularly messy or difficult texts might consider looking into Cleaning Data with OpenRefine by Seth van Hooland et al. The approach outlined in this tutorial is not optimised for working with poorly transcribed texts such as text converted through Optical Character Recognition if the software has a high error rate. Readers working with early modern texts with non-standardised spelling may also find this approach challenging, as the gazetteer one uses must contain exact matches of the words sought. However, with a good enough gazetteer, this approach could prove quite useful for early modernites, and may exceed what’s practical with traditional keyword searching by making fuzzy searching possible.
This tutorial assumes that you have already installed Python version 3 on your computer. The lesson will use the Command Line to run Python, as this is more flexible and makes it possible for use in classrooms or computer labs in which students do not have the ability to download and install interactive development environments (IDEs) like Komodo Edit. Readers who would prefer to use an IDE might like to first read Python Introduction and Installation, but this is optional. The tutorial also makes some basic assumptions about your Python skills. It assumes you know what the following Python data structures are (though not knowing will not prevent the code from working should you follow all of the steps in the tutorial):
The lesson touches on Regular Expressions, so some readers may find it handy to have the relevant Programming Historian lessons by Doug Knox or Laura Turner O’Hara open to consult as needed.
Familiarising yourself with the data
The first step of this process is to take a look at the data that we will be using in the lesson. As mentioned, the data includes biographical details of approximately 6,692 graduates who began study at the University of Oxford in the early seventeenth century.
The_Dataset_-_Alumni_Oxonienses-Jas1.csv (1.4MB)
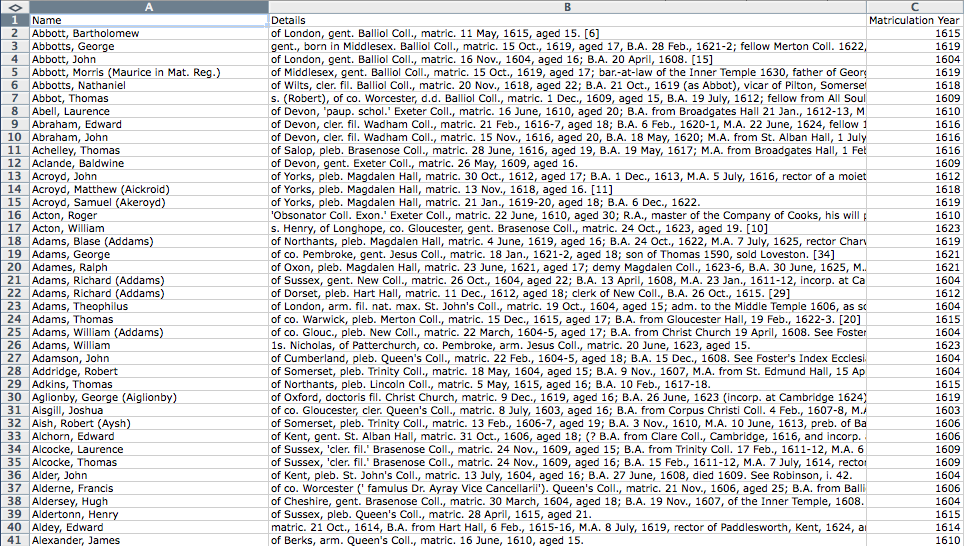
Screenshot of the first forty entries in the dataset
Download the dataset and spend a couple of minutes looking at the types of information available. You should notice three columns of information. The first, ‘Name’, contains the name of the graduate. The second: ‘Details’, contains the biographical information known about that person. The final column, ‘Matriculation Year’, contains the year in which the person matriculated (began their studies). This final column was extracted from the details column in the pre-processing stage of this tutorial. The first two columns are as you would find them on the British History Online version of the Alumni Oxonienses. If you notice more than three columns then your spreadsheet programme has incorrectly set the delimiter between columns. It should be set to “,” (double quotes, comma). How you do this depends on your spreadsheet programme, but you should be able to find the solution online.
Most (but not all) of these bibliographic entries contain enough information to tell us what county the graduate came from. Notice that a large number of entries contain placenames that correspond to either major cities (‘of London’, in the first entry) or English counties (‘of Middlesex’ in entry 5 or ‘of Wilts’ - short for Wiltshire in entry 6). If you are not British you may not be familiar with these county names. You can find a list of historic counties of England on Wikipedia.
Unfortunately, the information is not always available in the same format. Sometimes it’s the first thing mentioned in an entry. Sometimes it’s in the middle. Our challenge is to extract those counties of origin from within this messy text, and store it in a new column next to that person’s entry.
Build your gazetteer
In order to extract the relevant place names, we first have to decide what they are. We need a list of places, often called a gazetteer. Many of the place names mentioned in the records are shortforms, such as ‘Wilts’ instead of ‘Wiltshire’, or ‘Salop’ instead of ‘Shropshire’. Getting all of these variations may be tricky. For a start, let’s build a basic gazetteer of English counties.
Make a new directory (folder) on your computer where you will save all of your work. Create a text file called gazetteer.txt and using the entries listed on the Wikipedia page listed above, add each county to a new line on the text file. It should look something like this:
Bedfordshire
Berkshire
Buckinghamshire
Cambridgeshire
Cheshire
Cornwall
Cumberland
Derbyshire
Devon
Dorset
Durham
Essex
Gloucestershire
Hampshire
Herefordshire
Hertfordshire
Huntingdonshire
Kent
Lancashire
Leicestershire
Lincolnshire
Middlesex
Norfolk
Northamptonshire
Northumberland
Nottinghamshire
Oxfordshire
Rutland
Shropshire
Somerset
Staffordshire
Suffolk
Surrey
Sussex
Warwickshire
Westmorland
Wiltshire
Worcestershire
Yorkshire
Make sure that there are no blank lines in the gazetteer file. If there are, your program will think all spaces are a matching keyword. Some text editing programs (particularly in Linux) will want to add a blank line at the end of your file. If this is the case, try another text editor. It’s best to use software that puts you in control. For more on this problem, see the explanation on Stack Overflow - with thanks to John Levin for the link.
If you ever need to add to this set of keywords, you can open this file in your text editor and add new words, each on their own line. Komodo Edit is a good text editor for this task, especially if you have set it up to run with Python, but you can also use any plain text editor as long as it is not a word processor such as Microsoft Word or Open Office. Word processors are inappropriate for writing code because of how they stylise apostrophes and quotes, causing havoc for your code.
Loading your texts
The next step is to put the texts that you want to search into another text file, with one entry per line. The easiest way to do that is to open the spreadsheet and select all of the second (details) column, then paste the contents into a .txt file. Call the file texts.txt and save it to the same directory as your gazetteer.txt file. Your directory should look something like this:

Contents of your working directory
The reason we do this is to keep the original data (the .CSV file) away from the Python program we are about to write, on the off-chance that we accidentally change something without noticing. In my opinion, this approach also makes for easier to read code, which is important when learning. It is not strictly necessary to use a .txt file for this step, as Python does have ways of opening and reading CSV files. At the end of this lesson we will look at how to use the CSV reading and writing features in Python, but this is an optional advanced step.
Write your Python program
The last step is to write a program that will check each of the texts for each of the keywords in the gazetteer, and then to provide an output that will tell us which entries in our spreadsheet contain which of those words. There are lots of ways that this could be achieved. When planning to write a program, it is always a good idea to devise an algorithm. An algorithm is a set of human-readable steps that will solve the problem. It’s a list of what you are going to do, which you then convert into the appropriate programmatic instructions. The approach we will take here uses the following algorithm:
- Load the list of keywords that you’ve created in
gazetteer.txtand save them each to a Python list - Load the texts from
texts.txtand save each one to another Python list - Then for each biographical entry, remove the unwanted punctuation (periods, commas, etc)
- Then check for the presence of one or more of the keywords from your list. If it finds a match, store it while it checks for other matches. If it finds no match, move on to the next entry
- Finally, output the results in a format that can be easily transferred back to the CSV file.
Step 1: Load the Keywords
Using your text editor, create a new empty file, and add the following lines:
#Import the keywords
f = open('gazetteer.txt', 'r')
allKeywords = f.read().lower().split("\n")
f.close()

print(allKeywords)
print(len(allKeywords))
The first line is a comment for our own benefit, to tells us (the human) what the code does. All Python lines beginning with a # are a comment. When the code runs it will ignore the comments. They are for human use only. A well commented piece of code is easier to return to later because you will have the means of decyphering your earlier creation.
The second line opens the gazetteer.txt file, and reads it, which is signified by the ‘r’ (as opposed to ‘w’ for write, or ‘a’ for append). That means we will not be changing the contents of the file. Only reading it.
The third line reads everything in that file, converts it to lower() case, and splits the contents into a Python list, using the newline character as the delimiter. Effectively that means each time the program comes across a new line, it stores it as a new entry. We then save that Python list containing the 39 counties into a variable that we have called allKeywords.
The fourth line closes the open text file. The fifth line prints out the results, and the sixth line tells us how many results were found.
Save this file as extractKeywords.py, again to the same folder as the other files, and then run it with Python. To do this from the command line, first you need to launch your command line terminal.
On Windows it is called Command Prompt. Windows users may find it easier to launch Python by opening the folder containing your extractKeywords.py file, then press shift + right-click and then select ‘open command window here’. Assuming you have Python installed, you should be able to run your programme using the command beginning with ‘python’ below.
On Mac OS X, this is found in the Applications folder and is called Terminal. Once the Terminal window is open, you need to point your Terminal at the directory that contains all of the files you have just created. I have called my directory ‘ExtractingKeywordSets’ and I have it on my computer’s Desktop. To change the Terminal to this directory, I use the following command:
cd Desktop/ExtractingKeywordSets
You would need to change the above to reflect the name you gave your directory, and where you put it on your machine. Note that Windows uses ‘' instead of ‘/’ in file paths. If you get stuck, rename your directory to ExtractingKeywordSets and place it on the Desktop so that you can follow along.
You can now run the program you’ve written with the following command:
python extractKeywords.py
Once you have run the program you should see your gazetteer printed as a Python list in the command output, along with the number of entries in your list (39). If you can, great! Move on to step 2. If the last line of your output tells you that there was 1 result, that means the code has not worked properly, since we know that there should be 39 keywords in your gazetteer. Double check your code to make sure you havn’t included any typos. If you still can’t solve the problem, try changing “\n” to “\r” on line three. Some text editors will use carriage returns instead of ‘newline characters’ when creating a new line. The \r means ‘carriage return’ and should solve your problem if you’re experiencing one.
Step 2: Load the texts
The second step is very similar to the first. Except this time we will load the texts.txt in addition to the gazetteer.txt file
Add the following lines to the end of your code:
#Import the texts you want to search
f = open('texts.txt', 'r')
allTexts = f.read().lower().split("\n")
f.close()

print(allTexts)
If you got step 1 to work, you should understand this bit as well. Before you run the code, make sure that you have saved your program or you may accidentally run the OLD version and will be confused with the result. Once you’ve done that, rerun the code. As a shortcut, instead of writing out the command again in the Terminal, you can press the up arrow, which should display the last command you entered. If you keep pressing the up or down arrows, you can scroll through previous commands, saving yourself the time needed to retype them. Once you’ve found the command for running the program, press the return key to run the code.
If the code worked, you should see a big wall of text. Those are the texts we input into the program. As long as you see them, you’re ok. Before moving on to the next step, delete the three lines from your code beginning with ‘print’. Now that we know they are printing the contents of these files properly we do not need to continue to check. Move on to step 3.
Step 3: Remove unwanted punctuation
When matching strings, you have to make sure the punctuation doesn’t get in the way. Technically, ‘London.’ is a different string than ‘London’ or ‘;London’ because of the added punctuation. These three strings which all mean the same thing to us as human readers will be viewed by the computer as distinct entities. To solve that problem, the easiest thing to do is just to remove all of the punctuation. You can do this with regular expressions, and Doug Knox and Laura Turner O’Hara have provided great introductions at Programming Historian for doing so.
To keep things simple, this program will just replace the most common types of punctuation with nothing instead (effectively deleting punctuation).
Add the following lines to your program:
for entry in allTexts:
    #for each entry:
    allWords = entry.split(' ')
    for words in allWords:

        #remove punctuation that will interfere with matching
        words = words.replace(',', '')
        words = words.replace('.', '')
        words = words.replace(';', '')
The ‘allTexts’ list variable contains all of our texts. Using a for loop, we will look at each entry in turn.
Since we are interested in single words, we will split the text into single words by using the .split() method, looking explicitly for spaces: entry.split(' '). Note that there is a single space between those quotation marks. Since words are generally separated by spaces, this should work fairly well. This means we now have a Python list called ‘allWords’ that contains each word in a single bibliographic entry.
We use another for loop to look through each word in that list, and wherever we find a comma, period, or semi-colon, we replace it with nothing, effectively deleting it. Note that there is no space between those quotation marks in the last three lines.
We now have a clean set of words that we can compare against our gazetteer entries, looking for matches.
Step 4: Look for matching keywords
As the words from our text are already in a list called ‘allWords’, and all of our keywords are in a list called ‘allKeywords’, all we have to do now is check our texts for the keywords.
First, we need somewhere to store details of any matches we have. Immediately after the ‘for entry in allTexts:’ line, at one level of indentation, add the following two lines of code:
    matches = 0
    storedMatches = []
Indentation is important in Python. The above two lines should be indented one tab deeper than the for loop above it. That means the code is to run every time the for loop runs - it is part of the loop. If your text editor does not allow tabs, you can use spaces instead.
The ‘storedMatches’ variable is a blank list, where we can store our matching keywords. The ‘matches’ variable is known as a ‘flag’, which we will use in the next step when we start printing the output.
To do the actual matching, add the following lines of code to the bottom of your program, again minding the indentation (2 levels from the left margin), making sure you save:
        #if a keyword match is found, store the result.
        if words in allKeywords:
            if words in storedMatches:
                continue
            else:
                storedMatches.append(words)
            matches += 1
    print(matches)
If you are worried that you have your indentation wrong, scroll ahead towards the bottom of the lesson and check the finished code.
Take a look at your whole program. These lines follow immediately after the last section in which you removed the punctuation. So each time a word had its punctuation removed (if it had punctuation to remove in the first place) it was immediately checked to see if it was in the list of keywords in your gazetteer file. If it was a match, we check that we do not already have this word recorded in our ‘storedMatches’ variable. If we do, we skip ahead to the next word. If it is not already recorded, we append it to the ‘storedMatches’ list. This is keeping track of the matching words for us for each text. When we find a match, we also increase our ‘matches’ flag by 1. This lets us know how many matches we have found for that entry.
This code will automatically check each word in a text, keeping track of matches in the ‘storedMatches’ list. When it gets to the end of a text, it will empty out the ‘storedMatches’ variable and start again. Printing out the ‘matches’ variable just lets us see how many matches we got for each text. When you run this code you should see somewhere between 0 and 2 for most entries. If it says 0 for everything then check your code again. If you only have one entry outputting then go back to step one and make sure your program is identifying the right number of keywords (39).
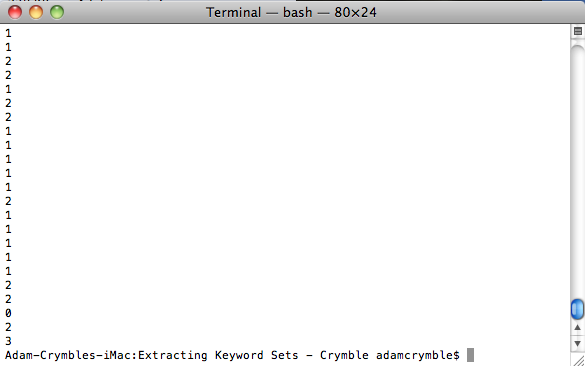
Correct output of the code to this point
If it looks like it worked, delete the ‘print matches’ line and move to the next step.
Step 5: Output results
If you have got to this stage, then your Python program is already finding the matching keywords from your gazetteer. All we need to do now is print them out to the command output pane in a format that’s easy to work with.
Add the following lines to your program, minding the indentation as always:
    #if there is a stored result, print it out
    if matches == 0:
        print(' ')
    else:
        matchString = ''
        for matches in storedMatches:
            matchString = matchString + matches + "\t"

        print(matchString)
This code checks if the number of matches is equal to 0. If so, then we havn’t found any keywords and we don’t need to print them out. However, we are going to print a blank space, because we want our output to contain the same number of lines as did our input (we want 1 line of output per line of text that we searched). This will make it easier to paste the output directly into our CSV file and have all of the entries line up properly with their corresponding text.
If there IS a match, then the program creates a new variable called ‘matchString’ (it could have been called just about anything. That’s just the name I chose because it’s a string of matches). Then for each of the matching keywords that were kept in ‘storedMatches’, it appends the keyword to ‘matchString’, along with a tab (“\t”) character. The tab character is useful for CSV files because when you paste it into a spreadsheet, content separated by a tab will automatically go into an adjacent cell. This means that if a single text has more than one match, we’ll be able to automatically paste one match per cell. This makes it easier to keep the keywords separate once we have them back in our CSV file.
When all of the matching keywords have been added to ‘matchString’, the program prints it out to the command output before moving on to the next text.
If you save your work and run the program, you should now have code that achieves all of the steps from the algorithm and outputs the results to your command output.
The finished code should look like this:
Finished Code
#Import the keywords
f = open('gazetteer.txt', 'r')
allKeywords = f.read().lower().split("\n")
f.close()

#Import the texts you want to search
f = open('texts.txt', 'r')
allTexts = f.read().lower().split("\n")
f.close()

#Our programme:
for entry in allTexts:
    matches = 0
    storedMatches = []

    #for each entry:
    allWords = entry.split(' ')
    for words in allWords:

        #remove punctuation that will interfere with matching
        words = words.replace(',', '')
        words = words.replace('.', '')
        words = words.replace(';', '')


        #if a keyword match is found, store the result.
        if words in allKeywords:
            if words in storedMatches:
                continue
            else:
                storedMatches.append(words)
            matches += 1

    #if there is a stored result, print it out
    if matches == 0:
        print(' ')
    else:
        matchString = ''
        for matches in storedMatches:
            matchString = matchString + matches + "\t"

        print(matchString)
If you do not like the output format, you can change it by adjusting the second last line of code. For example, you could save each entry to a new line in a .txt file rather than to the screen. To do that you would replace ‘print matchString’ with the following code (make sure it is at one level of indentation, just as was the replaced line):
    f = open('output.txt', 'a')
    f.write(matchString)
    f.close()
Note the ‘a’ instead of the ‘r’ we used earlier. This ‘appends’ the text to the file called output.txt, which will be saved in your working directory. You will have to take care, because running the program several times will continue to append all of the outputs to this file, creating a very long file. There are ways around this, which we will cover in a moment, and you might consider looking into how the ‘w’ (write) feature works, and experimenting with output formats. There is more information related to these features in ‘Working with Text Files in Python’.
Refining the Gazetteer
You can copy and paste that output directly into your spreadsheet next to the first entry. Check that the matches lined up properly. Your last entry of your spreadsheet should correspond to the correctly extracted keywords. In this case, the last entry should be blank, but the second last one should read ‘dorset’.
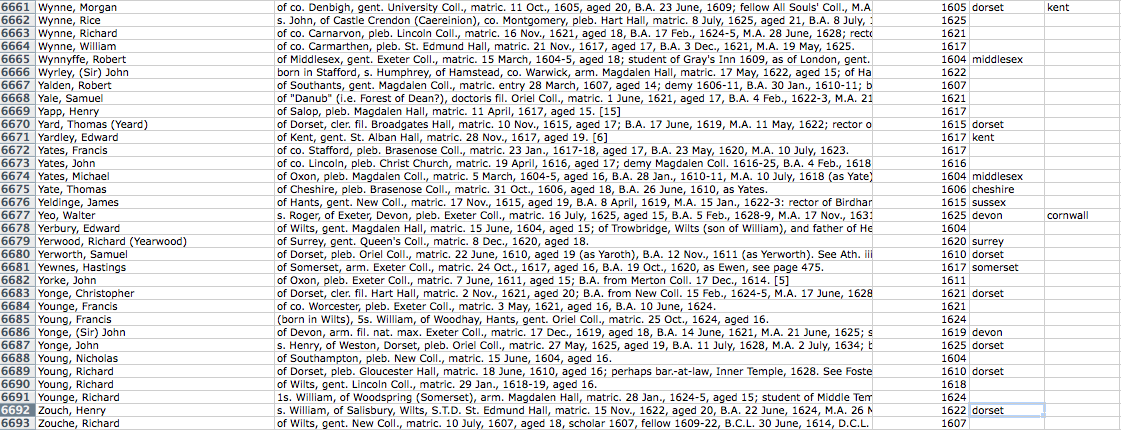
The output pasted back into the CSV file
At this point, you might like to refine the gazetteer, as a lot of place names have been missed. Many of them are shortforms, or archaic spellings (Wilts, Salop, Sarum, Northants, etc). You could go through looking at all the empty cells and seeing if you can find keywords that you’ve missed. It may help to know that you can find the next empty cell in a column in Excel by pressing CTRL + down arrow (CMD + down arrow on Mac).
One of the easiest ways to find all of the missing entries is to sort your spreadsheet by the new columns you’ve just added. If you sort the matches alphabetically for each of the new columns, then the entries at the bottom of the spreadsheet will all be unclassified. You can do this by selecting the whole spreadsheet and clicking on the Data -> Sort menu item. You can then sort a-z for each of the new columns.
Before you sort a spreadsheet, it’s often a good idea to add an ‘original order’ column in case you want to sort them back. To do this, add a new column, and in the first 3 rows, type 1, 2, and 3 respectively. Then highlight the three cells and put your cursor over the bottom right corner. If you are using Microsoft Excel your cursor will change into a black cross. When you see this, click and hold the mouse button and drag the cursor down until you reach the bottom of the spreadsheet (down to the last entry) before you let go. This should automatically number the rows consecutively so that you can always re-sort your entries back to the original order.
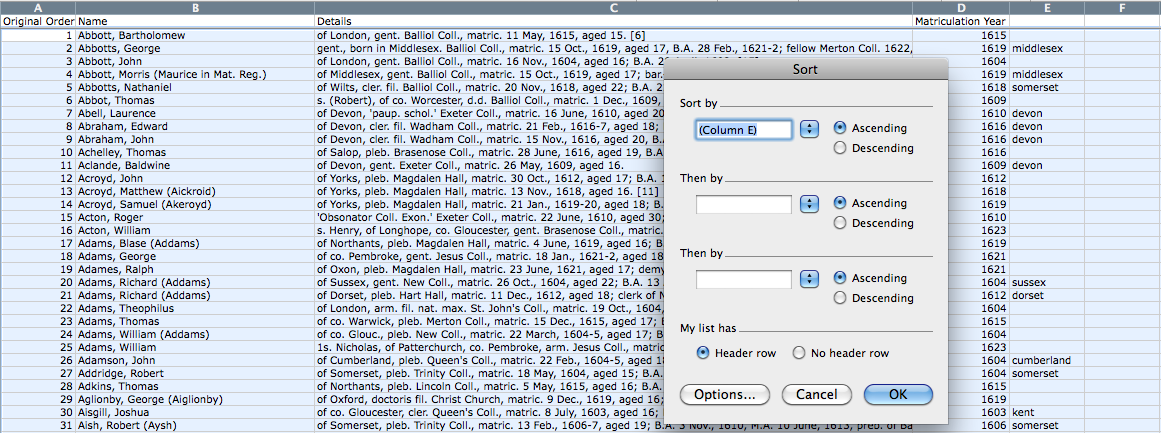
Adding an original order column and sorting the entries
Now you can sort the data and read some of the entries for which no match was found. If you find there is a place name in there, add it to your ‘gazetteer.txt’ file, one entry per line. You don’t have to be exhaustive at this stage. You could add a handful more entries and then try the code again to see what impact they had on the result.
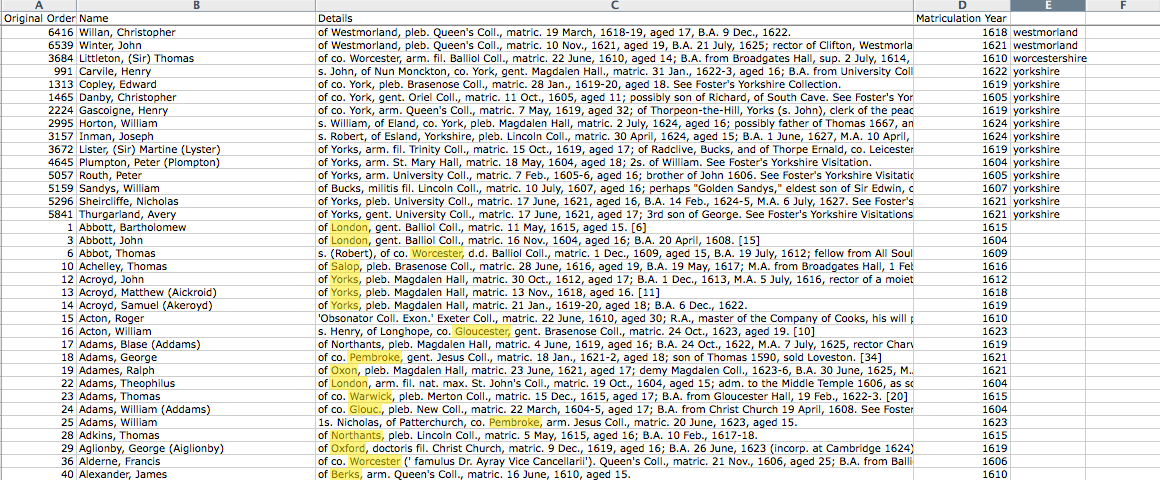
Missed place name words highlighted in yellow
Before you re-run your Python code, you’ll have to update your texts.txt file so that the program runs on the texts in the correct order. Since the code will output the matches in the same order that it receives the files in texts.txt, it’s important not to get this jumbled up if you’ve been sorting your spreadsheet where you intend to store your outputs. You can either re-sort the spreadsheet back to the original order before you run the program, or you can copy all of the cells in the ‘details’ column again and paste and save them into the texts.txt file.
I’d challenge you to make a few refinements to your gazetteer before moving ahead, just to make sure you have the hang of it.
Once you are happy with that, you can snag my completed list of English and Welsh counties, shortforms, and various other cities (London, Bristol etc) and places (Jersey, Ireland, etc). My completed list contains 157 entries, and should get you all of the entries that can be extracted from the texts in this collection.
At this point you could stop, as you’ve achieved what you set out to do. This lesson taught you how to use a short Python program to search a fairly large number of texts for a set of keywords defined by you.
With the outputs from this lesson, you could fairly quickly map these entries by geolocating the place names. This might reveal new insights into spatial patterns of Oxford alumni.
Having the ability to search for large numbers of keywords at the same time opens up flexibility for your research process, and makes it feasible to do work that might otherwise just have seemed like it would take too long. You could try a completely different set of words, or use this technique on another set of texts entirely. The research questions are of course, endless.
If you would like to refine the program further, we can use Python to read directly from the CSV file and to print the results to a new CSV file so that everything happens automatically from the Terminal window without the need for cutting and pasting.
Printing the Results Back to the CSV File Using Python
Python has a built in code library that can handle working with CSV files, called csv
To use it and its features, you first have to import it. At the top of your extractKeywords.py program, add the following line:
import csv
Now we are going to make some changes to our original program. Instead of cutting all of the texts into a texts.txt file, we’ll use Python to read the data directly into our ‘allTexts’ variable. Replace:
#Import the texts you want to search
f = open('texts.txt', 'r')
allTexts = f.read().lower().split("\n")
f.close()
With this:
#Import the 'Details' column from the CSV file
allTexts = []
fullRow = []
with open('The_Dataset_-_Alumni_Oxonienses-Jas1.csv') as csvfile:
    reader = csv.DictReader(csvfile)
    for row in reader:
        #the full row for each entry, which will be used to recreate the improved CSV file in a moment
        fullRow.append((row['Name'], row['Details'], row['Matriculation Year']))

        #the column we want to parse for our keywords
        row = row['Details'].lower()
        allTexts.append(row)
encoding='latin1' parameter, like this: with open('The_Dataset_-_Alumni_Oxonienses-Jas1.csv, encoding='latin1') as csvfile:
As this is an advanced option, I won’t explain what every line does in detail, but you can take a look at the comments in the code to get an idea. Effectively this uses Python to read the CSV file and stores all of the information in the ‘Details’ column in the same ‘allTexts’ variable that we had it in previously, in exactly the same format as before. This code also stores each row of the CSV file into another list called ‘fullRow’, which will be used for writing a new CSV file containing our program’s outputs.
There are a few extra lines of code here, but you didn’t need to cut and paste anything into the texts.txt file, and there’s no risk here of your sorting of your spreadsheet causing any issues about the order of inputs and outputs. This is therefore a more robust option. You can print out either of these variables using the ‘print’ feature, to make sure they contain what you’d expect of them.
TROUBLESHOOTING: If you get the following error when you attempt to read your CSV file using Python, the CSV file may have been saved on a Mac, and the Python CSV library is only able to read Windows-compatible CSV files
(Error: new-line character seen in unquoted field - do you need to open the file in universal-newline mode?).
To solve this problem, open your CSV file in a spreadsheet program (eg., Excel) and ‘Save As’ and under format chose ‘Windows Comma Separated (csv)’. This should solve the problem. To read more on this issue, see Stack Overflow
Creating a new CSV file
Next we need to create a new CSV file where the results of the analysis can be stored. It’s always a good idea to make a new file rather than try to append it to your only copy of the original data. It’s also a good idea to append the current date and time to the filename for your new file. That way you can run the code lots of times as you refine everything and it will always be clear which file contains your most recent ouputs.
To do this, import the ‘time’ library just below where you imported the ‘csv’ library.
import time
And then add the following two lines of code right below where you were just working with the new CSV code:
#use the current date and time to create a unique output filename
timestr = time.strftime("%Y-%m-%d-(%H-%M-%S)")
filename = 'output-' + str(timestr) + '.csv'
This will create a variable called ‘filename’, which we’ll use when we make the new output file.
The rest of the process involves creating that new output file, putting in the correct headers, pasting in the original data, and then pasting in our new outputs from our gazetteer matching. That involves quite a few tweaks to the original code, so to keep everything as clear as possible, I’ve included the finished code below. I have appended ‘NEW!’, ‘OLD!’ and ‘CHANGED!’ in the comments for each section so that you can see at a glance which bits have changed:
#NEW!
import csv
import time

#OLD! Import the keywords
f = open('gazetteer.txt', 'r')
allKeywords = f.read().lower().split("\n")
f.close()


#CHANGED! Import the 'Details' column from the CSV file
allTexts = []
fullRow = []
with open('The_Dataset_-_Alumni_Oxonienses-Jas1.csv') as csvfile:
    reader = csv.DictReader(csvfile)
    for row in reader:
        #the full row for each entry, which will be used to recreate the improved CSV file in a moment
        fullRow.append((row['Name'], row['Details'], row['Matriculation Year']))

        #the column we want to parse for our keywords
        row = row['Details'].lower()
        allTexts.append(row)

#NEW! a flag used to keep track of which row is being printed to the CSV file
counter = 0

#NEW! use the current date and time to create a unique output filename
timestr = time.strftime("%Y-%m-%d-(%H-%M-%S)")
filename = 'output-' + str(timestr) + '.csv'

#NEW! Open the new output CSV file to append ('a') rows one at a time.
with open(filename, 'a') as csvfile:

    #NEW! define the column headers and write them to the new file
    fieldnames = ['Name', 'Details', 'Matriculation Year', 'Placename']
    writer = csv.DictWriter(csvfile, fieldnames=fieldnames)
    writer.writeheader()

    #NEW! define the output for each row and then print to the output csv file
    writer = csv.writer(csvfile)

    #OLD! this is the same as before, for currentRow in fullRow:
    for entry in allTexts:

        matches = 0
        storedMatches = []

        #for each entry:
        allWords = entry.split(' ')
        for words in allWords:

            #remove punctuation that will interfere with matching
            words = words.replace(',', '')
            words = words.replace('.', '')
            words = words.replace(';', '')

            #if a keyword match is found, store the result.
            if words in allKeywords:
                if words in storedMatches:
                    continue
                else:
                    storedMatches.append(words)
                matches += 1

        #CHANGED! send any matches to a new row of the csv file.
        if matches == 0:
            newRow = fullRow[counter]
        else:
            matchTuple = tuple(storedMatches)
            newRow = fullRow[counter] + matchTuple

        #NEW! write the result of each row to the csv file
        writer.writerows([newRow])
        counter += 1
The code is heavily commented so if you spend some time, you should be able to figure it out. Save this code and rerun it using Python and you should get a file called output.csv appearing in your working directory, which if you open it should contain all of the same information as you had before, but without the need to do any cutting or pasting.
To give a brief outline of what has been changed from the original version:
- The texts were extracted automatically from the original datafile instead of having to paste them into a
texts.txtfile. - Using the ‘time’ library, we used the current date and time to create a unique and easily decypherable filename for our output file.
- Using the ‘csv’ library we created a new .csv file using that filename, and put in the column headers we wanted to use.
- We then ran the same matching code as before, checking ‘allTexts’ against ‘allWords’ and storing the results.
- Instead of printing the results to the screen, we stored each row’s original data (Name, Details, Matriculation Year) + the matches to a tuple called ‘newRow’.
- Using the ‘csv’ library we wrote the ‘newRow’ data to the new CSV file, one row at a time.
This approach created longer and more complex code, but the result is a powerful program that reads from a CSV file, matches the texts against the contents of a gazetteer, and then automatically writes the output to a clean new CSV file with no intermediary steps for you the user. You didn’t have to go that extra mile, but hopefully you can see the advantages if you made it all the way through.
Suggested Further Reading
Readers who have completed this lesson might be interested in then geo-referencing the output using the Google API and mapping the results. You can learn more about this process from Fred Gibbs’s tutorial, Extract and Geocode Placenames from a Text File. This will let you visualise the practical outputs of this tutorial. Alternatively, readers may be interested in Jim Clifford et. al’s tutorial on georeferencing in QGIS 2.0, an open source GIS program.