
Contents
- Introduction
- A GUI Project: PDF Merger
- Exercises for the Reader
- Creating the Distributable Application
- Concluding Remarks
Introduction
This lesson demonstrates how to implement a Graphical User Interface (GUI) using Python. A GUI is an expected feature of most modern applications, but many users lack the necessary computing skills to execute Python scripts or operate terminal/command line applications. Distributing applications that use GUIs helps support the greatest number of other historians to benefit from the applications you develop. This tutorial focuses on the three steps involved in creating modern-looking and useable applications: designing a GUI, implementing a GUI within an application, and creating an executable file to distribute the application.
We will program a GUI to deal with a problem commonly encountered by historians: merging PDF files. Historians often find themselves with various PDF files that are logically connected, and that would be simpler to use for research or collaboration if they were merged into a single document. Many archives on the internet only allow users to download one page at a time, rather than an entire document. Another use-case scenario arises when historians only download the pages they need and skip intervening pages. Or, when historians at physical archives take digital pictures of only certain documents, rather than the entire file. At the end of their archival visit, they find that they have a large number of individual images, of which many should be part of one document or file. Oftentimes, internet archives or digital cameras name these files in conventional and logical ways (img_001, img_002, img_003). Our Python script will provide a simple drag-and-drop interface to move these files into the application and a single button press will merge them into one document.
Learning Goals
This lesson uses Python to create a program with a GUI interface that can merge multiple PDF documents into a single PDF file. The main goal is to learn the basics of creating GUIs. By the end of this lesson, you will be able to:
- Design a GUI using proven design principles of user-friendliness
- Create a GUI using Qt Designer
- Implement a GUI within a Python script
- Build a distributable application version of your script
Command Line Interface vs. GUI: Merits and Drawbacks
Most Python programmers are familiar with using a command line interface (CLI). But CLIs can easily daunt more casual computer users. GUIs are often easier to learn, and most users are already familiar with their use. A GUI can offer granular control over operating system files through drag-and-drop functionality.
How does one decide between programming a CLI or a GUI script/app? If the script requires little or no interaction from the user, use a CLI. If the program is relatively uncomplicated, a CLI will likely suffice. However, if you wish to share your applications or scripts with users with little programming knowledge or limited computing skills, you should use a GUI. Finally, suppose your application contains complicated features, and you do not know in what order the user might want to use those features. In that case, a GUI offers freedom for the user and is actually simpler for the programmer to implement than the confusing and intricate logic branches and loops that a CLI script would require.
Our PDF Merger sample application will provide flexibility, ease of use, and efficiency that a traditional CLI application cannot achieve when confronted by a similar research challenge. This tutorial takes a concrete example: our program’s goal is to merge various PDFs. A CLI could do this, but it would be challenging to merge PDFs that were not in the same file directory. With the GUI created in this tutorial, the user will be able to use drag-and-drop functionality to select and merge specific PDFs from any file location on the computer, including the hard drive, cloud, USB stick, or other peripherals.
After you finish the tutorial, your final design should resemble Figure 1. It may be helpful to refer back to this picture as you follow the steps.
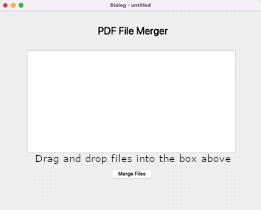
Figure 1. Final Design of the User Interface
Prerequisites and Tools
The following instructions work on macOS, Windows, and Linux machines.
You should have some familiarity with the command line interface on your system. For Linux and Mac users, you can learn this through Programming Historian’s Introduction to the Bash Command Line. Windows users can learn about the Power Shell with Programming Historian’s Introduction to the Windows Command Line with PowerShell.
You can use any version of Python 3, though 3.5+ is recommended. You will also need the Python package installer, pip. A tutorial is available at Programming Historian’s Installing Python Modules with pip.
Python GUI Tools
This tutorial uses the PyQt5 Python GUI source package. Use the following command to install the PyQt5 code base that allows us to program PyQt5 using Python:
pip install PyQt5
You will also need to download Qt Designer, an application to create Python GUIs using drag-and-drop widgets. It is possible to code your GUIs entirely from scratch using only the PyQt5 codebase that you just downloaded. This application, however, will allow you to speedily create GUIs using a drag and drop interface without ever needing to touch the code. This tutorial uses Qt Designer because it is beginner-friendly. As you become more advanced using PyQt5, you may decide to code GUIs entirely by hand, but using Qt Designer (at least for a basic, skeleton version of your app) is incredibly useful. Qt Designer can save even experienced GUI programmers the arduous task of programming hundreds of lines of banal code so that they may focus on the actual functionality of the app. Other GUI packages for Python exist. Apart from PyQt5, Tkinter is the most famous. This tutorial opts for PyQt5 because it is the only package that has a drag-and-drop editor for designing your GUI — a useful way to ease into GUI programming for beginners.
Windows and MacOS Users: Download Qt Designer as a stand-alone application available at fman build system.1
Linux Users: Use the following pip commands to install Qt Designer:
sudo apt-get install qttools5-dev-tools
sudo apt-get install qttools5-dev
Pyinstaller can convert a Python script into a distributable application file. Use the following pip command:
pip install -U pyinstaller
Packages and Files Specific to This Project
PyPDF4 is a useful package that can open and modify PDFs within a Python environment. Use the following command to install it:
pip install pypdf4
Finally, download the sample PDFs for testing your application towards the end of this tutorial.
GUI Design Principles
Deciding to implement a GUI often involves a reorientation of the programmer’s priorities. The objective is no longer to simply program an application that works, but to program one that virtually anyone can use at any skill level. There is no standard for GUI design, but we will focus on the following principles that can provide a basic guideline for beginners:
- Visibility. Key attributes of the interface should be readily visible to users. Examples of good visibility include buttons with specific functions and a clean navigation menu. At the same time, the visibility principle incorporates the idea that not everything should be visible; the interface should remain clutter-free and intuitive for the user.
- Consistency. Elements on the screen (such as buttons and menus) should have a consistent style. If the application requires multiple screens, consistency of style should be maintained throughout. The navigation menu should not appear at the top of the window on one screen then at the bottom of the window on the next screen.
- Learnability. The learning curve for using the application’s GUI should be as small as possible. This does not mean that the application itself cannot be complicated, but that learning to operate the GUI should interfere as little as possible with using the application.
- Predictability. Functions within the GUI, such as buttons or menus, should operate as the user expects them to. You should design your GUI to align with expected user interactions. There should be a clear, foreseeable path for the user to reach their goal within the application.
The field of user interface design is now vast. The Additional Resources section below contains more advanced resources for those wishing to dive more deeply into the field.
A GUI Project: PDF Merger
Merging PDF files in a directory is a relatively easy goal to achieve using Python and other freely available packages. Equally, a basic script operated from the command line can accomplish the task. Yet, what if the user only desires to merge some of the PDFs in the directory rather than all of them? Or perhaps the user needs to merge PDFs stored in various locations across their hard drive. In the former case, the user would need to remove the undesired files. In the latter case, the user would have to move or copy the files into one central location. An application with a GUI and drag-and-drop functionality can make the process simple.
Designing the Interface with Qt Designer
To begin, launch the Qt Designer application you downloaded earlier by clicking on its icon. On MacOS and Windows the application will be located where you selected during the installation process; the default for MacOS is your Applications folders and the default for Windows is C:\Program Files (x86)\Qt Designer. Linux users’ path will vary but, for example on Ubuntu, they may find the application with the following commands:
cd /usr/lib/x86_64-linux-gnu/qt5/bin/
./designer
If you cannot locate the application, follow the instructions above in the Prerequisites and Tools section to download and install Qt Designer.
After the application loads, a prompt will request you to create a New Form. To simplify this project, we will select “Dialog without Buttons.” Ensure that “Show this Dialog on Startup” is selected, and then press Create.
The Windows and Linux version of Qt Designer (Figure 2) is self-contained and provides little flexibility using the interface, but it is neatly organized ‘out of the box’. The MacOS version (Figure 3) has many individual windows and the arrangement is initially cluttered. This tutorial primarily uses the MacOS version and it is recommended that you arrange the individual windows in the layout shown in Figure 2 to ease visibility and usage. Whichever version you use, however, there is little to no difference when it comes to following this tutorial. At most, the arrangement of certain items or buttons may differ.
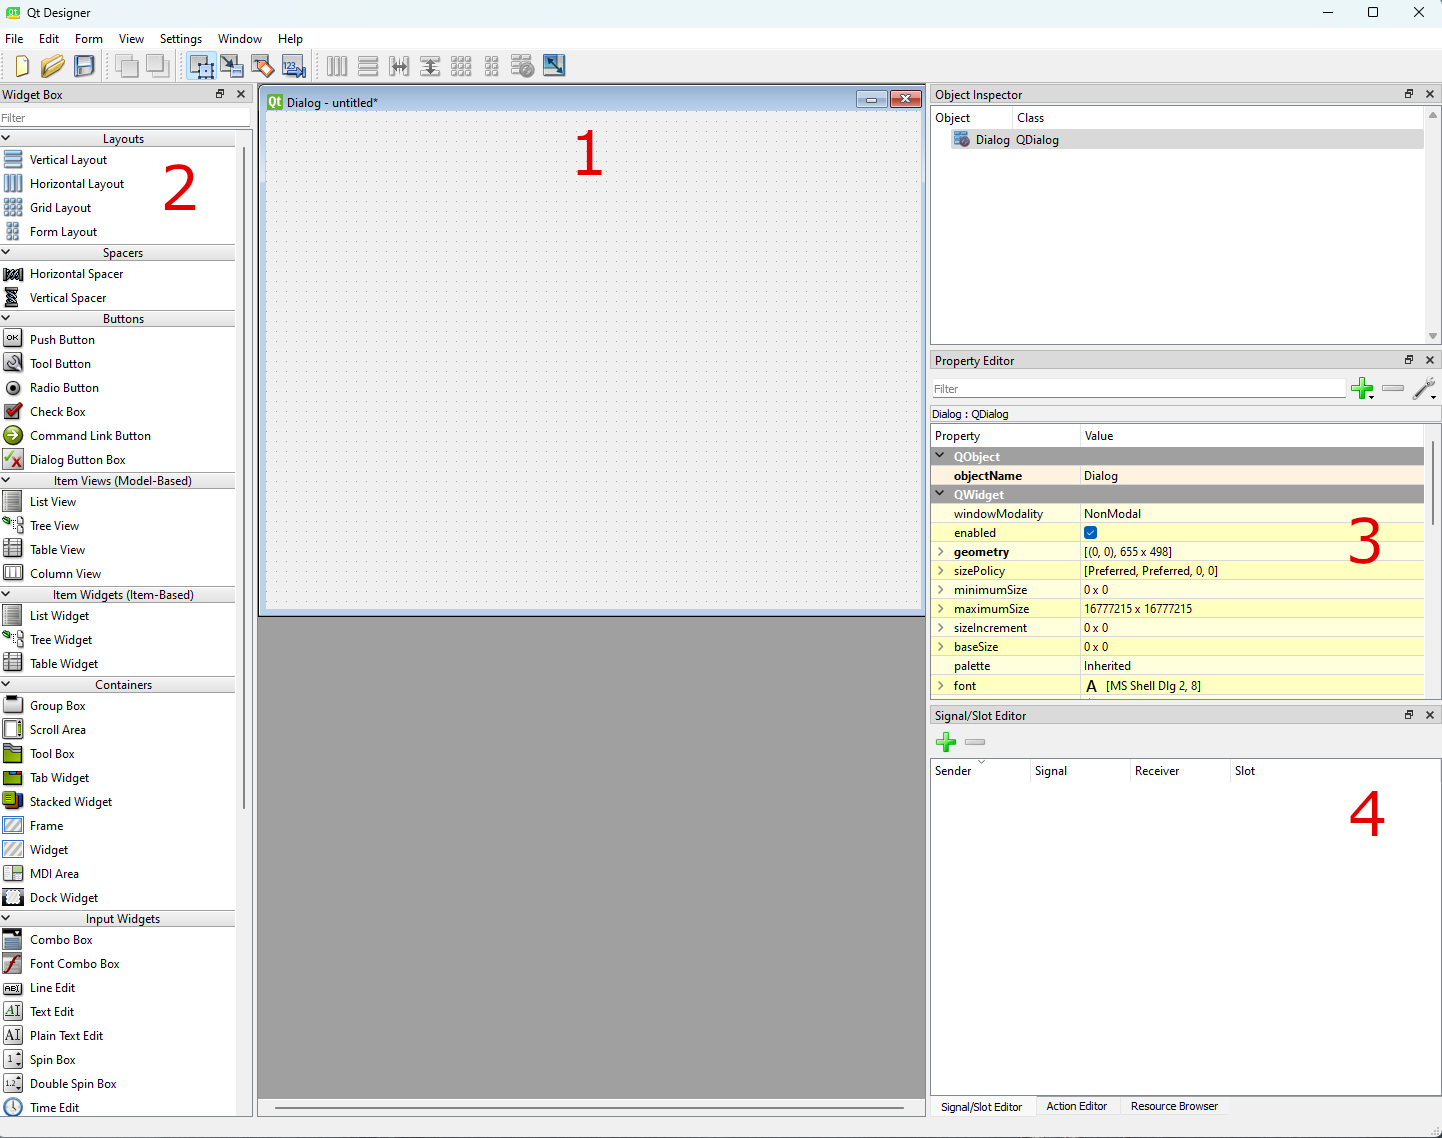
Figure 2. The Qt Designer Interface (Windows and Linux Version)
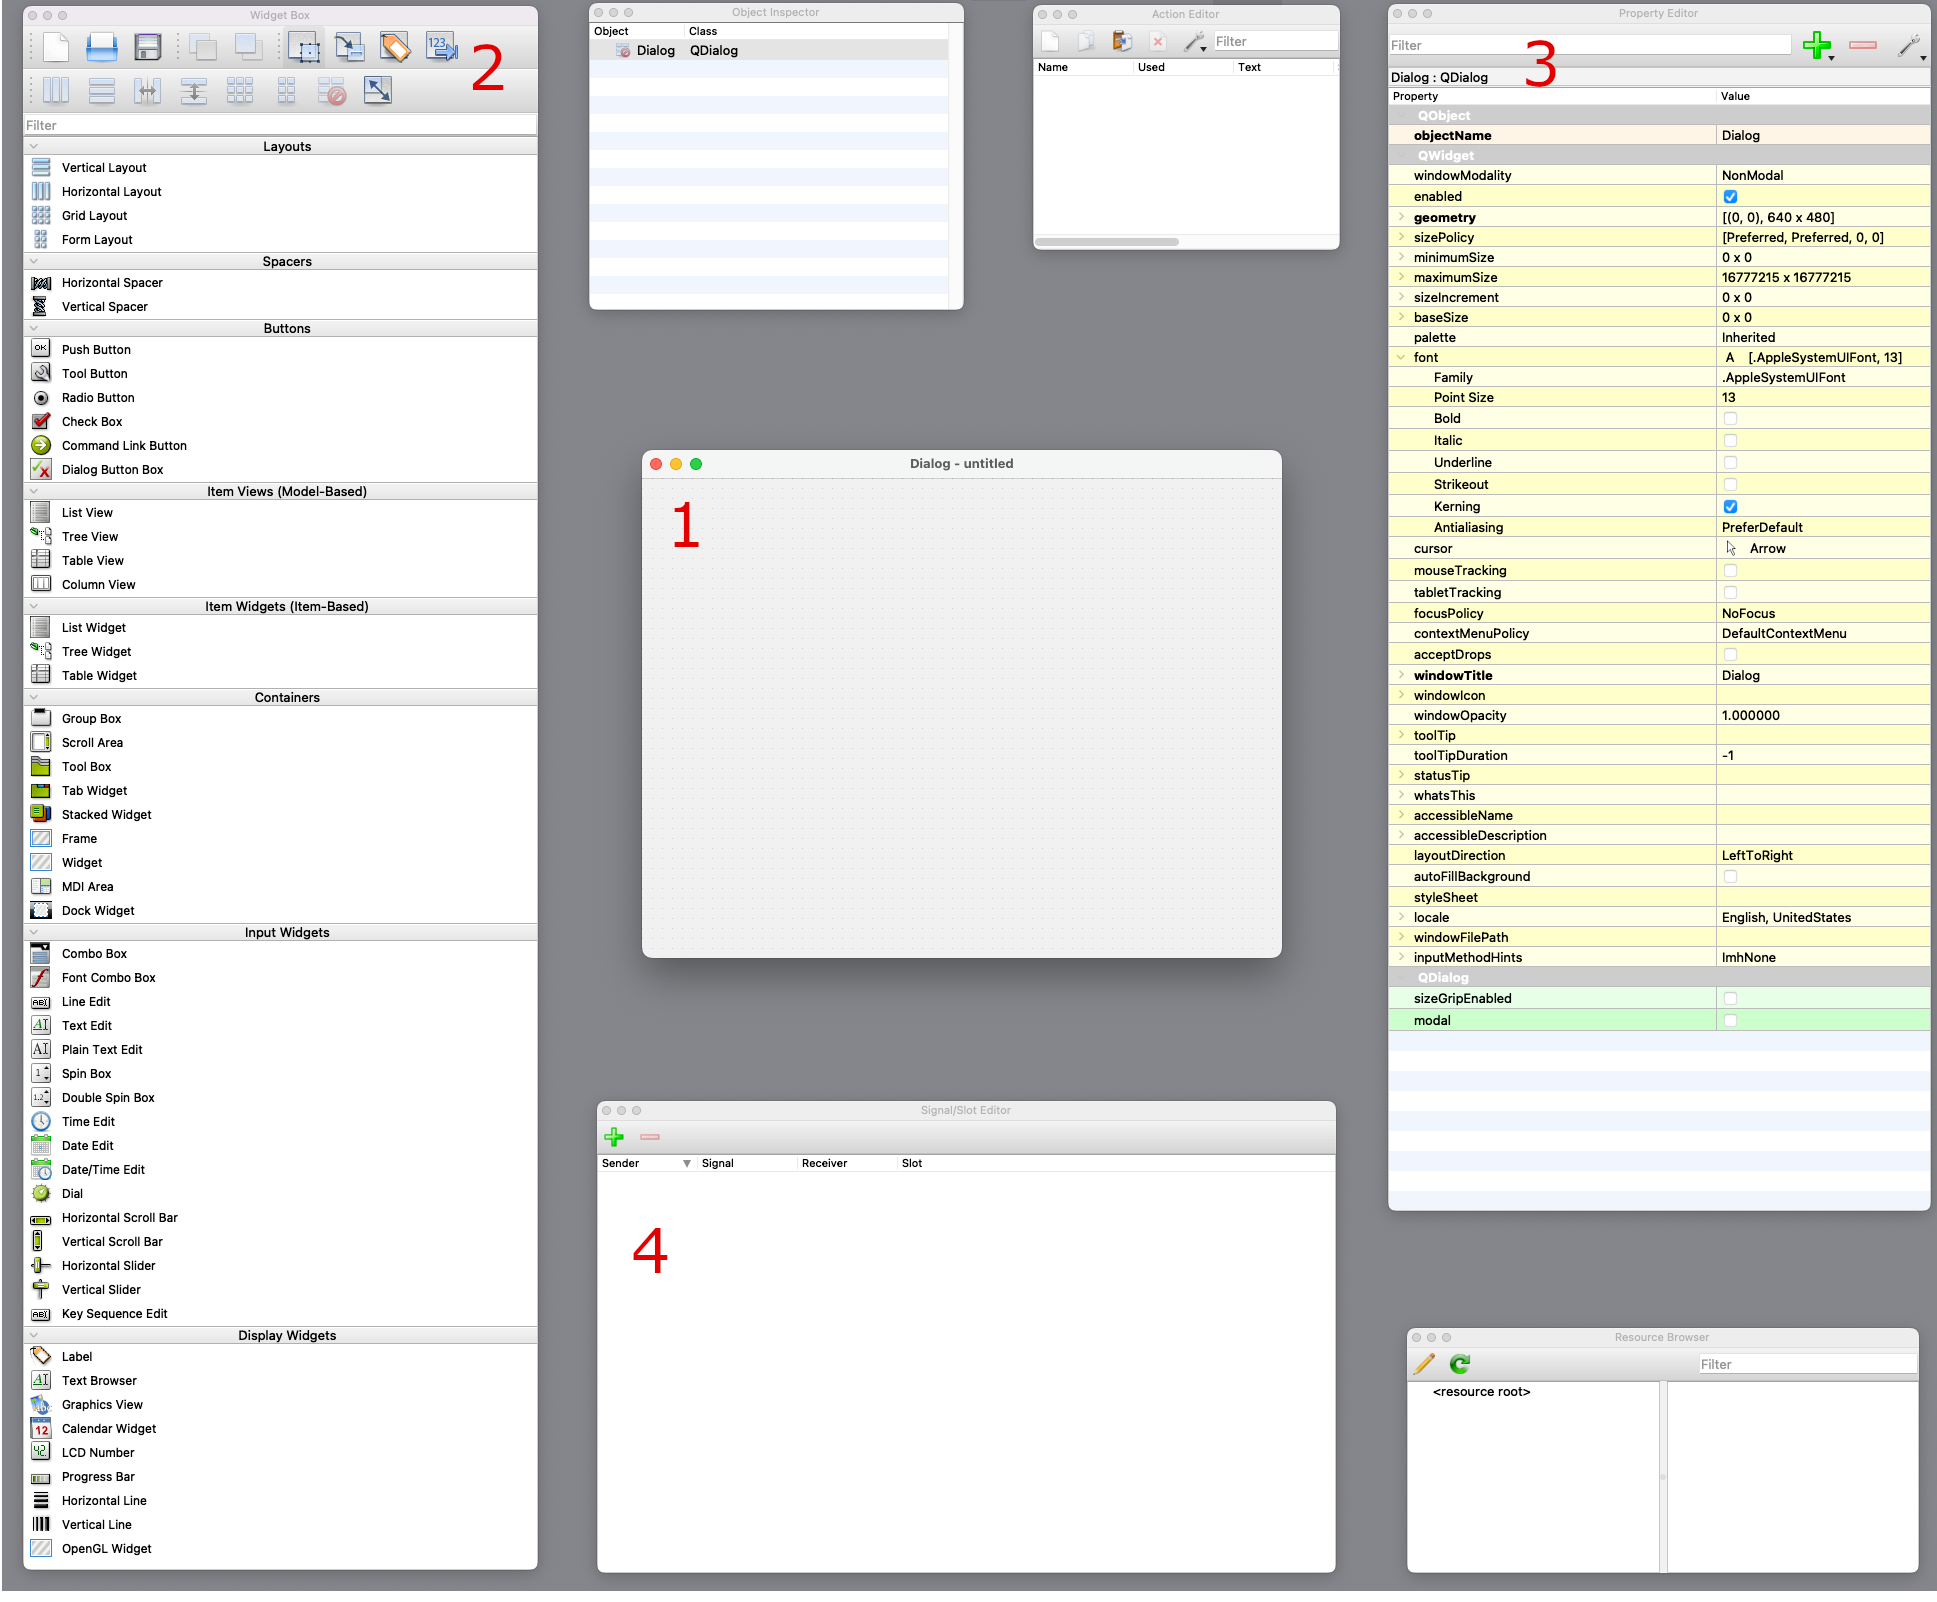
Figure 3. The Qt Designer Interface (MacOS Version)
For both versions above, the Dialog box (1) that will become our GUI is central on the screen. To its left is the Widget Box (2) that contains all the user interface (UI) features that Qt Designer can implement; this includes everything from simple design features such as static text to more complicated features such as the interactive List Widget that we will work with.
Our other main toolbox resides on the right, the Property Editor (3). It is here that we will customize every widget we implement and can do so at a granular level. Below the dialog box lies the Signal/Slot Editor window (4).
Note that you may have to select the tab “Signal/Slot Editor” at the bottom right corner of Qt Designer on the Windows and Linux version to see that tool. Later in the tutorial we will use this to implement the more intricate interactions between the GUI and the user. Qt Designer has several other windows that we will not use. Feel free to close them.
Adding the Application Title
QLabels provide a means to display plain text in your application, such as titles. From the Widget Box and under the “Display Widgets” section, drag “Label” to the Dialog box. Center it on the dialog box, but do not worry about precise locations while using Qt Designer. It is usually easier to align objects directly in the code, a task we will return to later.
In the Property Editor and under the QObject heading, select objectName and type in its value of title_label. Everything needs a descriptive name because the UI will eventually be converted to Python code, and we will need to keep track of which objects we are editing. Staying in the Property Editor, find the font heading, expand it with the small arrow and set the value for Point size to 24. Under the QLabel change the text value to “PDF File Merger”. Changing the font size and adding more text means that it exceeds the bounds of the textbox &mash; textboxes in Qt Designer do not automatically resize.
Select the textbox and drag from one of the corners to increase the size until the text fits comfortably. Now, drag the textbox until it is centered near the top of the dialog box. Your application now has a title that greets users and ensures they know precisely what application they are using.
Adding the Merge PDFs Button
Next, from the “Buttons” section of the Widget Box, drag a Push Button to your Dialog box. In the Property Editor, set the following values: objectName: merge_button; text: Merge Files.
Press Edit on the Menu Bar at the top left corner of your screen (where you can find your typical File menu to save your work, for example) and select Edit Signals/Slots from the top of the screen. When you hover your mouse over an object in your dialog box, it will now highlight red.
Press and hold on your Merge Files button and drag the mouse slightly off the button until you see a red line appear. Then release your mouse button. The Configure Connection dialog box will appear. Select clicked() from the left side of the menu and Edit on the right side. Under the top box labeled Slots, press the green addition sign. Type in mergeDocSlot(). Select mergeDocSlot(), then click “Ok” once to close the current window and again to close the next window. You should be back to the basic Qt Designer windows. Now select the item you just created.
This creates the connection between the button in the user interface and the function we will write later, mergeDocSlot(). Clicking the button signals the execution of the specific function. Without this, the button could be clicked, but nothing would happen.
Adding the File List Widget
Now, we need a list view to drag and drop files into our application and view which files we’ve added. We will use the QListWidget for this function. Drag the List Widget under the “Item Widgets (Item-Based)” heading from the Widget Box to your Dialog box. In the Property Editor, set its objectName to file_list_widget. Select the widget and use your mouse at one of its corners to configure its size to roughly the proportions shown in Figure 2 below. Return to the Edit Widgets mode.
In our final design, users will be able to drag and drop files directly into this widget. This is not, however, immediately obvious. You need some way to inform your users. If you are distributing your application to a handful of people or are only using it yourself, you could simply tell them. It is a principle of good design to inform users within the application itself.
The simplest way to inform the user is to simply add another Label just as we did in the Adding the Application Title section above. A note such as “Drag and drop files into the box above” just below the widget will suffice. Play around with customizing the exact wording and ensure that the font fits properly between the Merge PDFs button and the drag and drop widget.
Saving the Qt Designer File and Transforming it into Code
Save your UI document as PDFFileMerger.ui. Qt Designer has created the UI file, which contains XML representing the entire design in a convenient “tree” format. We must now convert this XML data into Python code that will provide the basic structure of our application.
Open your terminal or shell and navigate to the directory where you saved your UI file. Type the following:
pyuic5 -x PDFFileMerger.ui -o PDFFileMerger.py
A Python file will generate in the same directory. As you can see from this file, everything done in Qt Designer could have been done solely with Python code. Qt Designer, however, can speed up the process, especially for programs employing many widgets or multiple screens. Qt Designer has provided the basic Python code that we will now edit to implement our features.
Creating the User Interface Functionality
In your Python editor or integrated development environment (IDE), open the newly created PDFFileMerge.py file. Our entire codebase will reside in this single script. We will begin by adding the necessary libraries. Qt Designer will have automatically added some of the following but ensure that all are present in your Python file.
from PyQt5 import QtCore, QtGui, QtWidgets
from PyQt5.QtCore import QObject, pyqtSlot
from PyPDF4 import PdfFileMerger
Your beginning file, which is the .ui file converted to Python code, should look like this:
class Ui_Dialog(object):
    def setupUi(self, Dialog):
        Dialog.setObjectName("Dialog")
        Dialog.resize(667, 514)
        font = QtGui.QFont()
        font.setPointSize(26)
        Dialog.setFont(font)
        self.title_label = QtWidgets.QLabel(Dialog)
        self.title_label.setGeometry(QtCore.QRect(250, 30, 291, 41))
        self.title_label.setObjectName("label")
        self.merge_button = QtWidgets.QPushButton(Dialog)
        self.merge_button.setGeometry(QtCore.QRect(230, 400, 225, 45))
        self.merge_button.setObjectName("merge_button")
      self.file_list_widget = QtWidgets.ListWidget(Dialog)
        self.file_list_widget.setGeometry(QtCore.QRect(70, 100, 531, 261))
        self.file_list_widget.setObjectName("file_list_widget")

        self.retranslateUi(Dialog)
        self.merge_button.clicked.connect(Dialog.mergeDocSlot)
        QtCore.QMetaObject.connectSlotsByName(Dialog)

    def retranslateUi(self, Dialog):
        _translate = QtCore.QCoreApplication.translate
        Dialog.setWindowTitle(_translate("Dialog", "Dialog"))
        self.title_label.setText(_translate("Dialog", "PDF File Merger"))
        self.merge_button.setText(_translate("Dialog", "Merge Files"))


if __name__ == "__main__":
    import sys

    app = QtWidgets.QApplication(sys.argv)
    Dialog = QtWidgets.QDialog()
    ui = Ui_Dialog()
    ui.setupUi(Dialog)
    Dialog.show()
    sys.exit(app.exec_())
At this point, three things need to be edited:
- Change
class Ui_Dialog(object)toclass Ui_Dialog(QObject). This will allow us to seamlessly use slots and signals that enable the user to interact directly with the application. - Change
self.file_list_widget = QtWidgets.QListWidget(Dialog)toself.file_list_widget = ListDragWidget(Dialog). With this change, we will be able to implement drag and drop functionality and improve memory management. Do not be concerned if your IDE alerts you with a warning or error message; the ListDragWidget is a class we will create ourselves later. - Change
self.merge_button.clicked.connect(Dialog.mergeDocSlot)toself.merge_button.clicked.connect(self.mergeDocSlot)to properly link the signal from the merge button to the merge function we will create later.
The class definition will now look like this:
class Ui_Dialog(QObject):
    def setupUi(self, Dialog):
        Dialog.setObjectName("Dialog")
        Dialog.resize(667, 514)
        font = QtGui.QFont()
        font.setPointSize(26)
        Dialog.setFont(font)
        self.title_label = QtWidgets.QLabel(Dialog)
        self.title_label.setGeometry(QtCore.QRect(250, 30, 291, 41))
        self.title_label.setObjectName("label")
        self.merge_button = QtWidgets.QPushButton(Dialog)
        self.merge_button.setGeometry(QtCore.QRect(230, 400, 225, 45))
        self.merge_button.setObjectName("merge_button")
        self.file_list_widget = ListDragWidget(Dialog)
        self.file_list_widget.setGeometry(QtCore.QRect(70, 100, 531, 261))
        self.file_list_widget.setObjectName("file_list_widget")

        self.retranslateUi(Dialog)
        self.merge_button.clicked.connect(self.mergeDocSlot)
        QtCore.QMetaObject.connectSlotsByName(Dialog)

    def retranslateUi(self, Dialog):
        _translate = QtCore.QCoreApplication.translate
        Dialog.setWindowTitle(_translate("Dialog", "Dialog"))
        self.title_label.setText(_translate("Dialog", "PDF File Merger"))
        self.merge_button.setText(_translate("Dialog", "Merge Files"))
Our list of PDF files to merge will not be stored in a Python list or dictionary but directly in the QListWidget itself. This simple solution prevents the need to pass variables around functions or declare global variables.
We will need to create a new class outside the Ui_Dialog class to implement drag and drop functionality.
class ListDragWidget(QtWidgets.QListWidget):
    """Creates a list widget that allows user to drag and drop PDF
    files into the widget area to add these files."""
    def __init__(self, parent):
        super(ListDragWidget, self).__init__(parent)
        self.setAcceptDrops(True)
        self.setDragDropMode(QtWidgets.QAbstractItemView.InternalMove)

    def dragEnterEvent(self, event):
        if event.mimeData().hasUrls():
            event.acceptProposedAction()
        else:
            super(ListDragWidget, self).dragEnterEvent(event)

    def dragMoveEvent(self, event):
        super(ListDragWidget, self).dragMoveEvent(event)

    def dropEvent(self, event):
        if event.mimeData().hasUrls():
            for file in event.mimeData().urls():
                if file.path().endswith('.pdf'): # make sure it is a PDF file
                    self.addItem(file.toLocalFile())
        else:
            super(ListDragWidget, self).dropEvent(event)
The dragEnterEvent function allows files to be dragged onto the widget itself. The dropEvent function enables the functionality for releasing the mouse button. Both use event.mimeData().hasUrls() to ensure that whatever is being dragged and dropped has a file path, verifying that it is, in fact, a file. The dropEvent function contains additional verification that the file is a PDF document.
Now that we can select the PDF files we want to merge, we need to add the functionality to combine the files.
Return to the Ui_Dialog class and; below the retranslateUi(self, Dialog) function generated during conversion from the Qt Designer file, add the following:
@pyqtSlot()
def mergeDocSlot(self):
    output_file_name = 'merged.pdf'  # default name for file output

    if self.file_list_widget.count() > 1:  # no merging unless there are enough documents to merge

        options = QtWidgets.QFileDialog.Options()
        options |= QtWidgets.QFileDialog.DontUseNativeDialog
        output_file_name, _ = QtWidgets.QFileDialog.getSaveFileName(
            None, "Save File", "merged", "PDF File (*.pdf)", options=options)

        for i in range(self.file_list_widget.count()):
            if output_file_name + ".pdf" == self.file_list_widget.item(i).text():
                error_message = QtWidgets.QMessageBox.critical(None, "Error!",
                                                               "Error! Your file name is already in use!")
                return

        if output_file_name:  # check to make sure there is a name
            # user's file name won't include .pdf unless they type it in
            output_file_name = output_file_name + '.pdf'

            # create PDF merger object
            pdf_merger = PdfFileMerger(open(output_file_name, "wb"))

            for i in range(self.file_list_widget.count()):
                # get everything from the file list
                pdf_merger.append(self.file_list_widget.item(i).text())

            pdf_merger.write(output_file_name)
            pdf_merger.close()

            success_message = QtWidgets.QMessageBox.information(
                None, "Files Merged", f"{output_file_name} has been successfully written!")
First, we will create a generic output file name for our final PDF. Next, we will use PyQt’s built-in file-saving dialogue boxes. This will allow the user to choose a file name and ensures the file will be saved as a PDF.
The next for loop is purely for error-proofing and providing consistent behavior for the end-user. It ensures that the user does not select an output file name that matches one of the names in the list of files to be merged. This would cause the original file to be overwritten and lose its data, a behavior that the user would be unlikely to desire. Note, however, that this is based on file path, so if the file name matches, but the files are in two different locations, the files will be merged because there is no danger of data being overwritten.
The if statement double-checks that a file name exists, and the next line ensures that the file extension will be the correct .pdf extension. The double-check provides one last line of defense against the application crashing unexpectedly or inadvertent loss of data.
We now create an object using the PyPDF4 library, set it as the output filename, and ensure it is in a writeable mode (“wb”).
The next for loop iterates through every item in the QListWidget and appends it to our PDFMerger object. Once it completes, the following line of code instructs PyPDF4 to write the output file as a single PDF document.
If the file output is successful, we use PyQt’s built-in information message box to inform the user that their operation succeeded. This provides predictability for the user. Users expect confirmation of success or failure during computing operations, and if they do not receive it, they suspect an error has occurred.
Error Testing
At this point, the application functions once you run the PdfFileMerger.py script on your computer. Because this application is likely intended for distribution (so that others can benefit from your hard work), you should spend some time testing for errors — the end-user will not have the ability to open the original script and fix errors as they arise.
Especially for GUI applications, it is essential to test edge-cases and what “strange” things a user might do that could crash the application. The developer cannot imagine all possibilities, but thorough testing should ensure that the vast majority of use cases are covered.
Your goal when error testing is to try to “break” the application and then program solutions so that, during real-world use, the application does not crash.
Testing Basic Functionality
Four PDF files are available to download to test your application, alongside one merged.pdf to compare with your own application’s output. They consist of an excerpt from Thomas Carlyle’s The Moral Phenomena of Germany (1845).2 When you’ve run your PDF Merger script, drag the four files into the list widget.
You must drag and drop into the list widget because our code specified that area as drag-and-droppable &mash; the user cannot simply drop PDF files anywhere in the application. The items will enter the widget in the order that is considered alphabetical on your operating system (they are currently numbered to be alphabetical on MacOS). Our application also allows the user to re-arrange the order of the files after they have been dropped into the list widget. Whatever order prevails in the list widget at the time of execution is the order the files will appear in the final merged document.
Press “Merge PDFs,” then select the final file location and a filename. If all has processed correctly, you should see a dialogue box confirming successful execution. Now, navigate to the location you selected to save your merged document. Open it. The document should contain nine pages. Each PDF page should consist of two pages from Carlyle’s work. The original source material pages are numbered. Ensure that the beginning page is “Introduction” and that the following pages are numbered, in order, from 5 to 21. If the numbers match up, the merging was completely successful. You may also wish to verify that your final document matches the provided merged.pdf.
Selecting and Testing Edge Cases
Varying Test PDFs
The selection of sample PDF files was made so as to best ensure error detection (at least rudimentarily, for our purposes). For example, the four documents are of varying lengths: 2 pages, 1 page, 5 pages, 1 page. These refer to PDF “pages,” not the number of pages in the original source document. Testing this shows us that the various for loops in our code correctly iterate through each page of each document. Testing four documents at once also verifies that our code does not iterate incorrectly. The selection of two single-page files was also purposeful, as it helps verify against certain edge-cases of our iterations over files and pages. It is recommended that you try a few variations of PDFs to test whether you can break the application. Also do not forget to try adding something in the incorrect order and using the list widget to correct the order, before verifying that the merging is correct. If it is not, verify that your code matches the code above.
Disallowing Merging When User Attempts Zero or One PDF
There are also examples of error checking in our code that fulfill the principle of consistency and predictability in our user interface. For instance, in the mergeDocSlot function, one of the first lines of code is an if statement to check if QListWidget contains more than one PDF file to merge. This does two things for the user. First, if there are zero items in the ListWidget, the application will not crash when the user inadvertently clicks the Merge PDFs button and the program attempts to merge nothing &mash; an obvious impossibility. Second, suppose there is only one PDF to merge. In that case, no merging needs to occur. It saves the user time by not rolling through the file-save dialogue boxes and conserves computer memory and storage space by not needlessly creating and storing additional documents. The former example demonstrates error prevention, while the latter follows our principle of predictability of usage.
Ensuring the User Can Only Drag and Drop PDF Files
Another example of error detection and prevention exists in the QListWidget code. At two points, we check with .hasUrls() to ensure that the file a user is dragging and dropping has a valid file path. Finally, when the user releases the mouse button, our code ensures that the file is a PDF when the actual drop occurs. If another file type could be added, the app would crash as soon as PyPDF4 attempted to merge PDF files with other file formats. Our code prevents the user from even attempting to merge a PDF with an audio or video file. Future features that the app developer might add could help the user in this regard. For example, a common task is to merge Microsoft Word documents with PDFs. An app developer could add a way for the program to detect a Word document, convert it to a PDF, and merge it with the other PDFs. The Python package docx2pdf provides a way to implement this feature.
Exercises for the Reader
When designing applications with GUIs, it’s important to remember that one of the primary goals is ease of use for the end-user. Feature implementation projects available to the reader of this tutorial that could further aid usability are: a “browse” button to add files through an ordinary file dialogue box; a “remove selected item” button to eliminate an erroneously added file on the list; a “clear all list items” button to empty the list completely; and a formal “exit” button.
The Additional Resources section includes a link to the PyQt5 documentation with instructions and examples of all the necessary UI features: file browsing dialog boxes and button interactions with signals. With the exception of the Word to PDF converter outlined above, the author’s GitHub page contains a repository showing code to implement the above features: PDF Merger. It is suggested that you try implementing the features first, as an exercise, before consulting the repository.
You should also keep in mind that there are many, many ways to implement a single feature; do not worry if your code looks vastly different from that provided in the repository. You should, however, compare the code to look for inefficiencies or alternate methods — always a valuable learning exercise.
Creating the Distributable Application
The last significant step to making an application distributable is creating the executable file. Most users are unfamiliar with running a Python script and rely on executable files such as .exe files on Windows and .app files on macOS. Indeed, many users will not bother with an application or script if it requires compiling, using a terminal, or running a script. If you want the broadest audience for your application, it needs to come packaged and instantly usable after downloading.
Open your terminal and navigate to the directory containing your Python application. On macOS, enter the following command (if you use a M-series chipset, see the Additional Resources section):
pyinstaller PDFFilemerger.py --windowed
For Windows and Linux users:
pyinstaller PDFFilemerger.py --onefile
Allow the process to finish. You will find several directories created in the same folder as the original file. Your completed, distributable application will be in the dist folder as a .app file (macOS), .exe file (Windows), or an executable binary (Linux).
When you decide to distribute the application, remember that pyinstaller is not a cross-compiler so you must create an executable for each operating system. For example, the .app executable you create on macOS will not work on Windows or Linux. To make executables work on other platforms, you need to compile the application on that specific platform or use a virtual machine running that operating system and compile it from there.
Concluding Remarks
You now have an application with a GUI that is easily distributable to other users. Be aware that most email servers block users from sending executable files. Personal websites or GitHub are preferable methods for distributing applications.
This tutorial has provided the necessary steps to begin using Qt Designer and PyQt, and has demonstrated how you can integrate your code with these libraries. A plethora of documentation exists on the internet for more advanced features of PyQt. While GUIs initially take extra time to develop, even a very simple GUI compiled into a distributable application pays dividends by spreading the usage of your application. Whereas many users would immediately skip a command line script, they are more likely to engage with an application that has a well-designed GUI.
Additional Resources
It is important for programmers to become familiar with the official documentation for the tools they use. Qt for Python is a vast project that one tutorial cannot cover. When issues arise, the Qt documentation should be one of the first places you search for answers. The official documentation is available at Qt for Python.
The developers of PyPDF4 host their open source package on GitHub. Tests, sample code and documentation exist within their repository.
GUI design is now a vast field and many companies hire specialists to implement aesthetically appealing, easily useable interfaces. A corresponding literature has emerged. The following are good places to begin:
-
Galitz, Wilbert O. The Essential Guide to User Interface Design: An Introduction to GUI Design Principles and Techniques. Third edition. Indianapolis, IN: Wiley Publishing, 2007.
-
Johnson, Jeff. Designing with the Mind in Mind: Simple Guide to Understanding User Interface Design Guidelines. 2nd edition. Amsterdam: Morgan Kaufmann, 2014.
-
Platt, David. The Joy of UX: User Experience and Interactive Design for Developers. Boston: Addison-Wesley, 2016.
The author hosts a version of this application on his Github page along with other useful applications and scripts for digital historians and digital humanists.
For those running macOS with M-series chipsets, the following resources may help overcome the current incompatibility encountered when installing PyQt5:
-
This stackoverflow post suggests using a Rosetta 2 terminal and a non-homebrew version of Python. Other responses indicate that adding PyQt5 as a dependency for Python might work.
-
Users on this stackoverflow post suggest a workaround that involves installing PyQt5 using Anaconda, while one user suggests an alternate homebrew installation method.
Also for those running macOS with M-series chipsets, the following resources may help you overcome issues concerning Pyinstaller and the creation of a distributable application:
-
This issue ticket on the Pyinstaller Github page discusses using universal2 binaries.
-
Another issue ticket discusses bootloaders targeting specific architectures.
-
There has been some success using the following build command:
pyinstaller PDFMerger.py --target-arch arm64 --windowed. However, it does not seem to work on Anaconda-installed versions of Python. Pyinstaller worked correctly when the author of this tutorial installed Python using Homebrew, installed Pyinstaller using Homebrew, and then ran the above build command in a terminal using the Homebrew version of Python (rather than, for example, an “activated” environment in Anaconda).
Endnotes
-
This tutorial uses Qt Designer version 5.9.6. ↩
-
Carlyle, Thomas. The Moral Pheomena of Germany. London: Painter, 1845. Available in the public domain at HathiTrust. ↩