Contents
- Editor’s Note
- Lesson Goals
- What is Topic Modeling And For Whom is this Useful?
- Installing MALLET
- Typing in MALLET Commands
- Working with data
- Importing data
- Issues with Big Data
- Your first topic model
Editor’s Note
This lesson requires you to use the command line. If you have no previous experience using the command line you may find it helpful to work through the Programming Historian Bash Command Line lesson.
Lesson Goals
In this lesson you will first learn what topic modeling is and why you might want to employ it in your research. You will then learn how to install and work with the MALLET natural language processing toolkit to do so. MALLET involves modifying an environment variable (essentially, setting up a short-cut so that your computer always knows where to find the MALLET program) and working with the command line (ie, by typing in commands manually, rather than clicking on icons or menus). We will run the topic modeller on some example files, and look at the kinds of outputs that MALLET installed. This will give us a good idea of how it can be used on a corpus of texts to identify topics found in the documents without reading them individually.
Please see the MALLET users’ discussion list for the full range of things one can do with the software.
(We would like to thank Robert Nelson and Elijah Meeks for hints and tips in getting MALLET to run for us the first time, and for their examples of what can be done with this tool.)
What is Topic Modeling And For Whom is this Useful?
A topic modeling tool takes a single text (or corpus) and looks for patterns in the use of words; it is an attempt to inject semantic meaning into vocabulary. Before you begin with topic modeling, you should ask yourself whether or not it is likely to be useful for your project. Matthew Kirschenbaum’s Distant Reading (a talk given at the 2009 National Science Foundation Symposium on the Next Generation of Data Mining and Cyber-Enabled Discovery for Innovation) and Stephen Ramsay’s Reading Machines are good places for beginning to understand in which circumstances a technique such as this could be most effective. As with all tools, just because you can use it, doesn’t necessarily mean that you should. If you are working with a small number of documents (or even a single document) it may well be that simple frequency counts are sufficient, in which case something like Voyant Tools might be appropriate. However, if you have hundreds of documents from an archive and you wish to understand something of what the archive contains without necessarily reading every document, then topic modeling might be a good approach.
Topic models represent a family of computer programs that extract topics from texts. A topic to the computer is a list of words that occur in statistically meaningful ways. A text can be an email, a blog post, a book chapter, a journal article, a diary entry – that is, any kind of unstructured text. By unstructured we mean that there are no computer-readable annotations that tell the computer the semantic meaning of the words in the text.
Topic modeling programs do not know anything about the meaning of the words in a text. Instead, they assume that any piece of text is composed (by an author) by selecting words from possible baskets of words where each basket corresponds to a topic. If that is true, then it becomes possible to mathematically decompose a text into the probable baskets from whence the words first came. The tool goes through this process over and over again until it settles on the most likely distribution of words into baskets, which we call topics.
There are many different topic modeling programs available; this tutorial uses one called MALLET. If one used it on a series of political speeches for example, the program would return a list of topics and the keywords composing those topics. Each of these lists is a topic according to the algorithm. Using the example of political speeches, the list might look like:
- Job Jobs Loss Unemployment Growth
- Economy Sector Economics Stock Banks
- Afghanistan War Troops Middle-East Taliban Terror
- Election Opponent Upcoming President
- et cetera
By examining the keywords we can discern that the politician who gave the speeches was concerned with the economy, jobs, the Middle East, the upcoming election, and so on.
As Scott Weingart warns, there are many dangers that face those who use topic modeling without fully understanding it. For instance, we might be interested in word use as a proxy for placement along a political spectrum. Topic modeling could certainly help with that, but we have to remember that the proxy is not in itself the thing we seek to understand – as Andrew Gelman demonstrates in his mock study of zombies using Google Trends. Ted Underwood and Lisa Rhody (see Further Reading) argue that we as historians would be better to think of these categories as discourses; however for our purposes here we will continue to use the word: topic.
Note: You will sometimes come across the term “LDA” when looking into the bibliography of topic modeling. LDA and Topic Model are often used synonymously, but the LDA technique is actually a special case of topic modeling created by David Blei and friends in 2002. It was not the first technique now considered topic modeling, but it is by far the most popular. The myriad variations of topic modeling have resulted in an alphabet soup of techniques and programs to implement them that might be confusing or overwhelming to the uninitiated; ignore them for now. They all work in much the same way. MALLET uses LDA.
Examples of topic models employed by historians:
- Rob Nelson, Mining the Dispatch
- Cameron Blevins, “Topic Modeling Martha Ballard’s Diary” Historying, April 1, 2010.
- David J Newman and Sharon Block, “Probabilistic topic decomposition of an eighteenth century American newspaper,” Journal of the American Society for Information Science and Technology vol. 57, no. 6 (April 1, 2006): 753-767.
Installing MALLET
There are many tools one could use to create topic models, but at the time of this writing (summer 2017) the simplest tool to run your text through is called MALLET. MALLET uses an implementation of Gibbs sampling, a statistical technique meant to quickly construct a sample distribution, to create its topic models. MALLET requires using the command line – we’ll talk about that more in a moment, although you typically use the same few commands over and over.
The installation instructions are different for Windows and Mac. Follow the instructions appropriate for you below:

Windows Instructions
- Go to the MALLET project page. You can download MALLET here.
- You will also need the Java developer’s kit – that is, not the regular Java that’s on every computer, but the one that lets you program things. Install this on your computer.
- Unzip MALLET into your
C:directory . This is important: it cannot be anywhere else. You will then have a directory calledC:\mallet-2.0.8or similar. For simplicity’s sake, rename this directory justmallet. - MALLET uses an environment variable to tell the computer where to find all the various components of its processes when it is running. It’s rather like a shortcut for the program. A programmer cannot know exactly where every user will install a program, so the programmer creates a variable in the code that will always stand in for that location. We tell the computer, once, where that location is by setting the environment variable. If you moved the program to a new location, you’d have to change the variable.
To create an environment variable in Windows 10, click Start (Windows icon) or press the Windows key on your keyboard then type ‘Control Panel’. Within Control Panel, select System and Security. In System and Security, type ‘Advanced’ into the search field (upper right) and choose ‘View advanced system settings’ from the results. In the pop-up dialogue box, click ‘Environmental Variables’. Next, click ‘New’ and type MALLET_HOME in the variable name
box (Figures 1,2,3). It must be like this – all caps, with an underscore – since that is
the shortcut that the programmer built into the program and all of its
subroutines. Then type the exact path (location) of where you unzipped
MALLET in the variable value, e.g., c:\mallet.
To see if you have been successful, please read on to the next section.
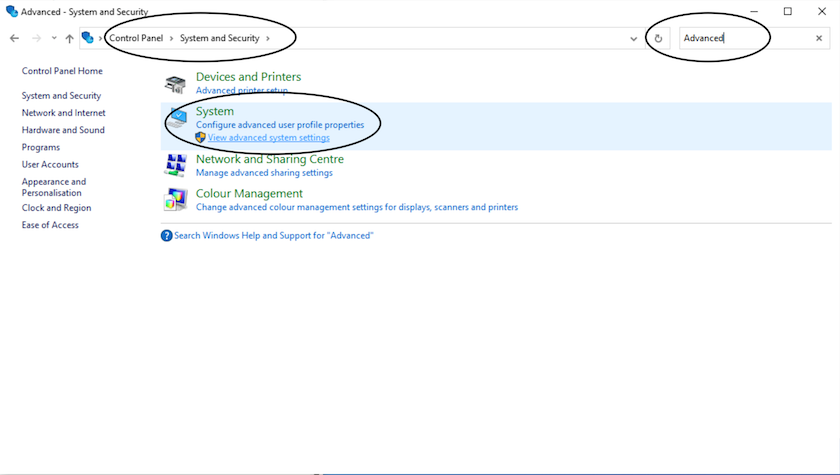
Figure 1: Advanced System Settings on Windows
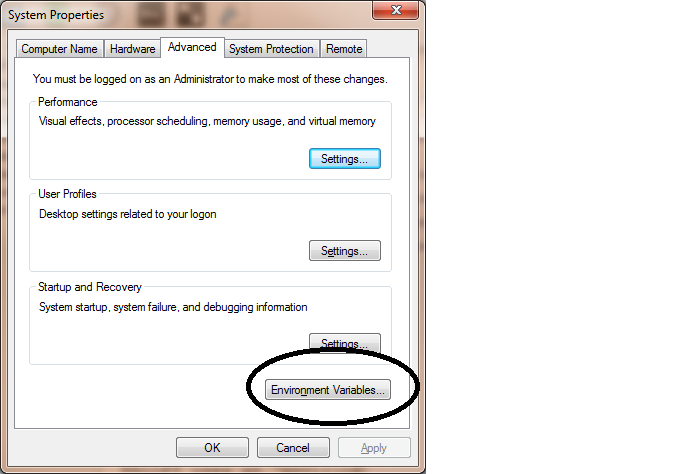
Figure 2: Environment Variables Location

Figure 3: Environment Variable
Running MALLET using the Command Line
MALLET is run from the command line, also known as Command Prompt (Figure 4). If you remember MS-DOS, or have ever played with a Unix computer Terminal, this will be familiar. The command line is where you can type commands directly, rather than clicking on icons and menus.
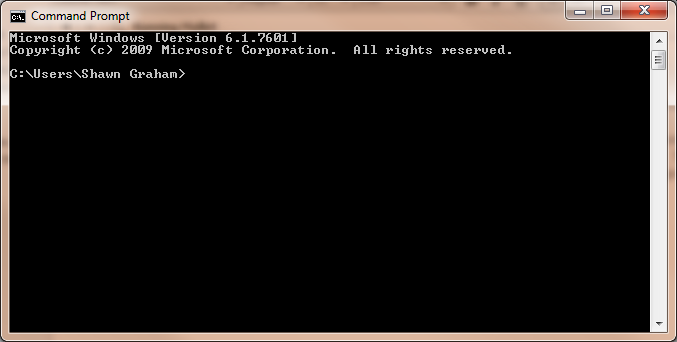
Figure 4: Command Prompt on Windows
- Click on your
Start Menu -> All Programs -> Accessories -> Command Prompt.
You’ll get the command prompt window, which will have a cursor atc:\user\user>(or similar; see Figure 4). - Type
cd ..(That is: cd-space-period-period) to change directory. Keep doing this until you’re at theC:\. (as in Figure 5)
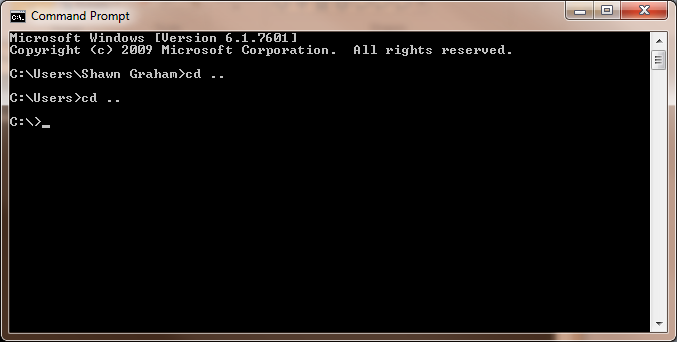
Figure 5: Navigating to the C:\ Directory in Command Prompt
- Then type
cd malletand you are in the MALLET directory. Anything you type in the command prompt window is a command. There are commands likecd(change directory) anddir(list directory contents) that the computer understands. You have to tell the computer explicitly that ‘this is a MALLET command’ when you want to use MALLET. You do this by telling the computer to grab its instructions from the MALLET bin, a subfolder in MALLET that contains the core operating routines. - Type
bin\malletas in Figure 6. If all has gone well, you should be presented with a list of MALLET commands – congratulations! If you get an error message, check your typing. Did you use the wrong slash? Did you set up the environment variable correctly? Is MALLET located atC:\mallet?
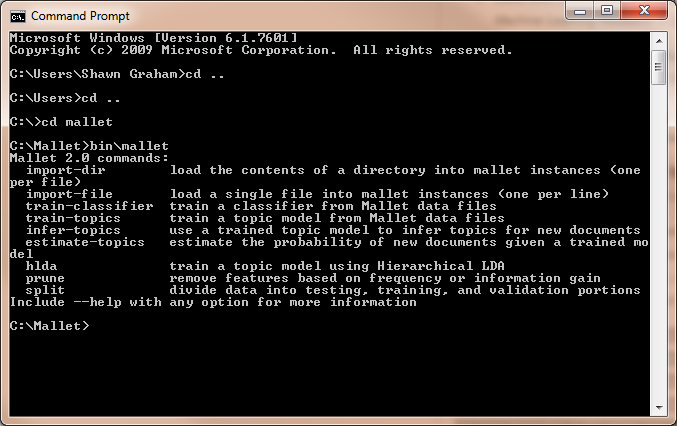
Figure 6: Command Prompt MALLET Installed
You are now ready to skip ahead to the next section.

Mac Instructions
Many of the instructions for OS X installation are similar to Windows, with a few differences. In fact, it is a bit easier.
- Download and install MALLET.
- Download the Java Development Kit.
Unzip MALLET into a directory on your system (for ease of following
along with this tutorial, your /user/ directory works but anywhere is
okay). Once it is unzipped, open up your Terminal window (in the
Applications directory in your Finder. Navigate to the directory where
you unzipped MALLET using the Terminal (it will be mallet-2.0.8 . If
you unzipped it into your /user/ directory as was suggested in this
lesson, you can navigate to the correct directory by typing
cd mallet-2.0.8). cd is short for “change directory” when working in
the Terminal.
The same command will suffice to run commands from this directory,
except you need to append ./ (period-slash) before each command. This
needs to be done before all MALLET commands when working on a Mac.
Going forward, the commands for MALLET on a Mac will be nearly
identical to those on Windows, except for the direction of slashes
(there are a few other minor differences that will be noted when they
arise). If on Windows a command would be \bin\mallet, on a Mac you
would instead type:
./bin/mallet
A list of commands should appear. If it does, congratulations – you’ve installed it correctly!
Typing in MALLET Commands
Now that you have MALLET installed, it is time to learn what commands are available to use with the program. There are nine MALLET commands you can use (see Figure 6 above). Sometimes you can combine multiple instructions. At the Command Prompt or Terminal (depending on your operating system), try typing:
import-dir --help
You are presented with the error message that import-dir is not
recognized as an internal or external command, operable program, or
batch file. This is because we forgot to tell the computer to look in
the MALLET bin for it. Try again, with
bin\mallet import-dir --help
Remember, the direction of the slash matters (See Figure 7, which
provides an entire transcript of what we have done so far in the
tutorial). We checked to see that we had installed MALLET by typing in
bin\mallet. We then made the mistake with import-dir a few lines
further down. After that, we successfully called up the help file, which
told us what import-dir does, and it listed all of the potential
parameters you can set for this tool.
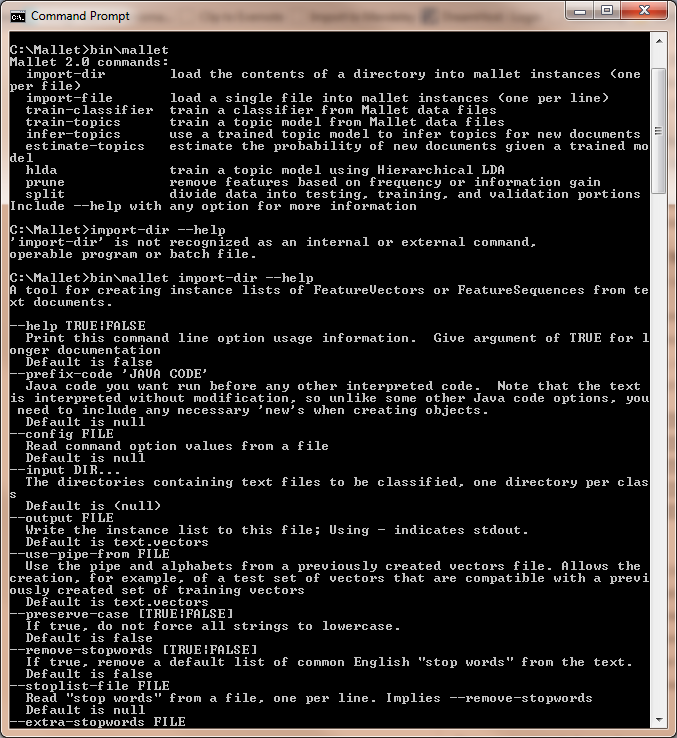
Figure 7: The Help Menu in MALLET
Note: there is a difference in MALLET commands between a single hyphen
and a double hyphen. A single hyphen is simply part of the name; it
replaces a space (e.g., import-dir rather than import dir), since
spaces offset multiple commands or parameters. These parameters let us
tweak the file that is created when we import our texts into MALLET. A
double hyphen (as with –-help above) modifies, adds a sub-command, or
specifies some sort of parameter to the command.
For Windows users, if you got the error ‘exception in thread “main”
java.lang.NoClassDefFoundError:’ it might be because you installed
MALLET somewhere other than in the C:\ directory. For instance,
installing MALLET at C:\Program Files\mallet will produce this error
message. The second thing to check is that your environment variable is
set correctly. In either of these cases, check the Windows installation
instructions and double check that you followed them properly.
Working with data
MALLET comes pre-packaged with sample .txt files with which you can
practice. Type dir at the C:\mallet> prompt, and you are given the
listing of the MALLET directory contents. One of those directories is
called sample-data. You know it is a directory because it has the word
<dir> beside it.
Type cd sample-data. Type dir again. Using what you know, navigate
to first the web then the en directories. You can look inside these
.txt files by typing the full name of the file (with extension).
Note that you cannot now run any MALLET commands from this directory. Try it:
bin\mallet import-dir --help
You get the error message. You will have to navigate back to the main MALLET folder to run the commands. This is because of the way MALLET and its components are structured.
Importing data
In the sample data directory, there are a number of .txt files. Each
one of these files is a single document, the text of a number of
different web pages. The entire folder can be considered to be a corpus
of data. To work with this corpus and find out what the topics are that
compose these individual documents, we need to transform them from
several individual text files into a single MALLET format file.
MALLET can import more than one file at a time. We can import the
entire directory of text files using the import command. The commands
below import the directory, turn it into a MALLET file, keep the
original texts in the order in which they were listed, and strip out the
stop words (words such as and, the, but, and if that occur in
such frequencies that they obstruct analysis) using the default English
stop-words dictionary. Try the following, which will use sample data.
bin\mallet import-dir --input sample-data\web\en --output tutorial.mallet --keep-sequence --remove-stopwords
If you type dir now (or ls for Mac), you will find a file called
tutorial.mallet. (If you get an error message, you can hit the cursor
up key on your keyboard to recall the last command you typed, and look
carefully for typos). This file now contains all of your data, in a
format that MALLET can work with.
Try running it again now with different data. For example, let’s imagine we wanted to use the German sample data instead. We would use:
bin\mallet import-dir --input sample-data\web\de --output tutorial.mallet --keep-sequence --remove-stopwords
And then finally, you could use your own data. Change sample-data\web\de to a directory that contains your own research files. Good luck!
If you are unsure how directories work, we suggest the Programming Historian lesson “Introduction to the Bash Command Line”.
For Mac
Mac instructions are similar to those above for Windows, but note some of the differences below:
./bin/mallet import-dir --input sample-data/web/en --output tutorial.mallet --keep-sequence --remove-stopwords
Issues with Big Data
If you’re working with large file collections – or indeed, very large files – you may run into issues with your heap space, your computer’s working memory. This issue will initially arise during the import sequence, if it is relevant. By default, MALLET allows for 1GB of memory to be used. If you run into the following error message, you’ve run into your limit:
Exception in thread "main" java.lang.OutOfMemoryError: Java heap space
If your system has more memory, you can try increasing the memory
allocated to your Java virtual machine. To do so, you need to edit the
code in the mallet file found in the bin subdirectory of your
MALLET folder. Using Komodo Edit, (See Mac,
Windows, Linux for installation instructions), open the
Mallet.bat file (C:\Mallet\bin\mallet.bat) if you are using Windows,
or the mallet file (~/Mallet/bin/mallet) if you are using Linux or OS X.
Find the following line:
MEMORY=1g
You can then change the 1g value upwards – to 2g, 4g, or even higher depending on your system’s RAM, which you can find out by looking up the machine’s system information.
Save your changes. You should now be able to avoid the error. If not, increase the value again.
Your first topic model
At the command prompt in the MALLET directory, type:
bin\mallet train-topics --input tutorial.mallet
This command opens your tutorial.mallet file, and runs the topic model
routine on it using only the default settings. As it iterates through
the routine, trying to find the best division of words into topics, your
command prompt window will fill with output from each run. When it is
done, you can scroll up to see what it was outputting (as in Figure 8).
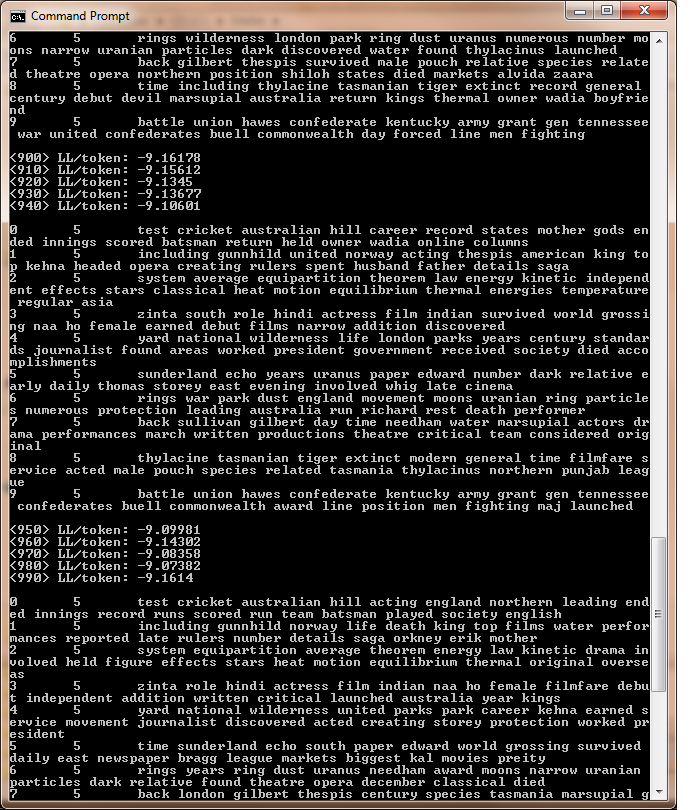
Figure 8: Basic Topic Model Output
The computer is printing out the key words, the words that help define a statistically significant topic, per the routine. In Figure 8, the first topic it prints out might look like this (your key words might look a bit different):
0 5 test cricket Australian hill acting England northern leading ended innings record runs scored run team batsman played society English
If you are a fan of cricket, you will recognize that all of these words
could be used to describe a cricket match. What we are dealing with here
is a topic related to Australian cricket. If you go to
C:\mallet\sample-data\web\en\hill.txt, you will see that this file is
a brief biography of the noted Australian cricketer Clem Hill. The 0 and
the 5 we will talk about later in the lesson. Note that MALLET
includes an element of randomness, so the keyword lists will look
different every time the program is run, even if on the same set of
data.
Go back to the main MALLET directory, and type dir. You will see
that there is no output file. While we successfully created a topic
model, we did not save the output! At the command prompt, type
bin\mallet train-topics --input tutorial.mallet --num-topics 20 --output-state topic-state.gz --output-topic-keys tutorial_keys.txt --output-doc-topics tutorial_compostion.txt
Here, we have told MALLET to create a topic model (train-topics) and
everything with a double hyphen afterwards sets different parameters
This command
- opens your
tutorial.malletfile - trains MALLET to find 20 topics
- outputs every word in your corpus of materials and the topic it
belongs to into a compressed file (
.gz; see www.gzip.org on how to unzip this) - outputs a text document showing you what the top key words are for
each topic (
tutorial_keys.txt) - and outputs a text file indicating the breakdown, by percentage, of
each topic within each original text file you imported
(
tutorial_composition.txt). (To see the full range of possible parameters that you may wish to tweak, typebin\mallet train-topics –-helpat the prompt.)
Type dir. Your outputted files will be at the bottom of the list of
files and directories in C:\Mallet. Open tutorial_keys.txt in a word
processor (Figure 9). You are presented with a series of paragraphs. The
first paragraph is topic 0; the second paragraph is topic 1; the third
paragraph is topic 2; etc. (The output begins counting at 0 rather than
1; so if you ask it to determine 20 topics, your list will run from 0 to
19). The second number in each paragraph is the Dirichlet parameter for
the topic. This is related to an option which we did not run, and so its
default value was used (this is why every topic in this file has the
number 2.5).
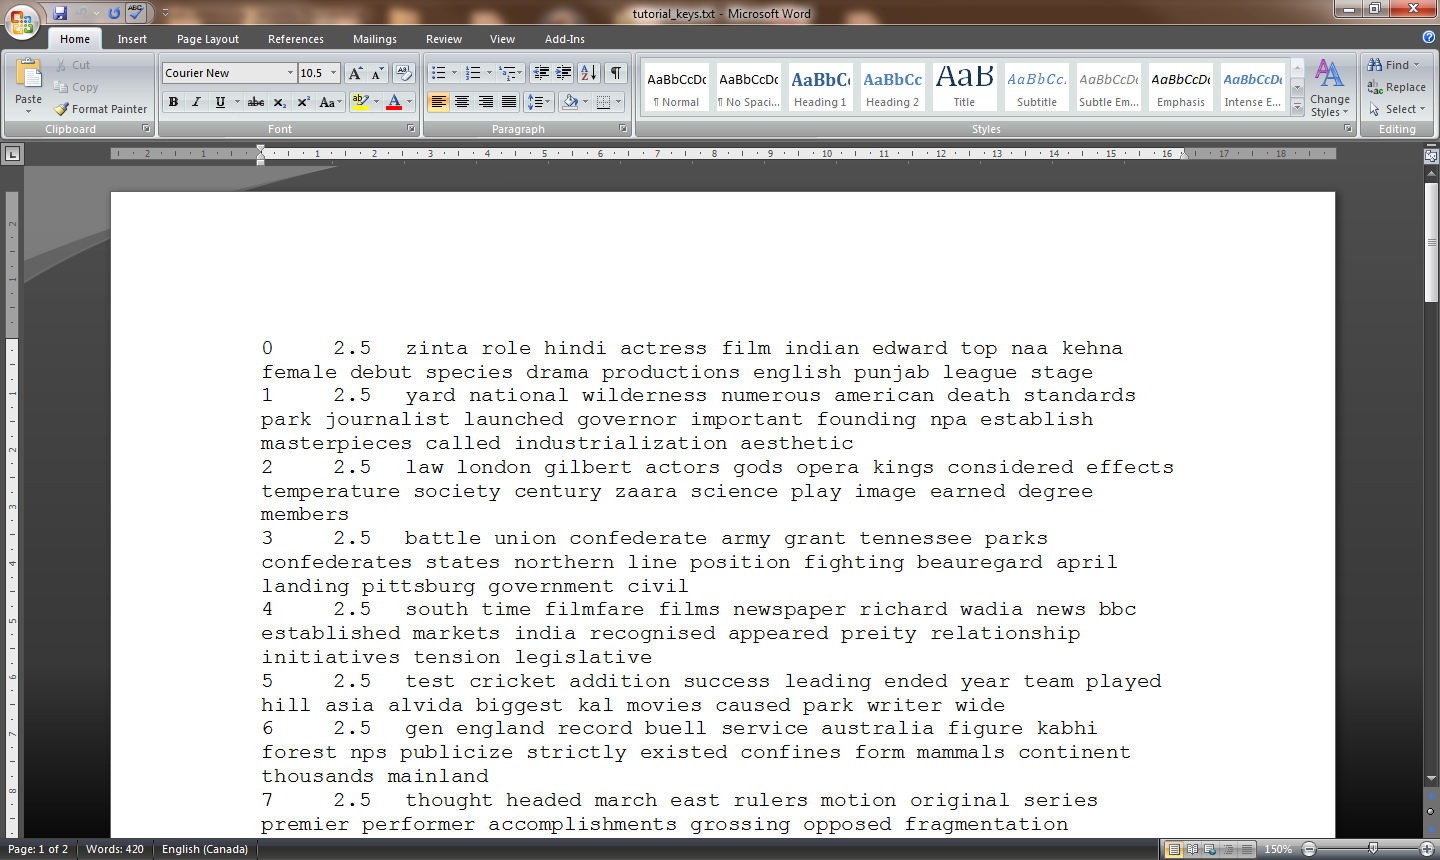
Figure 9: Keywords Shown in a Word Processor
If when you ran the topic model routine you had included
--optimize-interval 20
as below
bin\mallet train-topics --input tutorial.mallet --num-topics 20 --optimize-interval 20 --output-state topic-state.gz --output-topic-keys tutorial_keys.txt --output-doc-topics tutorial_composition.txt
the output might look like this:
0 0.02995 xi ness regular asia online cinema established alvida acclaim veenr commercial
That is, the first number is the topic (topic 0), and the second number
gives an indication of the weight of that topic. In general, including
-–optimize-interval leads to better topics.
The composition of your documents
What topics compose your documents? The answer is in the
tutorial_composition.txt file. To stay organized, import the
tutorial_composition.txt file into a spreadsheet (Excel, Open Office,
etc). You will have a spreadsheet with a #doc, source, topic,
proportion columns. All subsequent columns run topic, proportion, topic,
proportion, etc., as in figure 10.
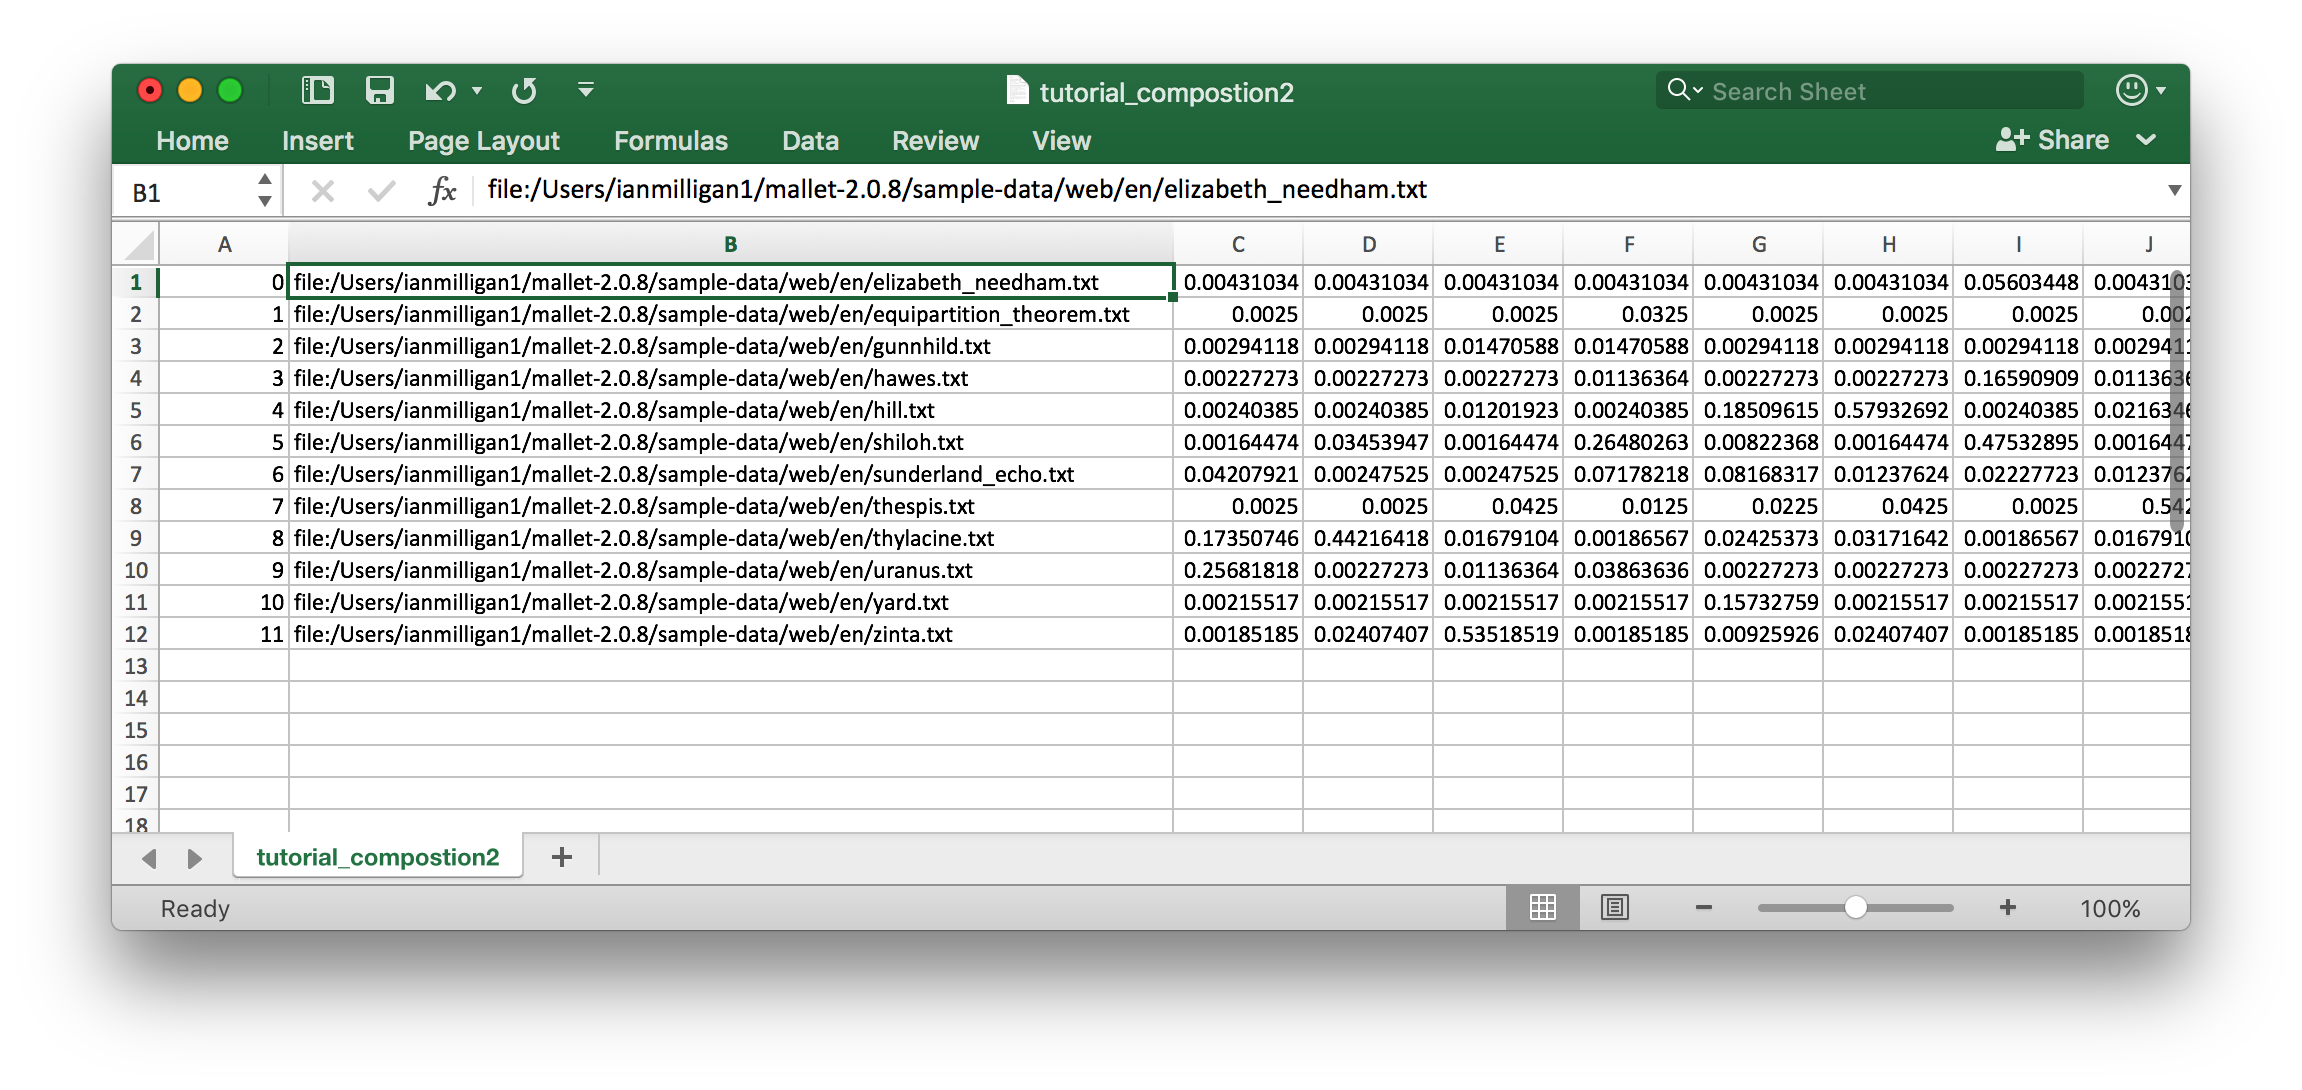
Figure 10: Topic Composition
This can be a somewhat difficult file to read. The topics begin in the third column, in this case Column C, and continue until the last topic in Column V. This is because we have trained 20 topics – if we trained 25, for example, they would run until column AA.
From this, you can see that doc# 0 (ie, the first document loaded into MALLET),
elizabeth_needham.txt has topic 0 at a percentage of 0.43% (column C).
We can see that topic 17 is the principal topic, at 59.05%, by locating the highest
value. Your own topics may be different given the nature of MALLET.
If you have a corpus of text files that are arranged in chronological
order (e.g., 1.txt is earlier than 2.txt), then you can graph this
output in your spreadsheet program, and begin to see changes over time,
as Robert Nelson has done in Mining the Dispatch.
How do you know the number of topics to search for? Is there a natural
number of topics? What we have found is that one has to run the
train-topics with varying numbers of topics to see how the composition
file breaks down. If we end up with the majority of our original texts
all in a very limited number of topics, then we take that as a signal
that we need to increase the number of topics; the settings were too
coarse. There are computational ways of searching for this, including
using MALLETs hlda command, but for the reader of this tutorial, it is
probably just quicker to cycle through a number of iterations (but for
more see Griffiths, T. L., & Steyvers, M. (2004). Finding scientific
topics. Proceedings of the National Academy of Science, 101, 5228-5235).
Getting your own texts into MALLET
The sample data folder in MALLET is your guide to how you should
arrange your texts. You want to put everything you wish to topic model
into a single folder within c:\mallet, ie c:\mallet\mydata. Your
texts should be in .txt format (that is, you create them with Notepad,
or in Word choose Save As -> MS Dos text). You have to make some
decisions. Do you want to explore topics at a paragraph by paragraph
level? Then each txt file should contain one paragraph. Things like
page numbers or other identifiers can be indicated in the name you give
the file, e.g., pg32_paragraph1.txt. If you are working with a diary,
each text file might be a single entry, e.g., april_25_1887.txt. (Note
that when naming folders or files, do not leave spaces in the name.
Instead use underscores to represent spaces). If the texts that you are
interested in are on the web, you might be able to automate this
process.
Further Reading about Topic Modeling
To see a fully worked out example of topic modeling with a body of materials culled from webpages, see Mining the Open Web with Looted Heritage Draft.
You can grab the data for yourself at Figshare.com, which includes a
number of .txt files. Each individual .txt file is a single news
report.
- For extensive background and bibliography on topic modeling you may wish to begin with Scott Weingart’s Guided Tour to Topic Modeling
- Ted Underwood’s ‘Topic modeling made just simple enough’ is an important discussion on interpreting the meaning of topics.
- Lisa Rhody’s post on interpreting topics is also illuminating. ‘Some Assembly Required’ Lisa @ Work August 22, 2012.
- Clay Templeton, ‘Topic Modeling in the Humanities: An Overview | Maryland Institute for Technology in the Humanities’, n.d.
- David Blei, Andrew Ng, and Michael Jordan, ‘Latent dirichlet allocation,’ The Journal of Machine Learning Research 3 (2003).
- Finally, also consult David Mimno’s bibliography of topic modeling articles. They’re tagged by topic to make finding the right one for a particular application that much easier. Also take a look at his recent article on Computational Historiography from ACM Transactions on Computational Logic which goes through a hundred years of Classics journals to learn something about the field. While the article should be read as a good example of topic modeling, his ‘Methods’ section is especially important, in that it discusses preparing text for this sort of analysis.