This lesson is for you if you want to store large amounts of data from your digital history projects in a structured manner. We will use a database called MySQL to store data.
R can perform analysis and data storage without the use of a relational database. However, there are times when databases are very useful including:
- Placing the results of an R script on a web site where the data can be interacted with.
- Handling more data than R can store in memory alone.
- When data is stored in a relational database already.
- Working with the data of different entities that are related to one another. An example would be a database of soldiers of two different armies that fought a battle where we wanted to know what squad, platoon, company and brigade each soldier was part of.
A further short discussion of this is on Jason A. French’s blog1.
By the end of this lesson you will be able to install a database system on your computer, create a database table, store information in the table and then query the data. At the conclusion of the lesson we’ll use a query of the database to make a graph.
We are using the R computer language for the examples, but the techniques can be used with other languages such as Python.
To do this lesson you will need a computer where you have permission to install software such as R and RStudio, if you are not running that already. In addition to programming in R, we will be installing some components of a database system called MySQL which works on Windows, Mac and Linux.
Some knowledge of installing software as well as organizing data into fields is helpful for this lesson which is of medium difficulty.
Contents
- Introduction
- Required Software
- Create a database
- Add a table
- Create an R Script that connects to the database
- Storing data in a table with SQL
- Storing a comma separated value .csv file into a MySQL database
- Selecting data from a table with SQL using R
- Going further with MySQL
- Conclusion
- Credits
- References
- Endnotes
Introduction
MySQL is a relational database used to store and query information. This lesson will use the R language to provide a tutorial and examples to:
- Set up and connect to a table in MySQL.
- Store records to the table.
- Query the table.
In this tutorial you will make a database of newspaper stories that contain words from a search of a newspaper archive. The program will store the title, date published and URL of each story in a database. We’ll use another program to query the database and look for historically significant patterns. Sample data will be provided from the Welsh Newspapers Online newspaper archive. We are working toward having a list of stories we can query for information. At the end of the lesson, we will run a query to generate a graph of the number of newspaper stories in the database to see if there is a pattern that is significant.
Required Software
R, R Studio, MySQL Server and MySQL Workbench are the pieces of software required for this lesson. Notes on installing these software packages are below.
R
In their lesson Basic Text Processing in R2, Taylor Arnold and Lauren Tilton provide an excellent summary of the knowledge of R required for this lesson. Only basic knowledge of R is assumed. Taryn Dewar’s lesson ‘R Basics with Tabular Data’3 covers how to install R and become familiar with it.
Download R
You can download R from the Comprehensive R Archive Network. Click on the link that matches your computer’s operating system. Select base to install R for the first time. Once downloaded, click on the file to run the installer.
RStudio
Examples in this lesson use RStudio which is software used for writing and running R programs. This lesson was done using Version 1.0.153 of RStudio.
Download RStudio
Download and install RStudio from rstudio.com. Since RStudio is open source, you can select the free version of RStudio Desktop then scroll down and click on one of the Installers for Supported Platforms that match your computer’s operating system. Once downloaded, click on the file to run the installer.
MySQL
SQL stands for Structured Query Language which is a set of commands used to store and retrieve information using a relational database. MySQL is a type of relational database and there are many others such as Microsoft SQL Server, IBM DB2 and Microsoft Access. This lesson uses MySQL since it is open-source, used by a large community, has a long track record and has a freely downloadable version.
Downloading and Installing MySQL
In this section we are going to install MySQL, which is the system that holds the database, as well as MySQL Workbench which is where you will work to set up the structure of the database. To use MySQL, you don’t need MySQL Workbench, you can use typed commands. This lesson uses MySQL Workbench since it is a GUI that facilitates learning about MySQL.
Complete these instructions to install MySQL Community Server and MySQL Workbench on your computer.
MySQL Community Server
This is the server where the database is stored. It needs to be installed and started for you to connect to it and store data. Below we will download the files, install and start the server. This lesson was done using Version 5.7 of MySQL and 6.3 of MySQL Workbench.
Download install file for MySQL Community Server
Click on this link: https://dev.mysql.com/downloads/mysql/. Scroll down and click to Select Operating System that matches your computer. If necessary, Select OS Version. Once you have done that click the blue Download button. On the download page, scroll down, you have the option of starting the download by clicking No thanks, just start my download.
Installation of MySQL Community Server
Here are the MySQL Installation instructions: https://dev.mysql.com/doc/workbench/en/wb-installing.html
Below are tips on the installation for the PC and Mac:
Installation tips for a PC
Using the MySQL Installer for Windows is the recommended way to install the components of MySQL. Once the file is downloaded, double click on the downloaded file to install it. Follow the prompts to accept the licence. After the products are installed, you will be prompted for options:
1. Choosing a Setup Type
Select: Developer Default. This installs the MySQL Server and the tools required for MySQL application development. This is useful if you intend to develop applications for an existing server. (See below)
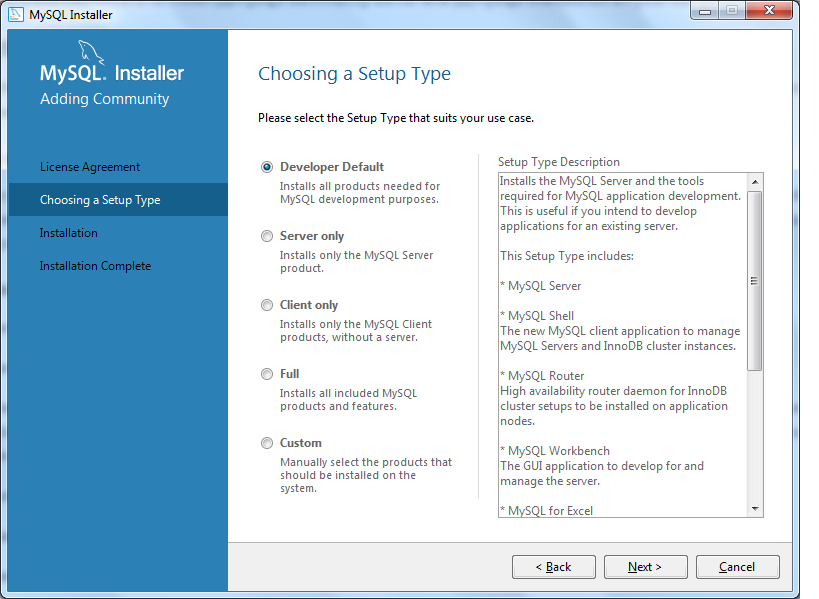
Setup Type Developer Default
2. Check Requirements
Click the Execute button if you have failing requirements listed under Check Requirements. Your list of requirements may be different than what is shown here. Once the execute process installs the missing requirements click the Next button. (See below)
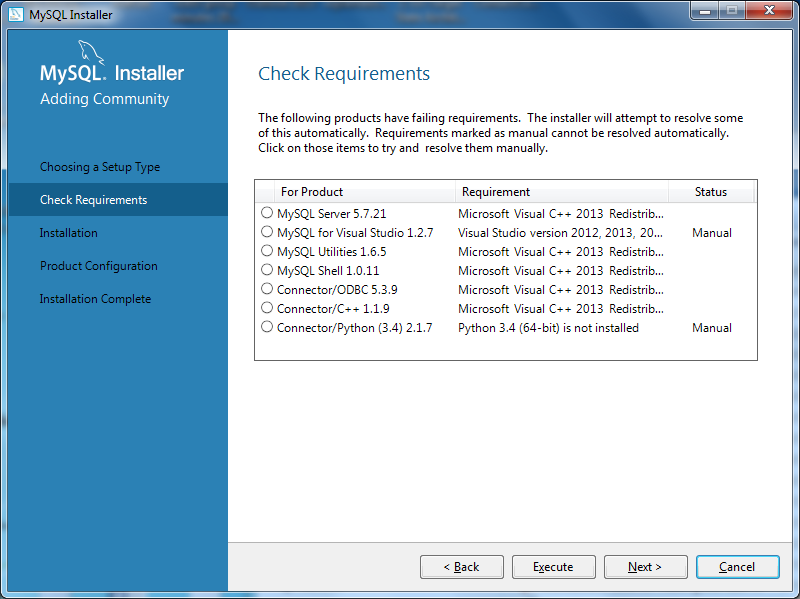
Click the Execute button if needed
3. Type and Networking
Select: Standalone MySQL Server (See below)
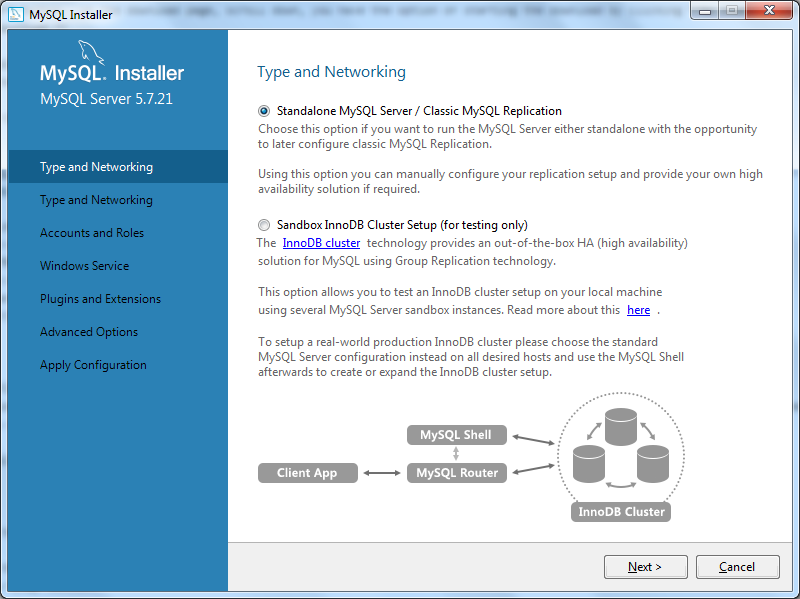
Select Standalone MySQL Server
4. Type and Networking
Config type: Select: Development Machine Check: TCP/IP. Port number: 3306. (See below)
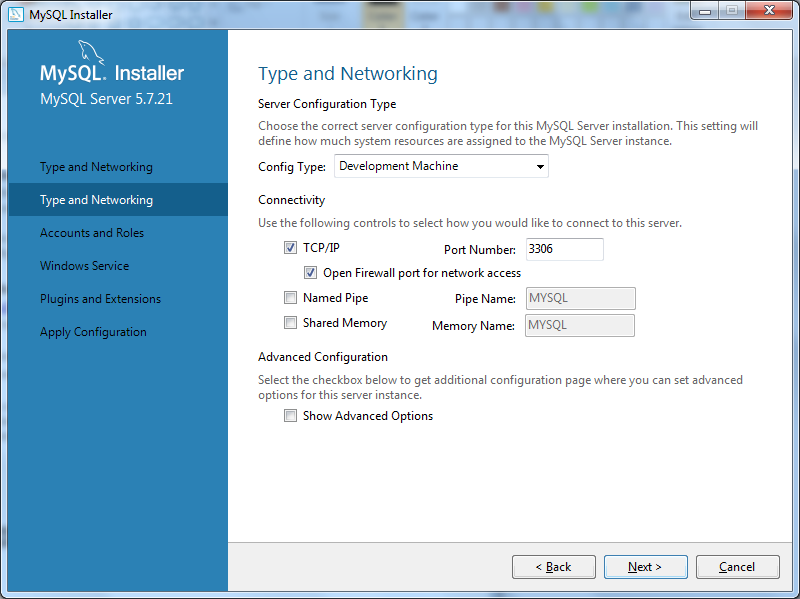
Development Machine TCPIP port 3306
5. Accounts and Roles
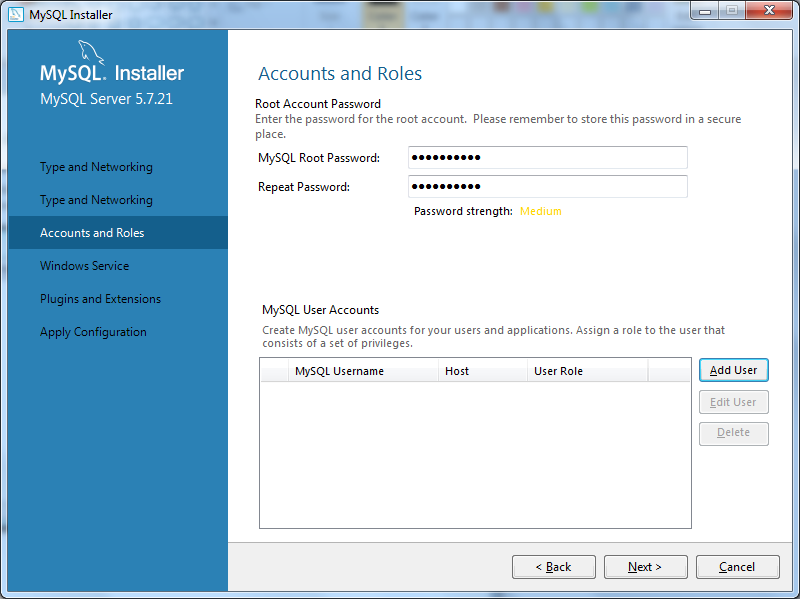
Write down and then type in a root password
6. Windows Service
Settings here are optional, but I find it easier to set up MySQL as a Windows Service and have it start automatically. A Windows Service is a process that runs on your computer while you are working. You can change your Windows Service settings later to start the MySQL service manually so that it does not start when you don’t need it.
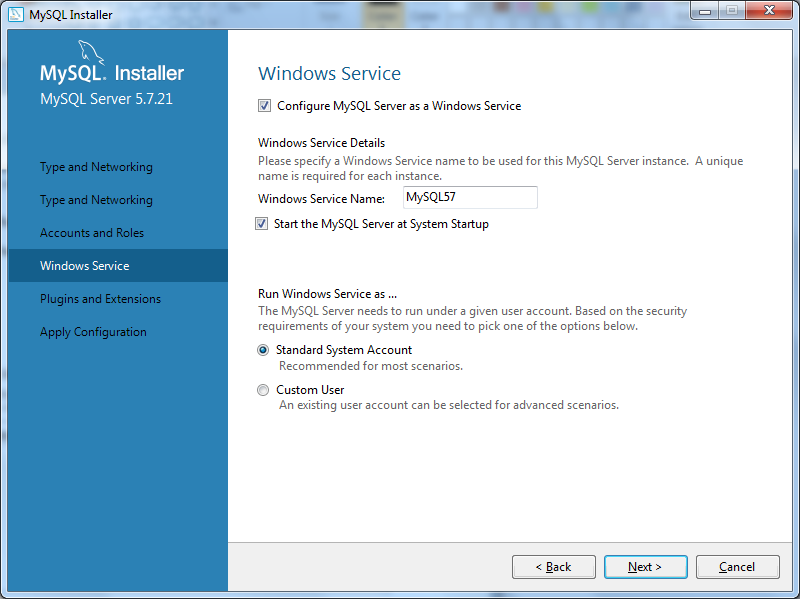
MySQL as a Windows Service
Click the Execute and Next buttons to finish the installation and start the server.
7. Root password
When prompted for the root password, enter the root password you wrote down in step 5. Accounts and Roles above. (See below)
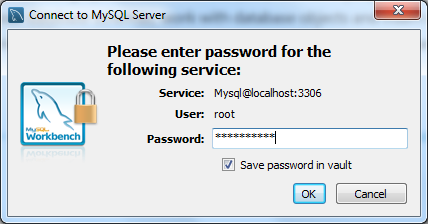
Root password
Look in the Start menu under MySQL for MySQL Workbench. If it is there, click to launch. If not, click on MySQL Installer - Community to re-run the installation and add MySQL Workbench to the installed products.
Installation tips for a Mac
1. Install MySQL Community Server
Once the MySQL Community Server install file is downloaded, double click on the downloaded file to install it. (See below)
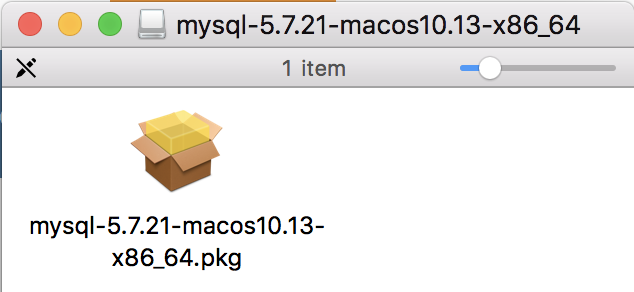
Install file
2. Write down temporary password
Follow the prompts to accept the licence and installation location. Important: There will be a prompt for a temporary password. Write this down carefully. (See below for an example. Your temporary password will be different than what is shown below.) If you make an error, you can remove the installed server and reinstall it, but that is a minor hassle. One of the lesson reviewers found this StackOverflow answer helpful for this part.
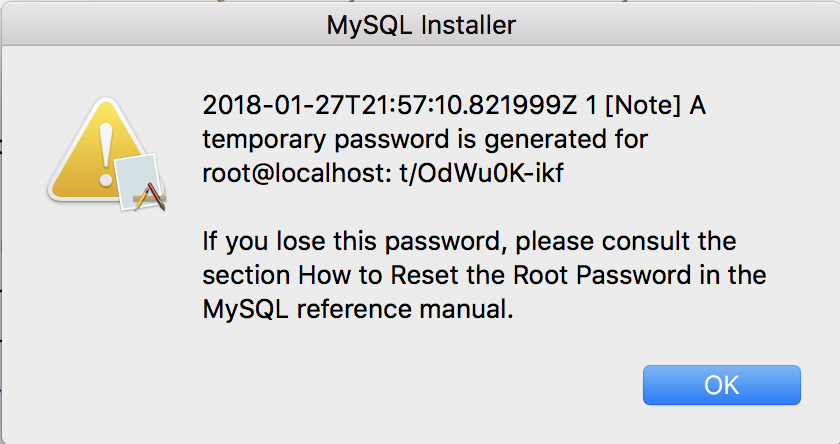
Temporary password
Once installed, we are going to change the root password for the MySQL server.
3. Change the root password for the MySQL server
This section of the lesson has caused difficulty for others. Take your time and please note that the MySQL commands end with a semicolon. Watch for them in some of the commands below.
3.1. Open a terminal window
3.2. Add /usr/local/mysql/bin to the PATH per the command below. The PATH is a list of directories the computer looks in when you type a command to run a program. In the next step below, when you run mysql, the PATH searches the directories it has for the mysql program. PATH finds mysql in the directory /usr/local/mysql/bin and runs it. PATH just saves typing the whole path, in this case /usr/local/mysql/bin/mysql, to a program when you want to run it.
export PATH=${PATH}:/usr/local/mysql/bin
3.3. Start the MySQL server.
Go to System Preferences > MySQL icon at bottom > click on “Start MySQL server”
3.4. Start a MySQL session. In the command below after –password enter the password you wrote down in step 2. Write down temporary password.
mysql --user=root --password=the_root_password_you_wrote_down_above
3.5. Set the root password to a new password. Choose and write down a new password carefully. At the mysql> prompt enter this command, replacing the password inside single quotes in the SET PASSWORD=PASSWORD(‘password’) command with the new password you have written down.
SET PASSWORD=PASSWORD('your_new_password_you_just_wrote_down_in_step_3.5');
3.6. Restart the machine. After restarting the machine you may need to repeat step 3.3 Start the MySQL server above.
MySQL Workbench downloads
Click on this link: http://dev.mysql.com/downloads/workbench/. Scroll down and click to Select Operating System that matches your computer. If necessary, Select OS Version. Once you have done that click the blue Download button. On the download page, scroll down, you have the option of starting the download by clicking No thanks, just start my download.
Once the file is downloaded, double click on the downloaded file to install it. Once the installation of MySQL Workbench is done, as per the instructions on the screen, drag the icon to the Applications folder on the left. (See below)
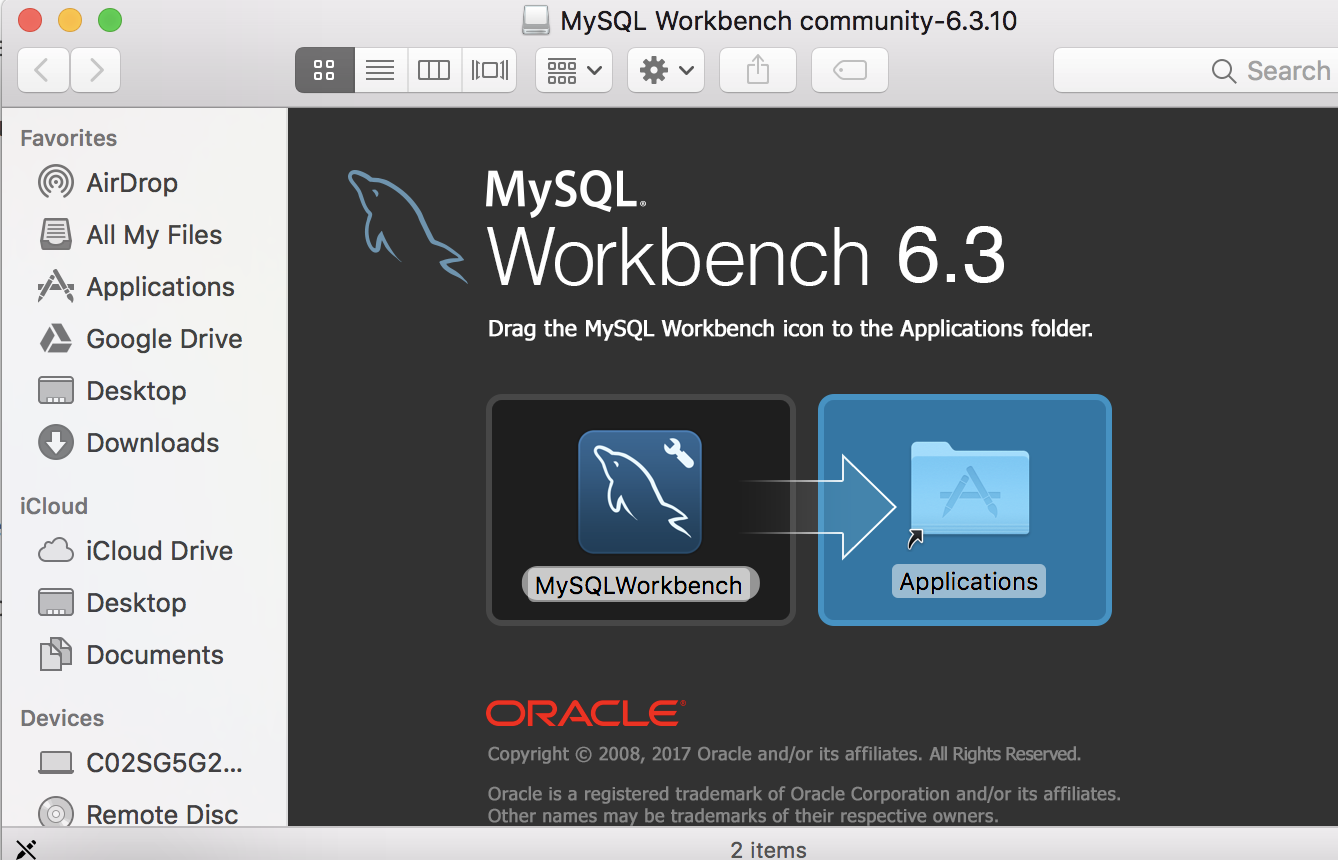
MySQL Workbench
Create a database
Here we will create a database which serves as a container for the tables we will store our information into. A table is the structure that holds the data we want to store. Tables hold many rows of records. An example record of basic contact information would contain fields for name, phone number and e-mail address. In a table, fields are organized into columns.
Here is a sample table with a row of data that represents a record.
| name | phone number | e-mail address |
|---|---|---|
| Pat Abraham | 613-555-1212 | pat@zmail.ca |
Open MySQL Workbench
Open MySQL Workbench. Double-click on the Local Instance MySQL57. (on a Mac this may appear as Local Instance 3306.) You may be prompted for the root password created in steps above. After opening the Local Instance MySQL57 you should see a screen similar to the picture below. On some Macs, a Query Tab will already be open; if it is not, open a Query Tab by doing File > New Query Tab.
CREATE DATABASE
Now we will create a new database. Using MySQL Workbench perform these steps:
- In the Query window type:
CREATE DATABASE newspaper_search_results; - Run the CREATE DATABASE command. Click on the lightning bolt or using the menu, click Query and then Execute Current Statement.
- The new database newspaper_search_results should be visible under SCHEMAS, on the lower left of the screen. If you don’t already see an item called newspaper_search_results, click the refresh icon. (See screenshot below.)
(See below:)
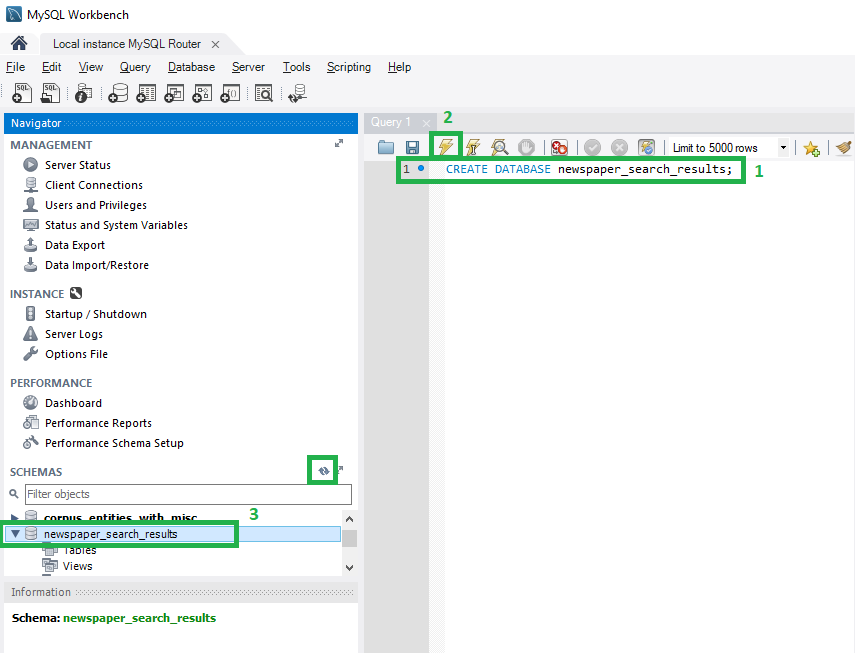
CREATE a database in MySQL Workbench
USE database
Next, we will enter a USE statement to inform MySQL Workbench which database to use. This becomes more important when you have you have more than one database on your machine.
In the Query window, delete all of the CREATE DATABASE command and type:
USE newspaper_search_results;
Again, click on the lightning bolt or using the menu, click Query and then Execute Current Statement. You can also use a keyboard command for this. On Mac it is Command+Return. On a PC use Ctrl+Shift+Enter. From this point on in the lesson, each time you enter a command into the Query Window you will run it this way.
(See below:)
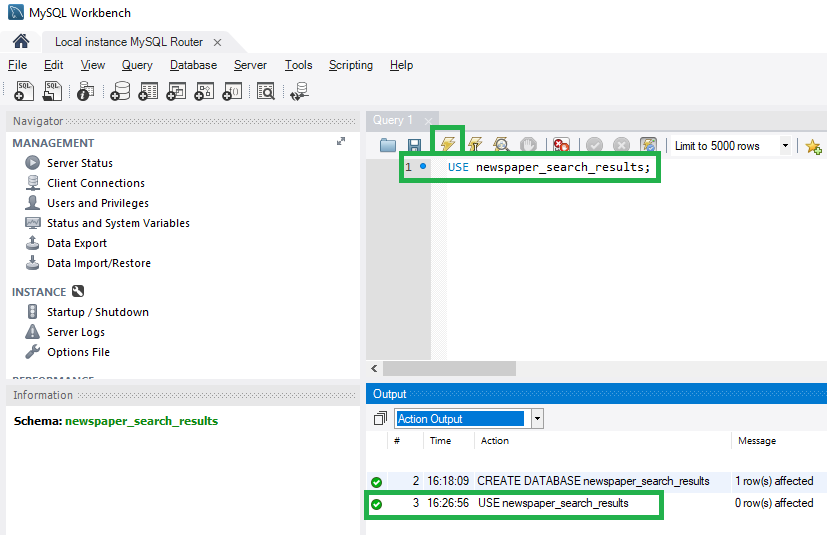
USE a database in MySQL Workbench
Add a table
- In MySQL Workbench, look in the left side in the Navigator panel, under SCHEMAS for newspaper_search_results.
- Right-click on Tables and click Create Table.
- for Table Name: type tbl_newspaper_search_results
Add columns to the table
Add these columns:
- id Data type: INT. Click PK (Primary Key), NN (Not Null) and AI (Auto Increment). This id column will be used to relate records in this table to records in other tables.
- story_title Data type: VARCHAR(99). This column will store the title of each article result we gather from the search.
- story_date_published Data type: DATETIME. This column will store the date the newspaper was published.
- story_url Data type: VARCHAR(99). This column will store the URL of each result we gather from the search.
- search_term_used Data type: VARCHAR(45). This column will store the word we used to search the newspapers. Click the Apply button.
All of the above steps can be done with a command if you prefer. This command could be run in the Query window to create the table with the columns noted below.
CREATE TABLE newspaper_search_results.tbl_newspaper_search_results (
id INT NOT NULL AUTO_INCREMENT,
story_title VARCHAR(99) NULL,
story_date_published DATETIME NULL,
story_url VARCHAR(99) NULL,
search_term_used VARCHAR(45) NULL,
PRIMARY KEY (id));
Tip: Take your time to think about table design and naming since a well designed database will be easier to work with and understand.
Add a user to connect to the database
A user is an account that has permission to connect to a database. Below, we are adding a new user so that this account connects only to the new database. Using this user account for one connection to this database limits exposure to other databases in case the password for this user is compromised. Giving a user the least privileges it needs to perform what you need it to do reduces the risk if someone else learns your user’s password. For example, if a user can only read a database, it is less of a risk if the password is cracked than for a user that can also change or delete the database.
In the MySQL Workbench menu click Server and then Users and Privileges
Mac users Some Mac computers, like my testing laptop, don’t display the Schema Privileges panel correctly. See the note below the screenshot if this happens to you.
Click the Add Account button and complete the Details for account newuser dialog box:
- Login Name: newspaper_search_results_user
- Authentication Type: select Standard
- Limit to Hosts Matching: localhost
- Enter and confirm a password SomethingDifficult
- Click on the Administrative Roles tab. Make sure nothing is checked. This account is for accessing the database only.
- Click on the Schema Privileges tab and click Add Entry
- In the New Schema Privilege Definition diablog box, click the Selected schema: radio button and select newspaper_search_results.
- Click all of the Object Rights: SELECT, INSERT, UPDATE, DELETE, EXECUTE, SHOW VIEW as per the image below. (This user will need to do many things later in the lesson so we are giving it many rights.)
- Click the Apply button.
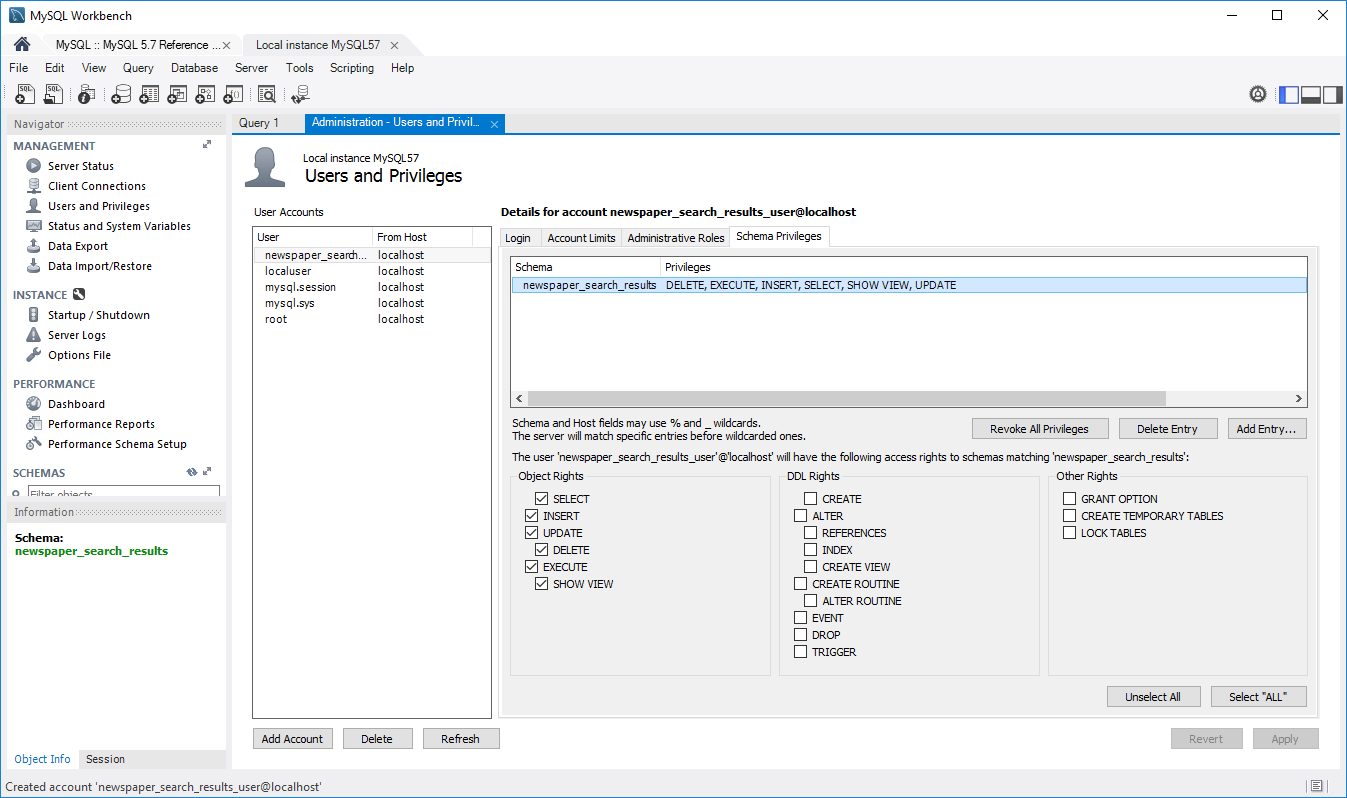
Setting permissions for new account
Schema Privileges not displaying
Some Mac computers, like my testing laptop, don’t display the Schema Privileges panel correctly. In that case, you can accomplish the above with a script using the Query Window.
If you have already created the user above run this command to grant the user privileges:
GRANT SELECT, INSERT, UPDATE, DELETE, EXECUTE, SHOW VIEW ON newspaper_search_results.* TO 'newspaper_search_results_user'@'localhost';
If you have not created a user yet run these two commands to create the user and then grant the user privileges:
CREATE USER 'newspaper_search_results_user'@'localhost' IDENTIFIED BY 'SomethingDifficult';
GRANT SELECT, INSERT, UPDATE, DELETE, EXECUTE, SHOW VIEW ON newspaper_search_results.* TO 'newspaper_search_results_user'@'localhost';
MySQL version 8 and user Authentication Type.
When a user is created in MySQL 8 Workbench the Authentication Type is defaulted to caching_sha2_password. That type of authentication causes an error for the R package we will use to connect to the database later in this lesson. The error is Authentication plugin ‘caching_sha2_password’ cannot be loaded and it is described in Stack Overflow.
To avoid this error we can change the user’s Authentication Type to Standard. To do this, run this command:
ALTER USER 'newspaper_search_results_user'@'localhost' IDENTIFIED WITH mysql_native_password BY 'SomethingDifficult';
Create an R Script that connects to the database
Open RStudio, which you installed earlier in this lesson. See the RStudio section.
We’ll now use RStudio to make a new R Script and save the script with the name newspaper_search.R. (Sometimes in this lesson I will refer to an R Script as a program.)
Go to File > New File > R Script, then save that new file with the name newspaper_search.R.
We will use the RMariaDB package to connect to MySQL. (If you’re curious, documentation for the RMariaDB package is here.)
If you don’t have the library RMariaDB installed (which is likely, if this is the first time you’re using RStudio), install it using the RStudio Console. After opening RStudio, copy and paste the following into the left window at the > prompt, then press enter:
install.packages("RMariaDB")
Add this statement to the newspaper_search.R program
library(RMariaDB)
Connecting to the database with a password
We will connect to the database at first using a password. (Later we’ll use a better way to connect.) For now, we will use a variable to store the password. Each time you start R you’ll need to reset this variable, but that is better than publishing a hardcoded password if you share your programs, like you may do using GitHub.
In the RStudio console type the command below, replacing SomethingDifficult with the password you created for newspaper_search_results_user in the steps you did above to add a user to connect to the database.
localuserpassword <- "SomethingDifficult"
Add the following R statements to your newspaper_search.R file and save it.
To run this script, select all the text and click the Run button. (There are other ways to run just a part of an R script or the whole script. If you are curious, look in the menu under Code > Run Region. CTRL+ALT+R will run all of the R code in the script.)
library(RMariaDB)
# The connection method below uses a password stored in a variable.
# To use this set localuserpassword="The password of newspaper_search_results_user"

storiesDb <- dbConnect(RMariaDB::MariaDB(), user='newspaper_search_results_user', password=localuserpassword, dbname='newspaper_search_results', host='localhost')
dbListTables(storiesDb)
dbDisconnect(storiesDb)
In the console you should see:
> dbListTables(storiesDb)
[1] "tbl_newspaper_search_results"
> dbDisconnect(storiesDb)
Success! you have:
- Connected to the database with dbConnect.
- Listed the table in the database with dbListTables.
- Disconnected from the database using dbDisconnect.
Connecting to the database with a password stored in a configuration file
The above example to connect is one way to make a connection. The connection method described below stores the database connection information in a configuration file so that you do not have to type a password into a variable every time you start a new session in R. I found this to be a finicky process, but it is a more standard and secure way of protecting the credentials used to log into your database. This connection method will be used in the code for the remainder of this tutorial, but it can be subsituted with the simpler connection method above if you prefer.
Create the .cnf file to store the MySQL database connection information
- Open a text editor, like notepad, nano or TextEdit, and paste in the items below, changing the password to the one you created for newspaper_search_results_user in the steps you did above to add a user to connect to the database.
[newspaper_search_results] user=newspaper_search_results_user password=SomethingDifficult host=127.0.0.1 port=3306 database=newspaper_search_results -
Save this file somewhere outside of your R working directory. I saved mine in the same folder as other MySQL settings files. On my PC machine this was: C:\ProgramData\MySQL\MySQL Server 5.7\ Depending on your operating system and version of MySQL this location may be somewhere else. On a Mac I used /Users/blackadar/Documents/ as the folder. I have tested putting this file in different places, it just needs to be somewhere R can locate it when the program runs. Name the file newspaper_search_results.cnf.
- Update the newspaper_search.R program above to connect to the database using the configuration file.
library(RMariaDB)
# The connection method below uses a password stored in a settings file.

# R needs a full path to find the settings file.
rmariadb.settingsfile<-"C:\\ProgramData\\MySQL\\MySQL Server 8.0\\newspaper_search_results.cnf"

rmariadb.db<-"newspaper_search_results"
storiesDb<-dbConnect(RMariaDB::MariaDB(),default.file=rmariadb.settingsfile,group=rmariadb.db)

# list the table. This confirms we connected to the database.
dbListTables(storiesDb)

# disconnect to clean up the connection to the database.
dbDisconnect(storiesDb)
- Run your script.
In the console, among other lines, you should see again:
> dbListTables(storiesDb)
[1] "tbl_newspaper_search_results"
You have successfully connected to the database using a configuration file.
Storing data in a table with SQL
In this section of the lesson we’ll create a SQL statement to insert a row of data into the database table about this newspaper story. We’ll insert the record first in MySQL workbench and later we’ll do it in R.
- In MySQL Workbench, click the icon labelled SQL+ to create a new SQL tab for executing queries.
- Paste this statement below into the query window. This will insert a record into the table.
INSERT INTO tbl_newspaper_search_results ( story_title, story_date_published, story_url, search_term_used) VALUES('THE LOST LUSITANIA.', '1915-05-21', LEFT(RTRIM('http://newspapers.library.wales/view/4121281/4121288/94/'),99), 'German+Submarine'); - Click the lightening bolt icon in the SQL tab to execute the SQL statement.
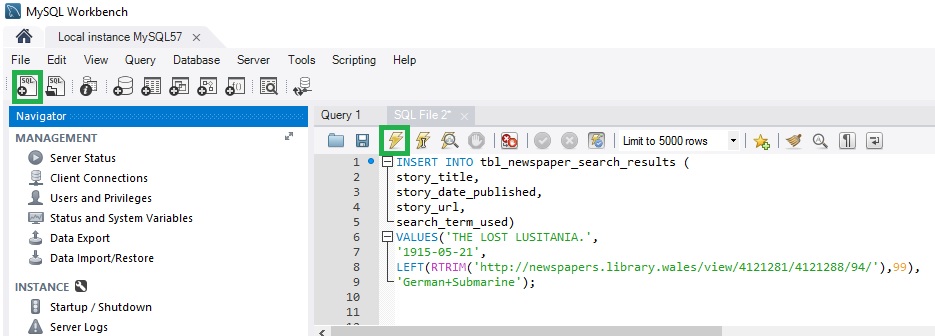
Inserting a record into a table using MySQL Workbench
Explanation of the INSERT statement
| SQL | Meaning |
|---|---|
| INSERT INTO tbl_newspaper_search_results ( | INSERT a record into the table named tbl_newspaper_search_results |
| story_title, | name of field to be populated by a value |
| story_date_published, | ” |
| story_url, | ” |
| search_term_used) | ” |
| VALUES(‘THE LOST LUSITANIA.’, | The value to be inserted into the story_title field |
| ‘1915-05-21’, | story_date_published field |
| LEFT(RTRIM(‘http://newspapers.library.wales/view/4121281/4121288/94/’),99), | story_url field. This field is a VARCHAR(99) so it has a maximum length of 99 characters. Inserting a URL longer than 99 characters would cause an error and so two functions are used to control for that. RTRIM() trims trailing spaces to the right of the URL. LEFT(value,99) returns only the leftmost 99 characters of the trimmed URL. This URL is much shorter than that and so these functions are here for an example only. |
| ‘German+Submarine’); | search_term_used field |
Optional: Modify the INSERT statement above and execute it a few more times. For example
INSERT INTO tbl_newspaper_search_results (
story_title,
story_date_published,
story_url,
search_term_used)
VALUES('test insert.',
'1916-07-01',
LEFT(RTRIM('http://newspapers.library.wales/view/4121281/4121288/94/'),99),
'German+Submarine');
Querying data in a table with SQL
In this section of the lesson we’ll create a SQL statement to select a row of data from the database table we just inserted. We’ll select the record first in MySQL workbench and later we’ll do it in R.
- Paste this statement below into a query window in MySQL workbench. This will select records from the table.
SELECT story_title FROM tbl_newspaper_search_results; - Highlight the SELECT statement and click the lightening bolt icon in the SQL tab to execute it. You should see the story title “THE LOST LUSITANIA.” in the Result Grid. See below.
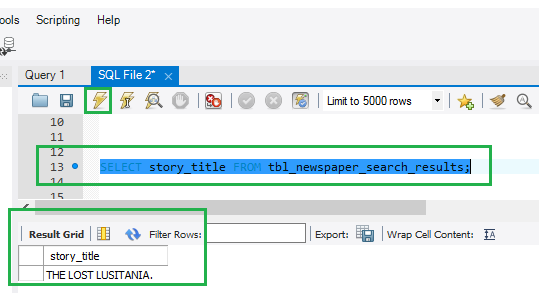
Selecting records from a table using MySQL Workbench
Optional: Modify the SELECT statement above by changing the fields selected and run it again. Add more than one field to the SELECT statement and run it:
SELECT story_title, story_date_published FROM tbl_newspaper_search_results;
Storing data in a table with SQL using R
Let’s do this using R! Below is an expanded version of the R Script we used above to connect to the database. For brevity, the first 3 comments we had in the R Script above are removed. We no longer need them.
In line 4 of the program below, remember to change the path to the rmariadb.settingsfile that matches your computer.
library(RMariaDB)
# The connection method below uses a password stored in a settings file.

# R needs a full path to find the settings file.
rmariadb.settingsfile<-"C:\\ProgramData\\MySQL\\MySQL Server 8.0\\newspaper_search_results.cnf"

rmariadb.db<-"newspaper_search_results"
storiesDb<-dbConnect(RMariaDB::MariaDB(),default.file=rmariadb.settingsfile,group=rmariadb.db)

# Optional. List the table. This confirms we connected to the database.
dbListTables(storiesDb)

# Create the query statement.
query<-"INSERT INTO tbl_newspaper_search_results (
story_title,
story_date_published,
story_url,
search_term_used)
VALUES('THE LOST LUSITANIA.',
'1915-05-21',
LEFT(RTRIM('http://newspapers.library.wales/view/4121281/4121288/94/'),99),
'German+Submarine');"

# Optional. Prints out the query in case you need to troubleshoot it.
print(query)

# Execute the query on the storiesDb that we connected to above.
rsInsert <- dbSendQuery(storiesDb, query)

# Clear the result.
dbClearResult(rsInsert)

# Disconnect to clean up the connection to the database.
dbDisconnect(storiesDb)
In the script above we do two steps to insert a record:
- Define the INSERT statement in the line beginning with: query<-“INSERT INTO tbl_newspaper_search_results (
- Execute the INSERT statement stored in the query variable with: rsInsert <- dbSendQuery(storiesDb, query)
Run the script above in R Studio and then execute a SELECT in MySQL Workbench. Do you see the new record you added?
Clean up the test data
At this point you likely have more than one record with the story title of “THE LOST LUSITANIA.” which is fine for testing, but we don’t want duplicate data. We will remove the test data and start again. Using the query window in MySQL Workbench run this SQL statement:
TRUNCATE tbl_newspaper_search_results;
In the Action Output pane of MySQL Workbench you should see:
TRUNCATE tbl_newspaper_search_results 0 row(s) affected 0.015 sec
To practice what we just did:
- Run a SELECT statement again. You should not get any rows back.
- Re-run the R program above to insert a record.
- Perform the SELECT statement. You should see one row of data.
Change the INSERT statement to use variables
We will be inserting a lot of data into the table using R, so we will change the INSERT statement to use variables. See the code below the #Assemble the query remark.
library(RMariaDB)
# The connection method below uses a password stored in a settings file.

# R needs a full path to find the settings file.
rmariadb.settingsfile<-"C:\\ProgramData\\MySQL\\MySQL Server 8.0\\newspaper_search_results.cnf"

rmariadb.db<-"newspaper_search_results"
storiesDb<-dbConnect(RMariaDB::MariaDB(),default.file=rmariadb.settingsfile,group=rmariadb.db)

# Optional. List the table. This confirms we connected to the database.
dbListTables(storiesDb)

# Assemble the query.

# Assign variables.
entryTitle <- "THE LOST LUSITANIA."
entryPublished <- "21 MAY 1916"
#convert the string value to a date to store it into the database
entryPublishedDate <- as.Date(entryPublished, "%d %B %Y")
entryUrl <- "http://newspapers.library.wales/view/4121281/4121288/94/"
searchTermsSimple <- "German+Submarine"

# Create the query statement
query<-paste(
  "INSERT INTO tbl_newspaper_search_results (
  story_title,
  story_date_published,
  story_url,
  search_term_used)
  VALUES('",entryTitle,"',
  '",entryPublishedDate,"',
  LEFT(RTRIM('",entryUrl,"'),99),
  '",searchTermsSimple,"')",
  sep = ''
  )

# Optional. Prints out the query in case you need to troubleshoot it.
print(query)

# Execute the query on the storiesDb that we connected to above.
rsInsert <- dbSendQuery(storiesDb, query)

# Clear the result.
dbClearResult(rsInsert)

# Disconnect to clean up the connection to the database.
dbDisconnect(storiesDb)
Let’s test this program:
- Run a SELECT statement and note the rows you have.
- Run the R program above to insert another record.
- Perform the SELECT statement. You should see an additional row of data.
SQL Errors
Let’s create a simple error in SQL to see what happens.
In R change
entryTitle <- "THE LOST LUSITANIA."
to
entryTitle <- "THE LOST LUSITANIA'S RUDDER."
and re-run the program.
In the R Console there is an error:
> rsInsert <- dbSendQuery(storiesDb, query)
Error in result_create(conn@ptr, statement, is_statement) :
  You have an error in your SQL syntax; check the manual that corresponds to your MySQL server version for the right syntax to use near 'S RUDDER.',
  '1916-05-21',
  LEFT(RTRIM('http://newspapers.library.wales/view/4' at line 6 [1064]
You can check with a SELECT statement that there is no record in the table with a story title of THE LOST LUSITANIA’S RUDDER.
Single apostrophes are part of SQL syntax and they indicate a text value. If they are in the wrong place, it causes an error. We have to handle cases where we have data with apostrophes. SQL accepts two apostrophes in an insert statement to represent an apostrophe in data (‘’).
We’ll handle apostrophes by using a gsub function to replace a single apostrophe with a double one, as per below.
entryTitle <- "THE LOST LUSITANIA'S RUDDER."
# change a single apostrophe into a double apostrophe
entryTitle <- gsub("'", "''", entryTitle)
Now that you have handled the apostrophe in the title of the story, re-run the R program and then check with a SELECT statement in MySQL workbench.
SELECT * FROM newspaper_search_results.tbl_newspaper_search_results WHERE story_title = "THE LOST LUSITANIA'S RUDDER.";
Once you see your test record, TRUNCATE tbl_newspaper_search_results to remove this test data.
Storing a comma separated value .csv file into a MySQL database
In the next part of the lesson we’ll query the database table. Our goal is to have enough data in the table to make a graph. To prepare for that let’s load some sample data from comma separated value (.csv) text files.
Download these .csv files to your R working directory. These files are stored in GitHub so download the Raw version of the files.
- sample-data-allotment-garden.csv This is a list of Welsh newspaper stories published during World War I that match the search terms allotment and garden.
- sample-data-submarine.csv This is a list of Welsh newspaper stories published during World War I that match the search terms German and submarine.
In R, execute the following read.csv() function and then see what is in the sampleData data frame.
sampleGardenData <- read.csv(file="sample-data-allotment-garden.csv", header=TRUE, sep=",")
sampleGardenData
You should see a lot of data, including what is below. Check the Environment tab on the right side of RStudio. The sampleGardenData Data Frame should contain “1242 obs. of 4 variables”.
story_title
1 -."e;'N'III GARDEN REQUISITES.
<...the result of the data frame results have been removed...>
story_date_published story_url search_term_used
1 1918-05-11 http://newspapers.library.wales/view/3581057/3581061/27/ AllotmentAndGarden
<...the result of the data frame results have been removed...>
Note that in this sample data, field names are included in the header for convenience: story_title, story_date_published, story_url and search_term_used.
As noted above, our goal here is to insert the sample data that is now stored in the sampleGardenData data frame into the MySQL table tbl_newspaper_search_results. We can do this a couple different ways, including looping through each row of the data frame and executing an INSERT command like we did above. Here though, we’ll use one command to insert all of the rows in sampleGardenData at one time: dbWriteTable. Don’t run this statement yet, just read it.
dbWriteTable(storiesDb, value = sampleGardenData, row.names = FALSE, name = "tbl_newspaper_search_results", append = TRUE )
| Function | Meaning |
|---|---|
| dbWriteTable(storiesDb, | Use the MySQL database connection storiesDb. |
| value = sampleGardenData, | Write the values in the sampleData data frame to the table. |
| row.names = FALSE, | No row names are specified. |
| name = “tbl_newspaper_search_results”, | Insert the values from sampleData into the table tbl_newspaper_search_results. |
| append = TRUE ) | Append these values to what is in the table already. If this program is run again, all of the rows in sampleData will be appended to the same table again. |
We’re not ready to run dbWriteTable() yet, we need to connect to the database first. Here is the program to do that, as well as load sample-data-submarine.csv too. Read through this and run it.
library(RMariaDB)
rmariadb.settingsfile<-"C:\\ProgramData\\MySQL\\MySQL Server 8.0\\newspaper_search_results.cnf"

rmariadb.db<-"newspaper_search_results"
storiesDb<-dbConnect(RMariaDB::MariaDB(),default.file=rmariadb.settingsfile,group=rmariadb.db)

setwd("C:\\a_orgs\\carleton\\hist3814\\R\\getting-started-with-mysql")

# read in the sample data from a newspaper search of Allotment And Garden
sampleGardenData <- read.csv(file="sample-data-allotment-garden.csv", header=TRUE, sep=",")

# The story_title column in the database table can store values up to 99 characters long.
# This statement trims any story_titles that are any longer to 99 characters.
sampleGardenData$story_title <- substr(sampleGardenData$story_title,0,99)

# This statement formats story_date_published to represent a DATETIME.
sampleGardenData$story_date_published <- paste(sampleGardenData$story_date_published," 00:00:00",sep="")

dbWriteTable(storiesDb, value = sampleGardenData, row.names = FALSE, name = "tbl_newspaper_search_results", append = TRUE )

# read in the sample data from a newspaper search of German+Submarine
sampleSubmarineData <- read.csv(file="sample-data-submarine.csv", header=TRUE, sep=",")

sampleSubmarineData$story_title <- substr(sampleSubmarineData$story_title,0,99)
sampleSubmarineData$story_date_published <- paste(sampleSubmarineData$story_date_published," 00:00:00",sep="")

dbWriteTable(storiesDb, value = sampleSubmarineData, row.names = FALSE, name = "tbl_newspaper_search_results", append = TRUE )

#disconnect to clean up the connection to the database
dbDisconnect(storiesDb)
If you run this more than once, you will have duplicate records. If that happens, just TRUNCATE the table and run the program again, but only once. You can check that you have the right number of records. In MySQL Workbench run this in the query window:
SELECT COUNT(*) FROM tbl_newspaper_search_results;
You should have a count of 2880 records. 1242 from sampleGardenData and 1638 from sampleSubmarineData.
Selecting data from a table with SQL using R
Our goal here is to use the table of newspaper stories we have imported and make a graph of the number of stories published in Welsh Newspapers during each month of World War I that match the search terms (allotment and garden) and (German and submarine)
The script below queries the database and produces the line graph plot below. Read through the script to see what is happening. An explanation of script follows it.
library(RMariaDB)
rmariadb.settingsfile<-"C:\\ProgramData\\MySQL\\MySQL Server 8.0\\newspaper_search_results.cnf"

rmariadb.db<-"newspaper_search_results"
storiesDb<-dbConnect(RMariaDB::MariaDB(),default.file=rmariadb.settingsfile,group=rmariadb.db)

searchTermUsed="German+Submarine"
# Query a count of the number of stories matching searchTermUsed that were published each month.
query<-paste("SELECT ( COUNT(CONCAT(MONTH(story_date_published), ' ',YEAR(story_date_published)))) as 'count'
    FROM tbl_newspaper_search_results
    WHERE search_term_used='",searchTermUsed,"'
    GROUP BY YEAR(story_date_published),MONTH(story_date_published)
    ORDER BY YEAR(story_date_published),MONTH(story_date_published);",sep="")

print(query)
rs = dbSendQuery(storiesDb,query)
dbRows<-dbFetch(rs)

countOfStories<-c(as.integer(dbRows$count))

# Put the results of the query into a time series.
qts1 = ts(countOfStories, frequency = 12, start = c(1914, 8))
print(qts1)

# Plot the qts1 time series data with a line width of 3 in the color red.
plot(qts1,
    lwd=3,
    col = "red",
    xlab="Month of the war",
    ylab="Number of newspaper stories",
    xlim=c(1914,1919),
    ylim=c(0,150),
    main=paste("Number of stories in Welsh newspapers matching the search terms listed below.",sep=""),
    sub="Search term legend: Red = German+Submarine. Green = Allotment And Garden.")

searchTermUsed="AllotmentAndGarden"

# Query a count of the number of stories matching searchTermUsed that were published each month.
query<-paste("SELECT (  COUNT(CONCAT(MONTH(story_date_published),' ',YEAR(story_date_published)))) as 'count'   FROM tbl_newspaper_search_results   WHERE search_term_used='",searchTermUsed,"'   GROUP BY YEAR(story_date_published),MONTH(story_date_published)   ORDER BY YEAR(story_date_published),MONTH(story_date_published);",sep="")
print(query)
rs = dbSendQuery(storiesDb,query)
dbRows<-dbFetch(rs)

countOfStories<-c(as.integer(dbRows$count))

# Put the results of the query into a time series.
qts2 = ts(countOfStories, frequency = 12, start = c(1914, 8))

# Add this line with the qts2 time series data to the the existing plot.
lines(qts2, lwd=3,col="darkgreen")

# Clear the result
dbClearResult(rs)

# Disconnect to clean up the connection to the database.
dbDisconnect(storiesDb)
Explanation of the select and plot data program.
The method to connect to the database is explained above.
This program selects two result sets of data and plots them on a graph. One of the result sets is newspaper stories matching the search German+Submarine. They are queried with this SELECT statement:
SELECT (
  COUNT(CONCAT(MONTH(story_date_published),' ',YEAR(story_date_published)))) as 'count'
  FROM tbl_newspaper_search_results
  WHERE search_term_used='",searchTermUsed,"'
  GROUP BY YEAR(story_date_published),MONTH(story_date_published)
  ORDER BY YEAR(story_date_published),MONTH(story_date_published);
| SQL | Meaning |
|---|---|
| SELECT ( | SELECT data matching the condition in the WHERE clause FROM the database table named. |
| COUNT(CONCAT(MONTH(story_date_published),’ ‘,YEAR(story_date_published))) as ‘count’ | This provides a count of the number of stories published that share the same month and year publishing date. CONCAT stands for concatenate which creates a single text value from two or more separate text values, in this case the month and the year. |
| FROM tbl_newspaper_search_results | This is the database table we’re selecting data from. |
| GROUP BY YEAR(story_date_published),MONTH(story_date_published) | This GROUP BY statement is important for the COUNT above. Here the data is grouped by month and year so that we can count all of the records in the group. |
| ORDER BY YEAR(story_date_published),MONTH(story_date_published); | This puts the result set in order by date, which is useful since we want to make a graph by date. |
The statements below run the query and puts the result set rs into data frame dbRows
rs = dbSendQuery(storiesDb,query)
dbRows<-dbFetch(rs)
Below the data frame dbRows is put into a time series with the ts() function so that it can be plotted for each month, starting from August 1914.
#Put the results of the query into a time series
qts1 = ts(countOfStories, frequency = 12, start = c(1914, 8))
Below, the data in the qts1 time series is plotted on a graph
plot(qts1,
    lwd=3,
    col = "red",
    xlab="Month of the war",
    ylab="Number of newspaper stories",
    xlim=c(1914,1919),
    ylim=c(0,150),
    main=paste("Number of stories in Welsh newspapers matching the search terms listed below.",sep=""),
    sub="Search term legend: Red = German+Submarine. Green = Allotment And Garden.")
What is different about the part of the program that plots the stories matching the search “Allotment And Garden”? Not very much at all. We just use the lines() function to plot those results on the same plot we made above.
lines(qts2, lwd=3,col="darkgreen")
Results of the select and plot data program.
Below is what the plot should look like:
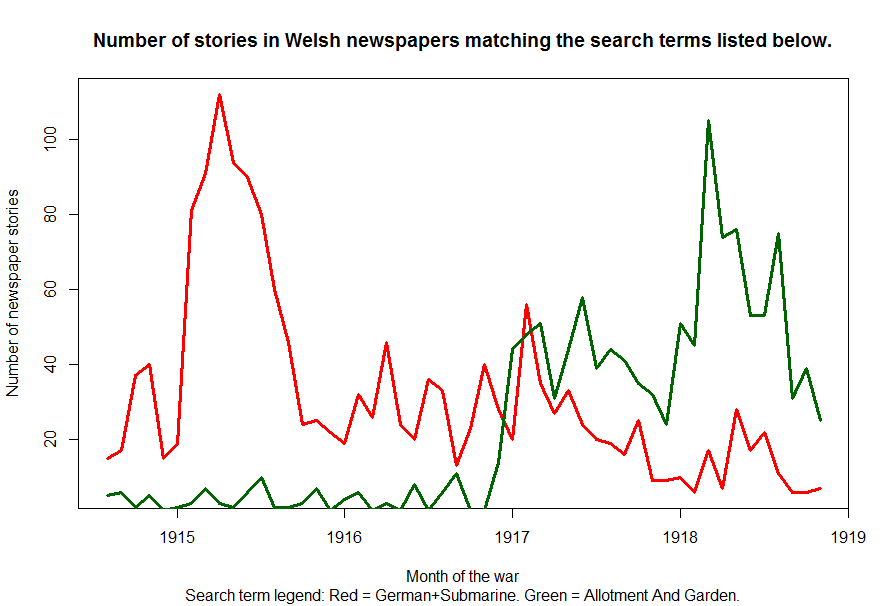
Plot of number of newspaper stories published each month matching search terms
Going further with MySQL
If you wanted to put a database on a website, using MySQL as the database and the PHP language to build the pages of the site is one way to do this. An example of this type of website is one I built to search issues of the Equity newspaper. Larry Ullman’s book PHP and MySQL for Dynamic Web Sites covers how to set up and connect to a database using MySQL and PHP in a hacker resistant way.
For examples of using SQL to sort and group data as well as perform calculations, see: MySQL by Examples for Beginners or MySQL’s Examples of Common Queries.
Conclusion
I hope that you now have the knowledge to set up a database table, connect to it and store records. Although we have only scratched the surface of the different ways to query data, I also hope that you now know the technique of using SELECT statements so that you can use them in your future digital history projects.
Credits
I completed this lesson thanks to the support of the George Garth Graham Undergraduate Digital History Research Fellowship.
Thank you to Dr. Amanda Visconti for her guidance and support during the preparation of this lesson.
References
Ullman, L. 2005. PHP and MySQL for Dynamic Web Sites, 2nd ed. Berkeley, Calif: Peachpit.
Endnotes
The R program I used to gather the sample data is here.
-
Jason A. French, “Using R With MySQL Databases,” blog (3 July 2014), http://www.jason-french.com/blog/2014/07/03/using-r-with-mysql-databases/. ↩
-
Taylor Arnold and Lauren Tilton, “Basic Text Processing in R,” Programming Historian (27 March 2017), /lessons/basic-text-processing-in-r. ↩
-
Taryn Dewar, “R Basics with Tabular Data,” Programming Historian (05 September 2016), /lessons/r-basics-with-tabular-data. ↩
