Contents
- Lesson Goals
- Setting Up
- Introducing APIs
- Using APIs
- Implementing Our API
- API Design Principles
- Connecting Our API to a Database
- Resources
Lesson Goals
Web APIs are tools for making information and application functionality accessible over the internet. In this lesson, you will:
- Learn what an API is and when you should use one.
- Learn how to build a web API that returns data to its users.
- Learn some principles of good API design, applying them to an API that draws book metadata from a database.
Setting Up
Prerequisites
You can use the Windows, macOS, or Linux operating systems to complete this tutorial, and those few instructions that are not the same across platforms will be explicitly noted. Python 3, the Flask web framework, and a web browser are required for this tutorial, and installation instructions for all platforms are outlined below.
The only knowledge explicitly assumed for this lesson is the ability to use a text editor, such as BBEdit on macOS or Notepad++ on Windows. However, knowledge of the command line, Python, and web concepts such as HTTP may make this tutorial easier to follow. If you’re new to Python, consider working through the Programming Historian series on dealing with online sources to familiarize yourself with fundamental concepts in Python programming.
Installing Python and Flask
For this tutorial, you will need Python 3 and the Flask web framework. You’ll also require a web browser (such as Firefox) and a text editor (such as Notepad++ or BBEdit).
To download Python, follow this link, select the button that says Download Python 3.x.x, and then run the installer as you normally would to install applications on your operating system. The default settings should be fine.
To confirm that Python installed successfully, first open the command line. In macOS, click the spotlight icon on the top right corner of your desktop (the magnifying glass) and type terminal. The terminal should be the first application that appears. On Windows, click the Start menu icon and type cmd in the search box, then press Enter.
Once your command line is open, enter these commands:
python --version
pip --version
If the output for these commands includes a version number, Python is installed and available from the command line and you can proceed to the next step.
Next, you’ll need to install Flask. At the command line, type
pip install flask
This will install Flask using the pip package manager for Python. You should see some output ending in a notification that Flask has been installed successfully.
As an alternative to the above installation instructions, you can install the Python 3 version of Anaconda, which can be downloaded here. Anaconda comes with Flask, so if you go this route you will not need to install Flask using the pip package manager.
If you’re running into trouble installing Python, you may find this Programming Historian article on installing Python helpful. Note that the instructions in that tutorial are for installing Python 2—make sure you choose Python 3 when downloading installers from the Python website, since this tutorial uses Python 3.
If you don’t have a preferred text editor, I recommend BBEdit for macOS or Notepad++ for Windows.
Introducing APIs
What is an API?
If you’ve heard the term API before, chances are it’s been used not to refer to APIs in general, but instead to a specific kind of API, the web API. A web API allows for information or functionality to be manipulated by other programs via the internet. For example, with Twitter’s web API, you can write a program in a language like Python or Javascript that can perform tasks such as favoriting tweets or collecting tweet metadata.
In programming more generally, the term API, short for Application Programming Interface, refers to a part of a computer program designed to be used or manipulated by another program, as opposed to an interface designed to be used or manipulated by a human. Computer programs frequently need to communicate amongst themselves or with the underlying operating system, and APIs are one way they do it. In this tutorial, however, we’ll be using the term API to refer specifically to web APIs.
When to Create an API
In general, consider an API if:
- Your data set is large, making download via FTP unwieldy or resource-intensive.
- Your users will need to access your data in real time, such as for display on another website or as part of an application.
- Your data changes or is updated frequently.
- Your users only need access to a part of the data at any one time.
- Your users will need to perform actions other than retrieve data, such as contributing, updating, or deleting data.
If you have data you wish to share with the world, an API is one way you can get it into the hands of others. However, APIs are not always the best way of sharing data with users. If the size of the data you are providing is relatively small, you can instead provide a “data dump” in the form of a downloadable JSON, XML, CSV, or SQLite file. Depending on your resources, this approach can be viable up to a download size of a few gigabytes.
Remember that you can provide both a data dump and an API, and individual users may find one or the other to better match their use case. Open Library, for example, provides both a data dump and an API, each of which serves different use cases for different users.
API Terminology
When using or building APIs, you will encounter these terms frequently:
- HTTP (Hypertext Transfer Protocol) is the primary means of communicating data on the web. HTTP implements a number of “methods,” which tell which direction data is moving and what should happen to it. The two most common are GET, which pulls data from a server, and POST, which pushes new data to a server.
- URL (Uniform Resource Locator) - An address for a resource on the web, such as
https://programminghistorian.org/about. A URL consists of a protocol (http://), domain (programminghistorian.org), and optional path (/about). A URL describes the location of a specific resource, such as a web page. When reading about APIs, you may see the termsURL,request,URI, orendpointused to describe adjacent ideas. This tutorial will prefer the terms URL and request to avoid complication. You can follow a URL or make a GET request in your browser, so you won’t need any special software to make requests in this tutorial. - JSON (JavaScript Object Notation) is a text-based data storage format that is designed to be easy to read for both humans and machines. JSON is generally the most common format for returning data through an API, XML being the second most common.
- REST (REpresentational State Transfer) is a philosophy that describes some best practices for implementing APIs. APIs designed with some or all of these principles in mind are called REST APIs. While the API outlined in this lesson uses some REST principles, there is a great deal of disagreement around this term. For this reason, I do not describe the example APIs here as REST APIs, but instead as web or HTTP APIs.
Using APIs
Why Use APIs as a Researcher?
The primary focus of this lesson is on creating an API, not exploring or using an API that has already been implemented. However, before we start building our own API, it may be useful to discuss how APIs are useful for researchers. In this section, we’ll see how APIs can be useful for approaching historical, textual, or sociological questions using a “macroscopic” or “distant reading” approach that makes use of relatively large amounts of information. In doing so, we’ll familiarize ourselves with the basic elements of a good API. Considering APIs from the perspective of a user will come in useful when we begin to design our own API later in the lesson.
An API Case Study: Sensationalism and Historical Fires
Imagine that our research area is sensationalism and the press: has newspaper coverage of major events in the United States become more or less sensational over time? Narrowing the topic, we might ask whether press coverage of, for example, urban fires has increased or decreased with government reporting on fire-related relief spending.
While we won’t be able to explore this question thoroughly, we can begin to approach this research space by collecting historical data on newspaper coverage of fires using an API—in this case, the Chronicling America Historical Newspaper API. The Chronicling America API allows access to metadata and text for millions of scanned newspaper pages. In addition, unlike many other APIs, it also does not require an authentication process, allowing us to immediately explore the available data without signing up for an account.
Our initial goal in approaching this research question is to find all newspaper stories in the Chronicling America database that use the term “fire.” Typically, use of an API starts with its documentation. On the Chronicling America API page, we find two pieces of information critical for getting the data we want from the API: the API’s base URL and the path corresponding to the function we want to perform on the API—in this case, searching the database.
Our base URL is:
http://chroniclingamerica.loc.gov
All requests we make to the API must begin with this portion of the URL. All APIs have a base URL like this one that is the same across all requests to the API.
Our path is:
/search/pages/results/
If we combine the base URL and the path together into one URL, we’ll have created a request to the Chronicling America API that returns all available data in the database:
http://chroniclingamerica.loc.gov/search/pages/results/
If you visit the link above, you’ll see all items available in Chronicling America (12,243,633 at the time of writing), , not just the entries related to our search term, “fire.” This request also returns a formatted HTML view, rather than the structured view we want to use to collect data.
According to the Chronicling America documentation, in order to get structured data specifically relating to fire, we need to pass one more kind of data in our request: query parameters.
http://chroniclingamerica.loc.gov/search/pages/results/?format=json&proxtext=fire
The query parameters follow the ? in the request, and are seperated from one another by the & symbol. The first query parameter, format=json, changes the returned data from HTML to JSON. The second, proxtext=fire, narrows the returned entries to those that include our search term.
If you follow the above link in your browser, you’ll see a structured list of the items in the database related to the search term “fire.” The format of the returned data is called JSON, and is a structured format that looks like this excerpt from the Chronicling America results:
"city": [
        "Washington"
      ],
      "date": "19220730",
      "title": "The Washington Herald.",
      "end_year": 1939,
By making requests to the Chronicling America API, we’ve accessed information on news stories that contain the search term “fire,” and returned data that includes the date of publication and the page the article appears on. If we were to pursue this research question further, a next step might be finding how many stories relating to fire appear on a newspaper’s front page over time, or perhaps cleaning the data to reduce the number of false positives. As we have seen, however, exploring an API can be a useful first step in gathering data to tackle a research question.
What Users Want in an API
As we’ve learned, documentation is a user’s starting place when working with a new API, and well-designed URLs make it easier for users to intuitively find resources. Because they help users to quickly access information through your API, these elements—documentation and well-conceived URLs—are the sine qua non of a good API. We’ll discuss these elements in greater depth later in this tutorial.
As you use other APIs in your research, you’ll develop a sense of what makes a good API from the perspective of a potential user. Just as strong readers often make strong writers, using APIs created by others and critically evaluating their implementation and documentation will help you better design your own APIs.
Implementing Our API
Overview
This section will show you how to build a prototype API using Python and the Flask web framework. Our example API will take the form of a distant reading archive—a book catalog that goes beyond standard bibliographic information to include data of interest to those working on digital projects. In this case, besides title and date of publication, our API will also serve the first sentence of each book. This should be enough data to allow us to envision some potential research questions without overwhelming us as we focus on the design of our API.
We’ll begin by using Flask to create a home page for our site. In this step, we’ll learn the basics of how Flask works and make sure our software is configured correctly. Once we have a small Flask application working in the form of a home page, we’ll iterate on this site, turning it into a functioning API.
Creating a Basic Flask Application
Flask is a web framework for Python, meaning that it provides functionality for building web applications, including managing HTTP requests and rendering templates. In this section, we will create a basic Flask application. In later sections, we’ll add to this application to create our API. Don’t worry if you don’t understand each individual line of code yet—explanations will be forthcoming once you have this initial version of the application working.
Why Flask?
Python has a number of web frameworks that can be used to create web apps and APIs. The most well-known is Django, a framework that has a set project structure and which includes many built-in tools. This can save time and effort for experienced programmers, but can be overwhelming. Flask applications tend to be written on a blank canvas, so to speak, and so are more suited to a contained application such as our prototype API.
First, create a new folder on your computer that will serve as a project folder. This can be in your Desktop folder, but I recommend creating a dedicated projects folder for this and similar projects. This tutorial will assume that the files related to this lesson will be stored in a folder called api inside a folder named projects in your home directory. If you need help with navigation on the command line, see the Programming Historian Introduction to the Bash Command Line for the macOS and Linux command line or the Introduction to the Windows Command Line with PowerShell for Windows.
In macOS, you can directly create a an api folder inside a projects folder in your home directory with this terminal command:
mkdir -p ~/projects/api
On Windows, you can create the api folder with these commands in your cmd command line environment:
md projects
cd projects
md api
You can also create the projects and api folders using your operating system’s graphical user interface.
Next, open a text editor (such as Notepad++ or BBEdit) and enter the following code:
import flask

app = flask.Flask(__name__)
app.config["DEBUG"] = True


@app.route('/', methods=['GET'])
def home():
    return "<h1>Distant Reading Archive</h1><p>This site is a prototype API for distant reading of science fiction novels.</p>"

app.run()
Save this code as api.py in the api folder you created for this tutorial.
Running the Application
In the command line, navigate to your api folder:
cd projects/api
You can check if you’re in the correct folder by running the pwd command. Once you’re in your project directory, run the Flask application with the command:
python api.py
You should see output similar to this:
* Running on http://127.0.0.1:5000/ (Press CTRL+C to quit)
You may also see some lines related to debugging. This message means that Flask is running your application locally (on your computer) at that address. Follow the link above, http://127.0.0.1:5000/, using your web browser to see the running application:
The home page when rendered in a browser.
Congratulations, you’ve created a working web application!
What Flask Does
Now that we have a homepage for our archive, let’s talk about how Flask works and what the above code is doing.
Flask maps HTTP requests to Python functions. In this case, we’ve mapped one URL path (‘/’) to one function, home. When we connect to the Flask server at http://127.0.0.1:5000/, Flask checks if there is a match between the path provided and a defined function. Since /, or no additional provided path, has been mapped to the home function, Flask runs the code in the function and displays the returned result in the browser. In this case, the returned result is HTML markup for a home page welcoming visitors to the site hosting our API.
The process of mapping URLs to functions is called routing. The
@app.route('/', methods=['GET'])
syntax is the part of the program that lets Flask know that this function, home, should be mapped to the path /. The methods list (methods=['GET']) is a keyword argument that lets Flask know what kind of HTTP requests are allowed. We’ll only be using GET requests in this tutorial, but many web applications need to use both GET requests (to send data from the application to the user) and POST requests (to receive data from a user).
Below are brief explanations of the other components of the application:
import flask — Imports the Flask library, making the code available to the rest of the application.
app = flask.Flask(__name__) — Creates the Flask application object, which contains data about the application and also methods (object functions) that tell the application to do certain actions. The last line, app.run(), is one such method.
app.config["DEBUG"] = True — Starts the debugger. With this line, if your code is malformed, you’ll see an error when you visit your app. Otherwise you’ll only see a generic message such as Bad Gateway in the browser when there’s a problem with your code.
app.run() — A method that runs the application server.
While it’s useful to have a familiarity with what’s going on in the script, don’t worry if you don’t understand precisely what every element is doing at this stage. If you understand the general outline of how this portion works, the details of how Flask renders pages are likely to become more understandable as we continue to develop our API.
Creating the API
Now that we have a running Flask application and know a little about what Flask does, we’re finally ready to implement a small API with data that we’ll define right in our application.
We’ll be adding our data as a list of Python dictionaries. Dictionaries in Python group pairs of keys and values, like this:
{
    'key': 'value',
    'key': 'value'
}
The key identifies the type of information represented, such as title or id. The value is the actual data. For example, a short telephone book might take this format:
[
    {
        'name': 'Alexander Graham Bell',
        'number': '1-333-444-5555'
    },
    {
        'name': 'Thomas A. Watson',
        'number': '1-444-555-6666'
    }
]
The above phone book is a list of two dictionaries. Each dictionary is a phone book entry consisting of two keys, name and number, each paired with a value that provides the actual information.
Let’s add some data (entries on three science fiction novels) as a list of dictionaries. Each dictionary will contain ID number, title, author, first sentence, and year of publication for each book. Finally, we’ll add a new function: a route that will allow a visitor to access our data.
Replace our previous code in api.py with the code below:
import flask
from flask import request, jsonify

app = flask.Flask(__name__)
app.config["DEBUG"] = True

# Create some test data for our catalog in the form of a list of dictionaries.
books = [
    {'id': 0,
     'title': 'A Fire Upon the Deep',
     'author': 'Vernor Vinge',
     'first_sentence': 'The coldsleep itself was dreamless.',
     'year_published': '1992'},
    {'id': 1,
     'title': 'The Ones Who Walk Away From Omelas',
     'author': 'Ursula K. Le Guin',
     'first_sentence': 'With a clamor of bells that set the swallows soaring, the Festival of Summer came to the city Omelas, bright-towered by the sea.',
     'published': '1973'},
    {'id': 2,
     'title': 'Dhalgren',
     'author': 'Samuel R. Delany',
     'first_sentence': 'to wound the autumnal city.',
     'published': '1975'}
]


@app.route('/', methods=['GET'])
def home():
    return '''<h1>Distant Reading Archive</h1>
<p>A prototype API for distant reading of science fiction novels.</p>'''


# A route to return all of the available entries in our catalog.
@app.route('/api/v1/resources/books/all', methods=['GET'])
def api_all():
    return jsonify(books)

app.run()
Run the code (navigate to your api folder in the command line and enter python api.py). Once the server is running, visit our route URL to view the data in the catalog:
http://127.0.0.1:5000/api/v1/resources/books/all
You should see JSON output for the three entries in our test catalog. Flask provides us with a jsonify function that allows us to convert lists and dictionaries to JSON format. In the route we created, our book entries are converted from a list of Python dictionaries to JSON before being returned to a user.
At this point, you’ve created a working, if limited, API. In the next section, we’ll allow users to find books via more specific data, such as an entry’s ID.
Finding Specific Resources
Right now, users can only view our entire database—they can’t filter or find specific resources. While this isn’t a problem with our test catalog, this will quickly become less useful as we add data. In this section, we’ll add a function that allows users to filter their returned results using a more specific request.
Below is the code for our new application with filtering capability. As before, we’ll examine the code more carefully once you have it running.
import flask
from flask import request, jsonify

app = flask.Flask(__name__)
app.config["DEBUG"] = True

# Create some test data for our catalog in the form of a list of dictionaries.
books = [
    {'id': 0,
     'title': 'A Fire Upon the Deep',
     'author': 'Vernor Vinge',
     'first_sentence': 'The coldsleep itself was dreamless.',
     'year_published': '1992'},
    {'id': 1,
     'title': 'The Ones Who Walk Away From Omelas',
     'author': 'Ursula K. Le Guin',
     'first_sentence': 'With a clamor of bells that set the swallows soaring, the Festival of Summer came to the city Omelas, bright-towered by the sea.',
     'published': '1973'},
    {'id': 2,
     'title': 'Dhalgren',
     'author': 'Samuel R. Delany',
     'first_sentence': 'to wound the autumnal city.',
     'published': '1975'}
]


@app.route('/', methods=['GET'])
def home():
    return '''<h1>Distant Reading Archive</h1>
<p>A prototype API for distant reading of science fiction novels.</p>'''


@app.route('/api/v1/resources/books/all', methods=['GET'])
def api_all():
    return jsonify(books)


@app.route('/api/v1/resources/books', methods=['GET'])
def api_id():
    # Check if an ID was provided as part of the URL.
    # If ID is provided, assign it to a variable.
    # If no ID is provided, display an error in the browser.
    if 'id' in request.args:
        id = int(request.args['id'])
    else:
        return "Error: No id field provided. Please specify an id."

    # Create an empty list for our results
    results = []

    # Loop through the data and match results that fit the requested ID.
    # IDs are unique, but other fields might return many results
    for book in books:
        if book['id'] == id:
            results.append(book)

    # Use the jsonify function from Flask to convert our list of
    # Python dictionaries to the JSON format.
    return jsonify(results)

app.run()
Once you’ve updated your API with the api_id function, run your code as before (python api.py from your api directory) and visit the below URLs to test the new filtering capability:
127.0.0.1:5000/api/v1/resources/books?id=0 127.0.0.1:5000/api/v1/resources/books?id=1 127.0.0.1:5000/api/v1/resources/books?id=2 127.0.0.1:5000/api/v1/resources/books?id=3
Each of these should return a different entry, except for the last, which should return an empty list: [], since there is no book for which the id value is 3. (Counting in programming typically starts from 0, so id=3 would be a request for a nonexistent fourth item.) In the next section, we’ll explore our updated API in more detail.
Understanding Our Updated API
In this code, we first create a new function, called api_id, with the @app.route syntax that maps the function to the path /api/v1/resources/books. That means that this function will run when we access http://127.0.0.1:5000/api/v1/resources/books. (Note that accessing this link without providing an ID will give the error message we provided in the code: Error: No id field provided. Please specify an id.)
Inside our function, we do two things:
First, examine the provided URL for an id and select the books that match that id. The id must be provided like this: ?id=0. Data passed through URLs like this (after the ?) are called query parameters—we’ve seen them before when we worked with the Chronicling America API. They’re a feature of HTTP used for filtering for specific kinds of data.
This part of the code determines if there is a query parameter, like ?id=0, and then assigns the provided ID to a variable.
    if 'id' in request.args:
        id = int(request.args['id'])
    else:
        return "Error: No id field provided. Please specify an id."
Then this section moves through our test catalog of books, matches those books that have the provided ID, and appends them to the list that will be returned to the user:
    for book in books:
        if book['id'] == id:
            results.append(book)
Finally, the return jsonify(results) line takes the list of results and renders them in the browser as JSON.
If you’ve gotten this far, you’ve created an actual API. Celebrate! At the end of this lesson, you’ll be exposed to a somewhat more complex API that uses a database, but most of the principles and patterns we’ve used so far will still apply. In the next section, we’ll discuss some guidelines for creating a well-designed API that others will actually want to use. In the last section of the tutorial, we’ll apply these principles to a version of our API that pulls in results from a database.
API Design Principles
Thus far, we’ve created a working API with test data that we’ve provided right in our application. Our next version of our API will pull in data from a database before providing it to a user. It will also take additional query parameters, allowing users to filter by fields other than ID.
Before building more functionality into our application, let’s reflect on some of the API design decisions that we’ve made so far. Two aspects of a good API are usability and maintainability, and as we build more functionality into our API, we’ll be keeping many of the following considerations in mind.
Designing Requests
The prevailing design philosophy of modern APIs is called REST. For our purposes, the most important thing about REST is that it’s based on the four methods defined by the HTTP protocol: POST, GET, PUT, and DELETE. These correspond to the four traditional actions performed on data in a database: CREATE, READ, UPDATE, and DELETE. In this tutorial, we’ll only be concerned with GET requests, which correspond to reading from a database.
Because HTTP requests are so integral to using a REST API, many design principles revolve around how requests should be formatted. We’ve already created one HTTP request, which returns all books provided in our sample data. To understand the considerations that go into formatting this request, let’s first consider a weak or poorly-designed example of an API endpoint:
http://api.example.com/getbook/10
The formatting of this request has a number of issues. The first is semantic—in a REST API, our verbs are typically GET, POST, PUT, or DELETE, and are determined by the request method rather than in the request URL. That means that the word “get” should not appear in our request, since “get” is implied by the fact that we’re using a HTTP GET method. In addition, resource collections such as books or users should be denoted with plural nouns. This makes it clear when an API is referring to a collection (books) or an entry (book). Incorporating these principles, our API would look like this:
http://api.example.com/books/10
The above request uses part of the path (/10) to provide the ID. While this is not an uncommon approach, it’s somewhat inflexible—with URLs constructed in this manner, you can generally only filter by one field at a time. Query parameters allow for filtering by multiple database fields and make more sense when providing “optional” data, such as an output format:
http://api.example.com/books?author=Ursula+K.+Le Guin&published=1969&output=xml
When designing how requests to your API should be structured, it also makes sense to plan for future additions. Even if the current version of your API serves information on only one type of resource—books, for example—it makes sense to plan as if you might add other resources or non-resource functionality to your API in the future:
http://api.example.com/resources/books?id=10
Adding an extra segment on your path such as “resources” or “entries” gives you the option to allow users to search across all resources available, making it easier for you to later support requests such as these:
https://api.example.com/v1/resources/images?id=10
https://api.example.com/v1/resources/all
Another way to plan for your API’s future is to add a version number to the path. This means that, should you have to redesign your API, you can continue to support the old version of the API under the old version number while releasing, for example, a second version (v2) with improved or different functionality. This way, applications and scripts built using the old version of your API won’t cease to function after your upgrade.
After incorporating these design improvements, a request to our API might look like this:
https://api.example.com/v1/resources/books?id=10
Documentation and Examples
Without documentation, even the best-designed API will be unusable. Your API should have documentation describing the resources or functionality available through your API that also provides concrete working examples of request URLs or code for your API. You should have a section for each resource that describes which fields, such as id or title, it accepts. Each section should have an example in the form of a sample HTTP request or block of code.
A fairly common practice in documenting APIs is to provide annotations in your code that are then automatically collated into documentation using a tool such as Doxygen or Sphinx. These tools create documentation from docstrings—comments you make on your function definitions. While this kind of documentation is a good idea, you shouldn’t consider your job done if you’ve only documented your API to this level. Instead, try to imagine yourself as a potential user of your API and provide working examples. In an ideal world, you would have three kinds of documentation for your API: a reference that details each route and its behavior, a guide that explains the reference in prose, and at least one or two tutorials that explain every step in detail.
For inspiration on how to approach API documentation, see the New York Public Library Digital Collections API, which sets a standard of documentation achievable for many academic projects. For an extensively documented (though sometimes overwhelming) API, see the MediaWiki Action API, which provides documentation to users who pass partial queries to the API. (In our example above, we returned an error on a partial query.) For other professionally maintained API documentation examples, consider the World Bank API, the various New York Times APIs, or the Europeana Pro API.
Connecting Our API to a Database
This last example of our Distant Reading Archive API pulls in data from a database, implements error handling, and can filter books by publication date. The database used is SQLite, a lightweight database engine that is supported in Python by default. SQLite files typically end with the .db file extension.
Before we modify our code, first download the example database from this location and copy the file to your api folder using your graphical user interface. The final version of our API will query this database when returning results to users.
Copy the below code into your text editor. As before, we’ll examine the code more closely once you have it running.
import flask
from flask import request, jsonify
import sqlite3

app = flask.Flask(__name__)
app.config["DEBUG"] = True

def dict_factory(cursor, row):
    d = {}
    for idx, col in enumerate(cursor.description):
        d[col[0]] = row[idx]
    return d


@app.route('/', methods=['GET'])
def home():
    return '''<h1>Distant Reading Archive</h1>
<p>A prototype API for distant reading of science fiction novels.</p>'''


@app.route('/api/v1/resources/books/all', methods=['GET'])
def api_all():
    conn = sqlite3.connect('books.db')
    conn.row_factory = dict_factory
    cur = conn.cursor()
    all_books = cur.execute('SELECT * FROM books;').fetchall()

    return jsonify(all_books)


@app.errorhandler(404)
def page_not_found(e):
    return "<h1>404</h1><p>The resource could not be found.</p>", 404


@app.route('/api/v1/resources/books', methods=['GET'])
def api_filter():
    query_parameters = request.args

    id = query_parameters.get('id')
    published = query_parameters.get('published')
    author = query_parameters.get('author')

    query = "SELECT * FROM books WHERE"
    to_filter = []

    if id:
        query += ' id=? AND'
        to_filter.append(id)
    if published:
        query += ' published=? AND'
        to_filter.append(published)
    if author:
        query += ' author=? AND'
        to_filter.append(author)
    if not (id or published or author):
        return page_not_found(404)

    query = query[:-4] + ';'

    conn = sqlite3.connect('books.db')
    conn.row_factory = dict_factory
    cur = conn.cursor()

    results = cur.execute(query, to_filter).fetchall()

    return jsonify(results)

app.run()
Save the code as api_final.py in your api folder and run it by navigating to your project folder in the terminal and entering the command:
python api_final.py
Note that if a previous version of the code is still running, you will first need to end that process by pressing Control-C before executing the new code. Once this example is running, try out the filtering functionality with these HTTP requests:
http://127.0.0.1:5000/api/v1/resources/books/all http://127.0.0.1:5000/api/v1/resources/books?author=Connie+Willis http://127.0.0.1:5000/api/v1/resources/books?author=Connie+Willis&published=1999 http://127.0.0.1:5000/api/v1/resources/books?published=2010
The database downloaded for this lesson has 67 entries, one for each of the winners of the Hugo Award for best science fiction novel between 1953 and 2014 (avoiding the voting controversy of 2015). The data set includes the novel’s title, author, year of publication, and first sentence. Our API allows users to filter by three fields: id, published (year of publication), and author.
The first request returns all entries in the database, similar to the /all request we implemented for the last version of our API. The second request returns all books by the author Connie Willis (?author=Connie+Willis). Note that, within a query parameter, spaces between words are denoted with a + sign, hence Connie+Willis. The third request filters by two fields—author and year of publication. Instead of the three books returned by requesting ?author=Connie+Willis, this request returns only the entry to The Doomsday Book, published in 1993. The last request returns all Hugo winners from the year 2010 (note that, in some years, more than one Hugo is awarded).
As we can see this version of our API serves a larger number of results, results that are stored in an SQLite database (books.db). When our user requests an entry or set of entries, our API pulls that information from the database by building and executing an SQL query. This iteration of our API also allows for filtering by more than one field. We’ll discuss potential uses for this functionality after examining our code more closely.
Understanding Our Database-Powered API
Relational databases allow for the storage and retrieval of data, which is stored in tables. Tables are similar to spread sheets in that they have columns and rows—columns indicate what the data representes, such as “title” or “date.” Rows represent individual entries, which could be books, users, transactions, or any other kind of entity.
The database we’re working with has five columns id, published, author, title, and first_sentence. Each row represents one book that won the Hugo award in the year under the published heading, and the text of which begins with the sentence in the first_sentence column.
Rather than use test data defined in the application, our api_all function pulls in data from our Hugo database:
def api_all():
    conn = sqlite3.connect('books.db')
    conn.row_factory = dict_factory
    cur = conn.cursor()
    all_books = cur.execute('SELECT * FROM books;').fetchall()

    return jsonify(all_books)
First, we connect to the database using our sqlite3 library. An object representing the connection to the database is bound to the conn variable. The conn.row_factory = dict_factory line lets the connection object know to use the dict_factory function we’ve defined, which returns items from the database as dictionaries rather than lists—these work better when we output them to JSON. We then create a cursor object (cur = conn.cursor()), which is the object that actually moves through the database to pull our data. Finally, we execute an SQL query with the cur.execute method to pull out all available data (*) from the books table of our database. At the end of our function, this data is returned as JSON: jsonify(all_books). Note that our other function that returns data, api_filter, will use a similar approach to pull data from the database.
The purpose of our page_not_found function is to create an error page seen by the user if the user encounters an error or inputs a route that hasn’t been defined:
@app.errorhandler(404)
def page_not_found(e):
    return "<h1>404</h1><p>The resource could not be found.</p>", 404
In HTML responses, the code 200 means “OK”(the expected data transferred), while the code 404 means “Not Found” (there was no resource available at the URL given). This function allows us to return 404 pages when something goes wrong in the application.
Our api_filter function is an improvement on our previous api_id function that returns a book based on its ID. This new function allows for filtering by three different fields: id, published, and author. The function first grabs all the query parameters provided in the URL (remember, query parameters are the part of the URL that follows the ?, like ?id=10).
query_parameters = request.args
It then pulls the supported parameters id, published, and author and binds them to appropriate variables:
id = query_parameters.get('id')
published = query_parameters.get('published')
author = query_parameters.get('author')
The next segment begins to build an SQL query that will be used to find the requested information in the database. SQL queries used to find data in a database take this form:
`SELECT <columns> FROM <table> WHERE <column=match> AND <column=match>;
To get the correct data, we need to build both an SQL query that looks like the above and a list with the filters that will be matched. Combined, the query and the the filters provided by the user will allow us to pull the correct books from our database.
We begin to define both the query and the filter list:
query = "SELECT * FROM books WHERE"
to_filter = []
Then, if id, published, or author were provided as query parameters, we add them to both the query and the filter list:
    if id:
        query += ' id=? AND'
        to_filter.append(id)
    if published:
        query += ' published=? AND'
        to_filter.append(published)
    if author:
        query += ' author=? AND'
        to_filter.append(author)
If the user has provided none of these query parameters, we have nothing to show, so we send them to the “404 Not Found” page:
    if not (id or published or author):
        return page_not_found(404)
To perfect our query, we remove the trailing ` AND and cap the query with the ;` required at the end of all SQL statements:
query = query[:-4] + ';'
Finally, we connect to our database as in our api_all function, then execute the query we’ve built using our filter list:
conn = sqlite3.connect('books.db')
conn.row_factory = dict_factory
cur = conn.cursor()

results = cur.execute(query, to_filter).fetchall()
Finally, we return the results of our executed SQL query as JSON to the user:
return jsonify(results)
Whew! When all is said and done, this section of code reads query parameters provided by the user, builds an SQL query based on those parameters, executes that query to find matching books in the database, and returns those matches as JSON to the user. This section of code makes our API’s filtering capability considerably more sophisticated—users can now find books by, for example, Ursula K. Le Guin that were published in 1975 or all books in the database published in 2010.
Our API in Practice
Now that we have implemented our Distant Reading API, let’s consider how it might be of use in digital projects and in research.
One of the advantages of providing data through an API, as opposed to providing some kind of downloadable database or file for users, is that, as new data or additional resources are added, they become immediately available to projects built using the API. Imagine that we make our API publicly available, and a user creates a visualization that plots the length of a novel’s first sentence in characters against its year of publication:
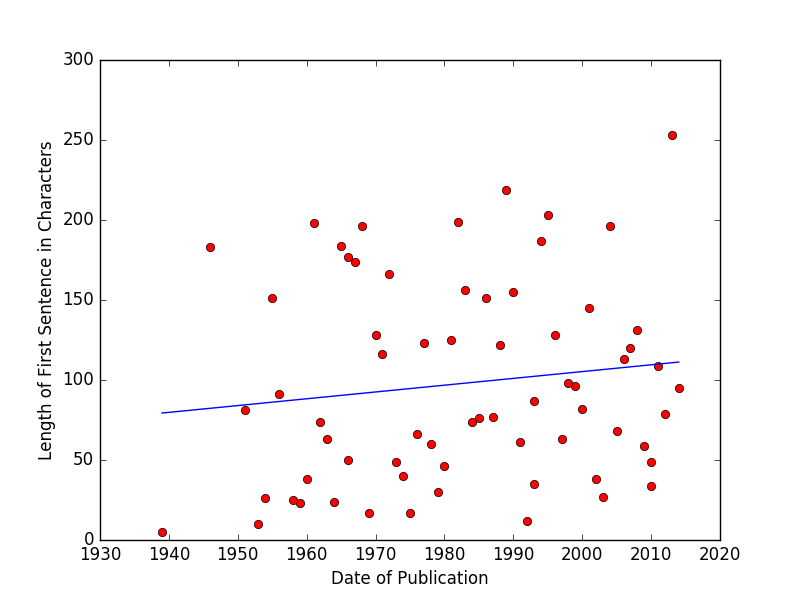
Scatterplot of first sentence length against date of publication.
As new Hugo winners were added to the database, the script that generated this visualization would immediately be able to use the new information. If the visualization were created in D3 or another web-based utility, this plot would actually reflect additional data added to the book archive as soon as the archive was updated—that is, in real time. As additional data accrued, we might, for example, learn if John Scalzi’s unusually lengthy opening to his 2013 Red Shirts was an aberration or the continuation of a longer trend toward wordiness in science fiction. Conversely, if your API were to change its URL structure or cease to function, applications based on it will no longer work. Remember that, when creating an API, you are assuming some responsibility for the applications that others may build with it.
A strong API can be considered the backbone of a potentially limitless number of projects or avenues of research. Though the above example takes the form of a visualization of the limited amount of data we’ve provided in our Distant Reading Archive, a project based on this API might just as easily take the form of a Twitterbot that shares first sentences (learn how to make one with this Programming Historian lesson) or a library webpage that displays book openings and year of publication alongside other book metadata. In many cases, it makes sense to first create an API interface to your core data or functionality before extrapolating on it to create a visualization, application, or website. Not only does it make your work accessible to researchers working on other projects, but it often leads to a more comprehensible and maintainable project.
Resources
The below resources provide information on useful APIs for researchers in the humanities and social sciences as well as further reading on API concepts.
APIs for Humanities Researchers
Chronicling America (Library Of Congress) - A digitized collection of American newspaper articles from the 18th to the 20th century.
Connecting Repositories (CORE) - A collection of open access articles from various sources hosted by the Open University.
English Broadside Ballad Archive (EBBA)
History Data Service (HDS) - A collection of data from a wide variety of historical sources.
API Resources
Anatomy of a URL - Explains the different sections of a URL (protocol, domain, path, and so on) in greater detail.
Original Paper on REST - PhD thesis by Roy Thomas Fielding that introduced the concepts behind the REST philosophy of API design.
The Flask Mega Tutorial - The most well-known tutorial for learning the Flask web framework.