Contents
- Introduction: A Small Collaborative Publishing Ecosystem
- Setup
- Authoring and Editing
- Reviewing and Publishing
- Drawbacks and Limitations
- Moving an existing website to Jekyll
- Help
- Acknowledgements
- Footnotes
Introduction: A Small Collaborative Publishing Ecosystem
This lesson will help you turn a basic Jekyll-generated website into a digital humanities (DH) community blog or other multi-author scholarly website, such as a simpler version of the DH center website and blog ScholarsLab.org. The “Building a static website with Jekyll and GitHub Pages” lesson explained how to create a free, easy-to-maintain, preservation-friendly, secure website over which full control is held, such as a scholarly blog, project website, or online portfolio. In this lesson, we provide novice-friendly instructions on how to turn that basic Jekyll website into an active, community-authored blog with a system for reviewing writing and other site changes before moving them to the website.1
The tutorial is divided into two parts: initial, one-time start-up actions; and the steps to follow each time you want to author or edit the site. This lesson will cover creating and editing blog posts on your site and creating and integrating author information for sites supporting multiple authors. We also offer practical advice on the challenges this sort of set-up offers for community authorship as well as questions to consider before undertaking this sort of workflow. If you have an existing blog you are hoping to migrate to Jekyll, we briefly advise on this process near the end of this lesson.
Pre-requisites and requirements
This lesson assumes you are starting from an existing Jekyll website you have created yourself, either by:
- completing The Programming Historian’s “Building a static website with Jekyll and GitHub Pages” lesson
- setting up a basic Jekyll-generated website hosted on GitHub Pages, and understanding how to work with it locally using the GitHub Desktop app and your command line (topics covered in that lesson).
You will start from a copy of the https://github.com/amandavisconti/jekylldemo repository (which runs a site that looks like https://amandavisconti.github.io/JekyllDemo), and you will finish with a repository that looks like https://github.com/scholarslab/CollabDemo and a site that looks like https://scholarslab.github.io/CollabDemo. “Repo” is a commonly used abbreviation for “repository” that you might see used elsewhere.
You may be able to follow this lesson using any kind of computer, but this lesson is written by users working on Macs and does not cover some specific details of Windows and Linux use. You will also need a steady internet connection that can support downloading software. This lesson was written for and tested against:
- Ruby version 2.3.0
- Jekyll version 3.3.0
- The GitHub interface as of September 2020
- The Netlify interface as of September 2020
In the version of this lesson that we use for our research center’s blog, users tend to complete the lesson in 1–1.5 hours.
How difficult is this lesson?
The steps in this tutorial are unambiguous and there are very few choices you need to make as you work through this lesson. We tried to make it very detailed, combining the steps to take along with explanations of why you are taking these actions. We have included screenshots so you can compare what you are seeing with what the lesson thinks you should be seeing. A help section includes a handy recap of the steps described below (useful once you understand them and need an accessible reference), links to a glossary of key terms, and further reading.
You will learn some new terms and gain familiarity with the GitHub.com interface. You will not need to use the command line or understand git/versioning. (We discuss two versioning concepts briefly, but you will not need to understand these to do this tutorial.)
Scholarly case study: Digital Humanities center research blog
This lesson’s case study centers on https://ScholarsLab.org, a collaboratively authored, scholarly blog and web presence for which this lesson’s authors are key contributors. The Scholars’ Lab is the University of Virginia Library’s internationally recognized community lab for the practice of experimental scholarship in all fields, informed by digital humanities, spatial technologies, and cultural heritage thinking.
In early 2019, the Scholars’ Lab relaunched this website to improve its appeal and accessibility, and to more clearly explain how our website informs scholars at our university and beyond about our in-progress and completed scholarship. As part of this redesign, we migrated the site from WordPress to a Jekyll-generated static site moderated through GitHub, which led to the collaborative creation of documentation to help our community members continue to contribute. This community includes 13 staff, a yearly cohort of approximately 50 students in formal roles, and a variety of other students, staff, and faculty collaborators. Technical knowledge among the blog’s potential authors ranged from none to expert-level, so ensuring everyone’s ability to confidently publish on our site was a key goal.
The migration decision used minimal computing thinking to weigh the benefits of WordPress (novice-friendly blogging and content editing dashboard, widgets/plugins) against its downsides (for example, sysadmin upkeep such as monthly or weekly code updates). The Scholars’ Lab focus on working with rather than for our collaborators, and on HTML, CSS, git/GitHub, and Markdown as foundational knowledge for digital scholarship, influenced our decision to move from WordPress to Jekyll. In doing so, we traded fewer people needing to exert more effort to run the website for more people needing to each expend less learning effort on the site. Our migration added a review process where there previously was none, using GitHub’s permission settings and pull request process to allow authors to request a read-through or feedback from other community members before publishing work publicly.
The example of scholarsLab.org helps explain the scholarly motivations behind technical choices in this lesson, but the website you will develop over the course of this tutorial will be considerably smaller and simpler. You will finish with a site where multiple authors can blog and edit webpages, but the lesson does not explain how to change the visual design of your website or how to add other functionalities (see the Drawbacks and Limitations section for more information). It does, however, include a number of features and issues relevant to developing a collaborative blogging environment based on Jekyll.
Why might this setup fit your needs?
Using a blog as a collaborative research notebook is a good way for a small, committed group of researchers to share their ongoing work with the scholarly community and public. Research shows that open publishing does not inhibit additional publication through more traditional scholarly channels,2 and, in digital humanities in particular, it is not unusual for exemplary blog posts to find their way into peer-reviewed journal articles and essay collections.3 Publishing ongoing work in this way can help your group to control when and how your work gets distributed to others, and you can learn from and build on it.
Collective blogs are common thanks to platforms like WordPress, but this lesson is designed to give you more direct control over the blogging process and product than a commercially hosted solution (such as WordPress.com) or a self-hosted but complex software suite (WordPress or Drupal, for example). Designing your own blogging environment, as much as you can, gives you and your collaborators more oversight of the mechanisms by which your research reaches the world. In the case of the Scholars’ Lab, our workflow has allowed us to more easily collaborate on series of posts with one another and with colleagues from other institutions. Because we control the technical infrastructure, we can design the blogging environment to meet our needs rather than adapting or limiting our needs to fit into a pre-constructed blogging environment. When working in a platform like Jekyll you trade ease of use for distributed labor, and the choice to do so should be made carefully.
Using a static-site approach like Jekyll can help some sites be more secure and load faster, compared to sites built on WordPress and other complex content management systems (CMSs). By default, Jekyll has fewer total files and lines of code behind the site, which can make it easier for more people to fully grasp what that code does, and faster for the site to load even on less reliable internet connections. CMSs are often more vulnerable to spam and hacking because of weaknesses in database security, commenting systems, and a proliferation of plugins and themes that are easy to install but harder to fully assess and check before installation or upgrading. Static sites are not invulnerable to attacks, however, and can easily become bloated and unwieldy (for example, by adding lots of media files, complicated search features, or Javascript). The key differences between static sites and complex solutions like CMSs are in what you start with (a smaller set of code) and what that foundation facilitates (better understanding of your own simple site, without relying on a lot of code you do not fully understand or need that can slow your site or make it vulnerable to attacks).
This lesson will offer experienced-based advice for how to successfully navigate such a setup with contributors of varying skill sets and levels, and a supportive workflow designed to accommodate those needs.
This lesson uses GitHub because it is free and was the best fit for the purposes of our scholarly case study, but you may wish to research the features of comparable opensource, free (such as GitLab) and paid (such as hosting on your own servers4) options for versioning and web hosting.5
Setup
Before starting collaborative writing and publishing on your site, you will need to follow the one-time setup steps below to make sure you are working from the same set of files as the authors, set up a way to view your site changes before publishing them, allow your site to handle multiple authors, and set reviewer permissions.
Import the demonstration repository
To make sure you are working from the same files and settings as we are, this lesson will have you work from a demonstration set of code6.
Download a ZIP file of the code we will work from by clicking on this link. This code represents the end state of the site produced by the previous Programming Historian lesson on Jekyll.
Log into GitHub (create an account if you don’t have one). On the upper left of https://github.com, click on the green “New” button.
Screenshot of creating a new repository
In the “Repository name” field, write a short name for your repository. We recommend “CollabDemo”, as this matches the demo repository we set up.
Skip all other options on the page and click on the green “Create repository” button at the bottom of the page.
Under the “Quick setup” section, click the “uploading an existing file” link.

Screenshot of the link to upload the demo ZIP file
Double-click on the ZIP file to unzip/decompress it. Inside the resulting folder, select all the files at once and drag them onto the screen (where it says “drag files here”). Click the green “Commit changes” (save) button at the bottom left of the screen.
GitHub will return you to the main page for your repository, now complete with all your uploaded files. Next, make a new branch (copy of our files) called “gh-pages” that GitHub will specifically use for publishing your site. Click the “master” button at left of the screen to make a new branch, type in “gh-pages”, and then click the button that appears offering to create a gh-pages branch for you.
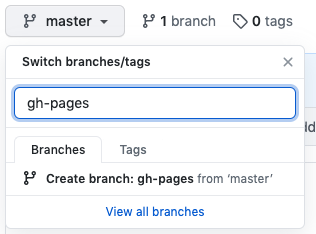
Creating a gh-pages branch in the GitHub interface
Lastly, make “gh-pages” your default branch by selecting the settings tab from the top menubar, selecting branches from the left sidebar, and looking for the section titled “default branch”. Change “master” to “gh-pages” and click update. You will need to confirm your choice.
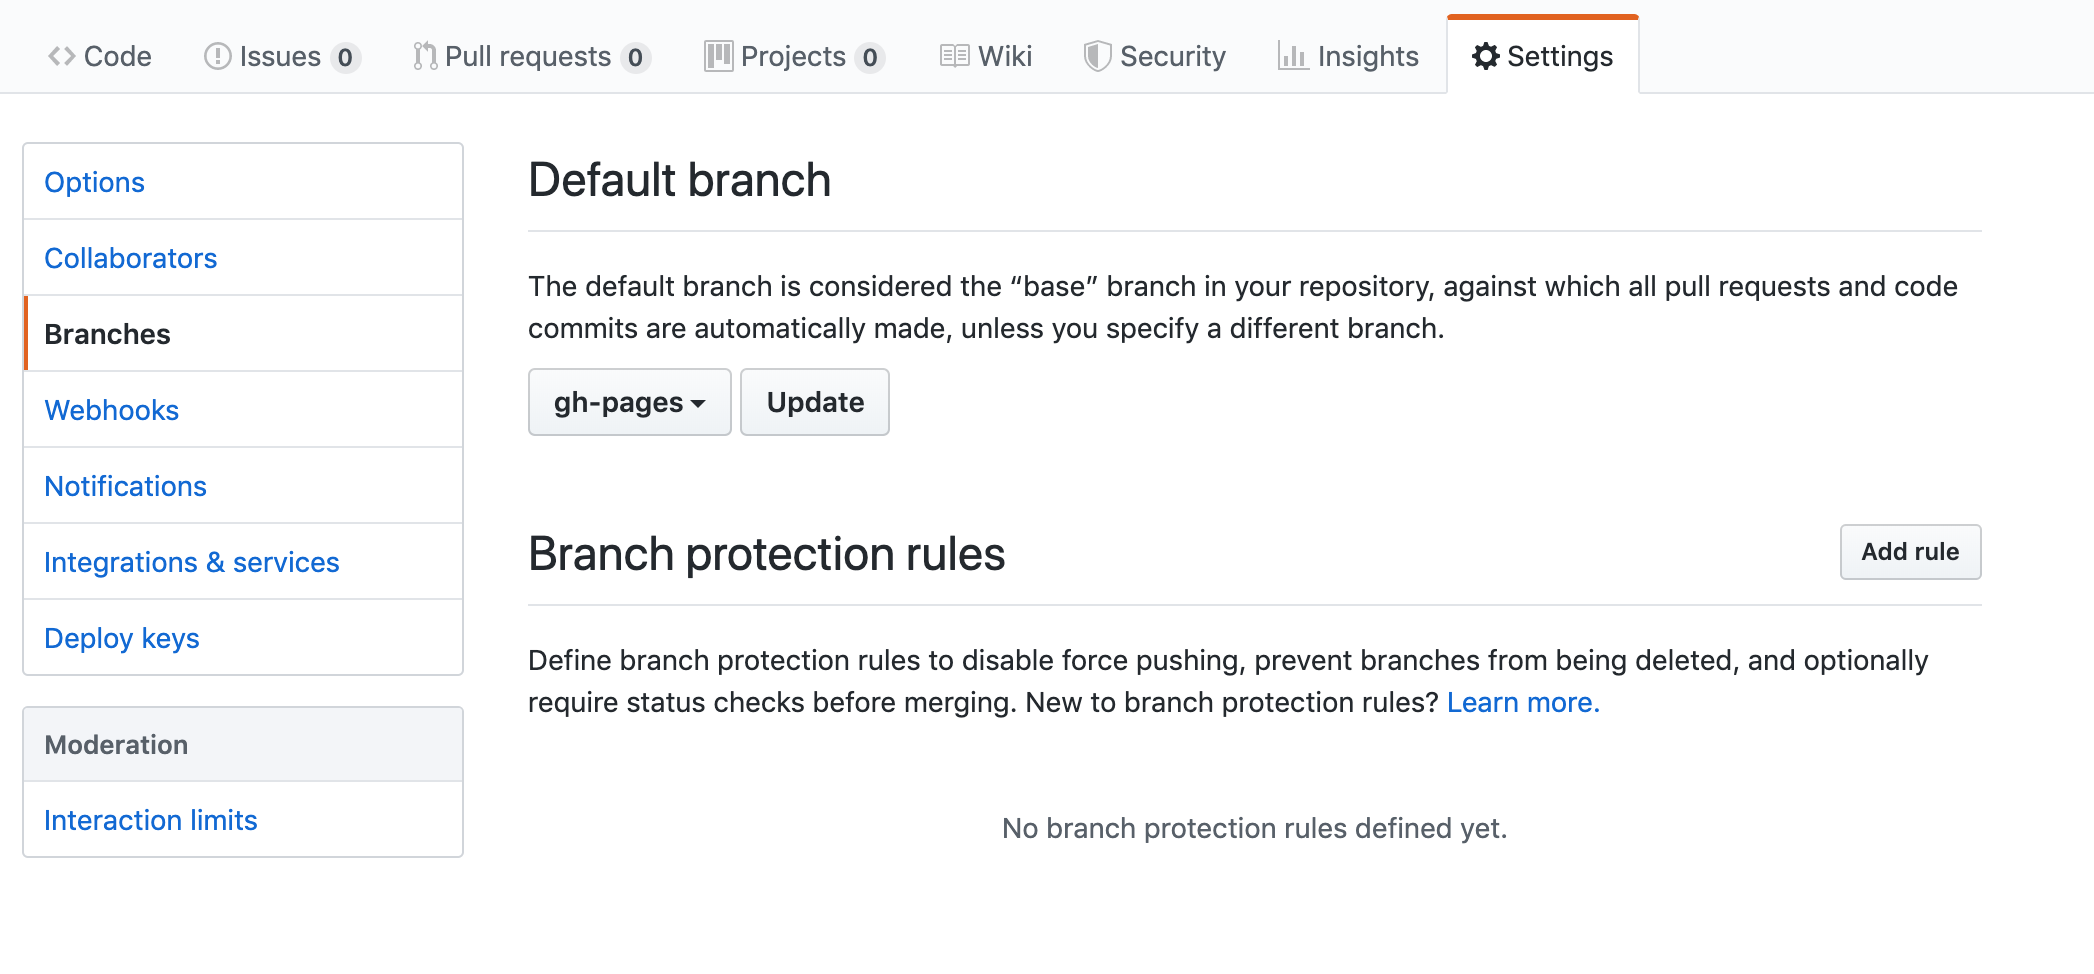
Update your default branch to gh-pages for the repository
In this lesson, when we write a link that includes https://github.com/scholarslab/CollabDemo, please replace “scholarslab” with your GitHub username, and “CollabDemo” with the name you entered for your repository above.
Set up Netlify
Netlify is a service that allows you to preview new content submitted by your collaborators before making it a part of your website. This makes it easier for people of varying technical levels to contribute to your project, but it requires some setup. Netlify is free to use up to a point, but they do begin to charge for their service depending on how frequently you use them to preview your site. More information on their billing can be found on their website.
Sign up for an account on netlify.com and log in. You should see the following screen:

Screenshot of the Netlify dashboard
You will need to link your Netlify account and your GitHub account. You can do this by accessing your user settings by clicking on the avatar associated with your username in the top right of the screen.
Screenshot of how to access Netlify settings in top right of the dashboard
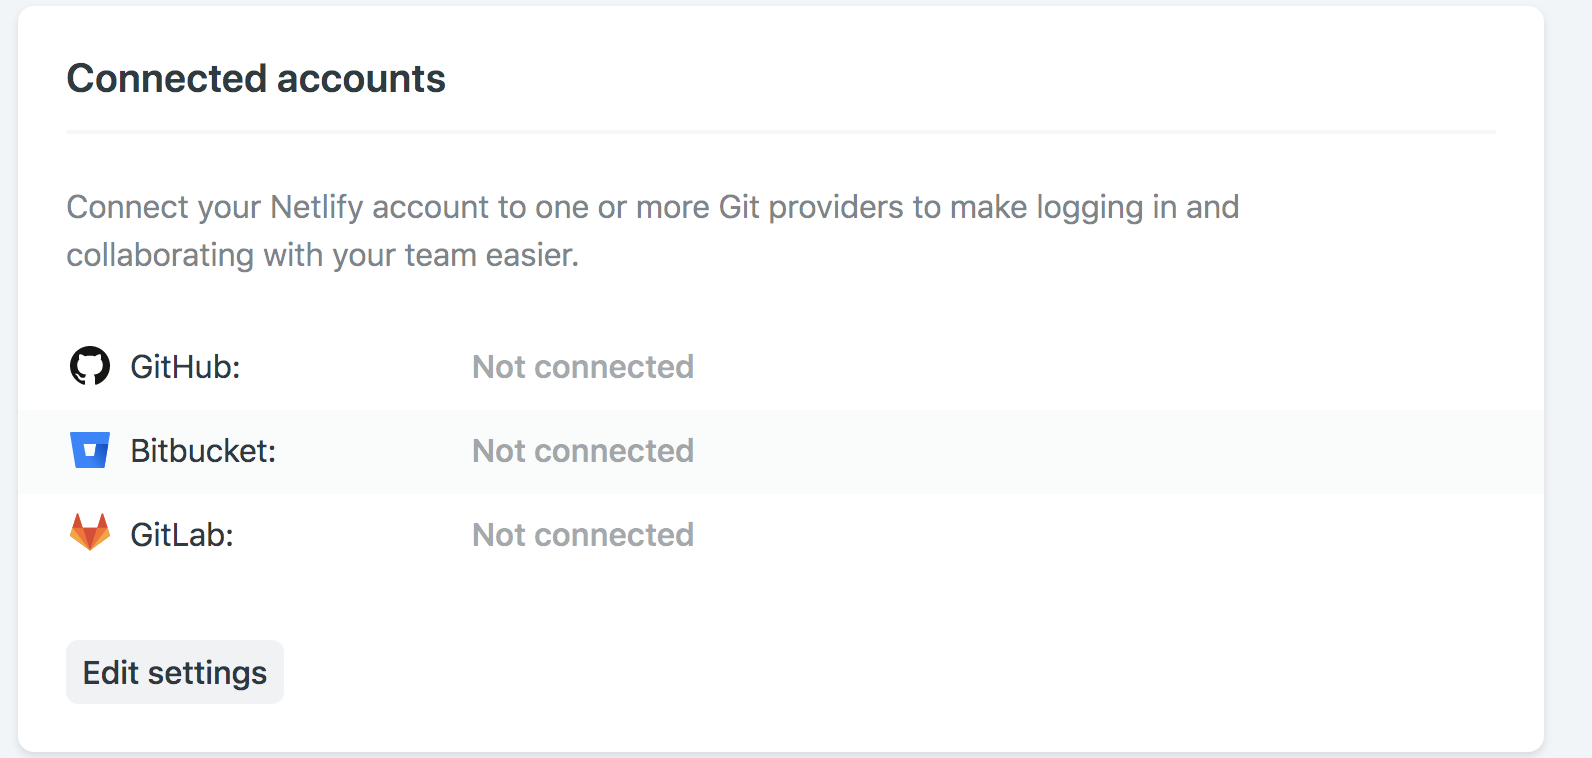
Within this interface, scroll down to the section titled “connected accounts,” click “edit settings”, and click “connect” next to GitHub. A dialog box should pop up asking you to log into GitHub. After doing so, click “authorize” to allow Netlify to interact with the code that you are publishing through GitHub.
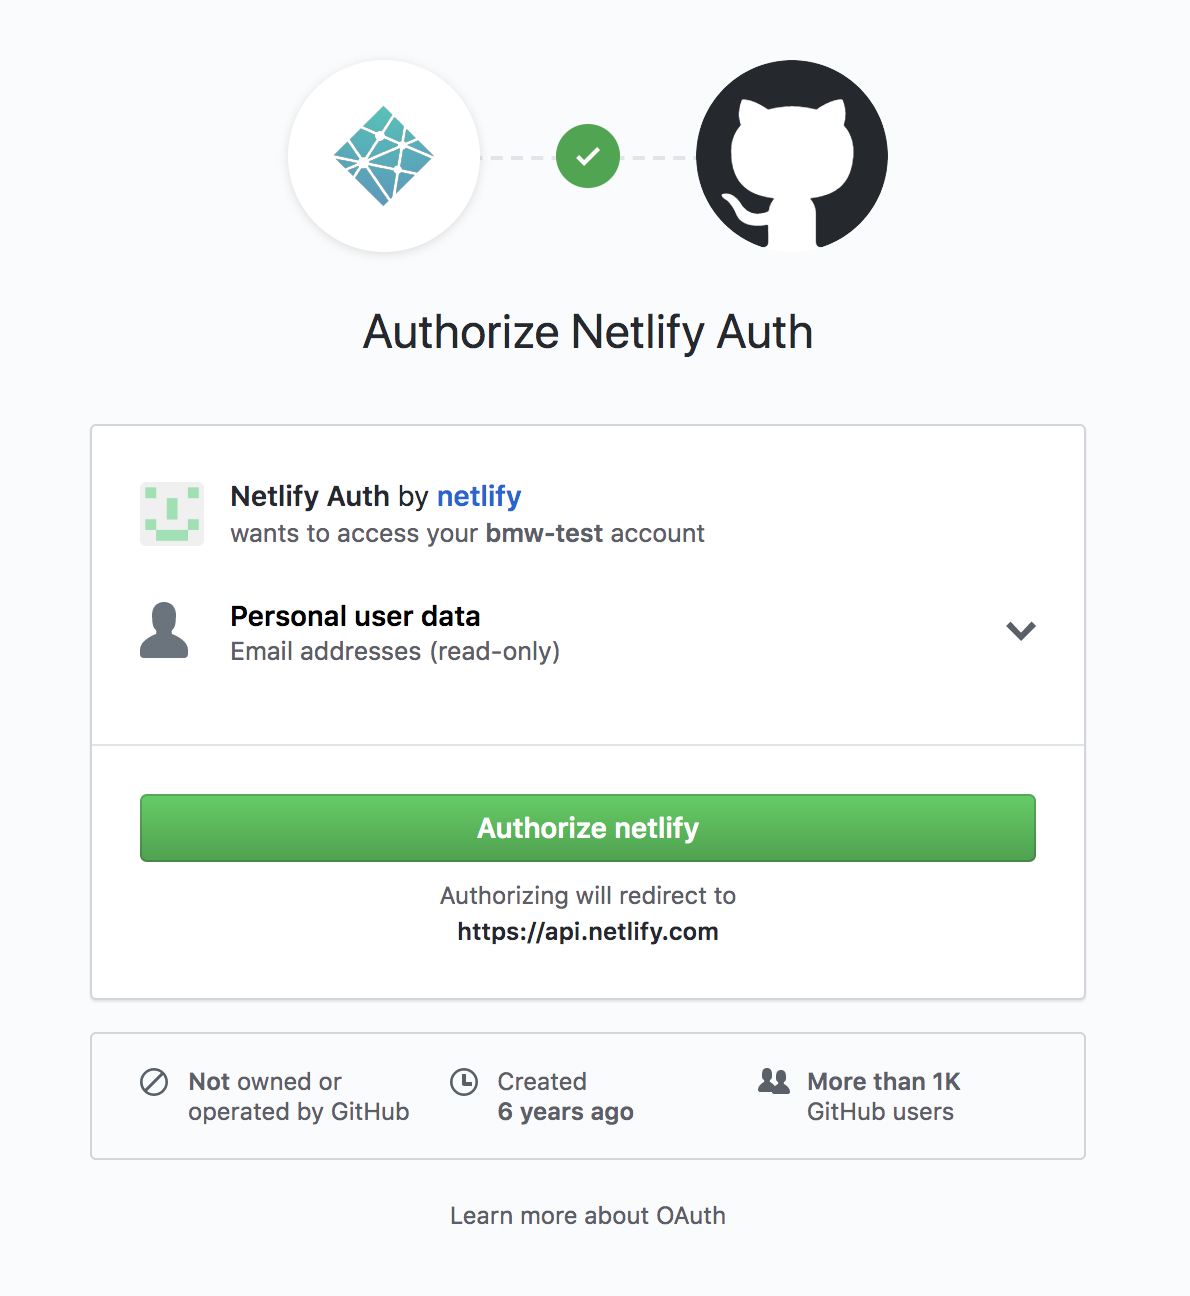
Screenshot of authorization pop up for Netlify
After authorizing Netlify, return to the Netlify dashboard and select “New site from Git.” Select “GitHub” on the page that it redirects you towards, and then select “Authorize” if another popup appears. The dialogue will ask whether you want to authorize Netlify for all apps or select a specific one. Either is fine, but for the purposes of this lesson we will be specific and simply select the particular repository you created for this lesson. Then select install.
The “create a new site” Netlify window will shift slightly to offer new options. Select your repository. Under “branch to deploy” select “gh-pages.” Netlify will automatically detect that you have a Jekyll site and fill in other settings under build command and publish directory for you.
Finally, click deploy. Netlify will be waiting for you to use later in the lesson.
Set up your site for multiple authors
In its original form, Jekyll does not meet the expectations you might have for a collaborative research environment. We need to customize the basic Jekyll set-up to better accommodate multiple authors working collaboratively. This section will set up your site to link a post’s author name to a page with biographical information and past posts by that author.
Note: throughout this section you can explore changes to your website by visiting https://scholarslab.github.io/CollabDemo (substituting scholarslab with your GitHub username and CollabDemo with the name you gave your repository).
If you did the previous lesson on Jekyll, you can use those skills in this section to edit repository files on your desktop and commit them using the GitHub Desktop app.7 If you are not comfortable with this, please see the authoring and editing section later in this lesson where we explain how to create and edit files entirely on GitHub.com for collaborators who may prefer to do everything in the browser. Although that section focuses on creating and editing posts, the same steps apply for creating and editing any website files.
By default, Jekyll’s main piece of data is the post. You can tell Jekyll who the author of that post is, but, as far as Jekyll is concerned, that “author” is just a string of characters. If we want to give authors more robust identities, we will need to give Jekyll a sense of authors as a type of information. In Jekyll, each of these distinct types of data is called a collection, and we need to take steps to integrate them in our blogging environment. First, we need to create the idea of an author collection. To do so, open _config.yml in a plain text editor and add these three lines at the end:
collections:
  people:
    output: true
Second, we will need to create new authors for our site. Just as with our blog posts in their _posts folder, each author will live in its own file in a specific folder. Make a new folder in the repository called “_people”. Inside the _people folder, create two new files for the two authors of this lesson. Title these files amanda-visconti.md and brandon-walsh.md (or names of actual intended authors on your site). Next we will add content to each.
Inside amanda-visconti.md, add:
---
name: Amanda Visconti
layout: author
---
Amanda Visconti is Managing Director of the Scholars' Lab at the University of Virginia Library.
Inside brandon-walsh.md, add:
---
name: Brandon Walsh
layout: author
---
Brandon Walsh is the Head of Student Programs in the Scholars' Lab at the University of Virginia Library.
Each author for the blog now exists as a piece of data in our Jekyll project. Note that the YAML header (the piece between three dashes at the top of each file) contains metadata about the collection. We can access these pieces of data in other parts of the project. The layout: key signals that each author’s page will draw upon the “author” layout, which we need to create now.
In the top level of your repo, create a new folder called “_layouts” and, inside it, create a new file called “author.md”. Inside author.md, insert the following content:
---
layout: default
---
<h2>{{ page.name }}</h2>

{{ content }}
This page creates the template for each individual author page through a mixture of items that will appear common to all author pages (like “Biography:”) and items that will be specific to particular author pages that work by accessing the metadata fields for particular authors to find their name from the YAML header.
To make these pages accessible, we need to create a page that lists all the site’s authors in one place. Make a new file called “writers.md” in the base of our repository and inserting these lines:
---
layout: page
title: Authors
---
All authors on this research project:

{% for person in site.people %}

* <a href="{{ site.baseurl }}{{ person.url }}">{{ person.name }}</a>

{% endfor %}
Now, we will make some final adjustments. First, we can edit the pages for individual authors to display a list of all the posts written by them. Open _layouts/author.md and below the code that is already there, add:
<h2>Posts by {{ page.name }}:</h2>
<ul>
{% for post in site.posts %}
{% if post.author == page.name %}
<li><a href="{{ site.baseurl }}{{ post.url }}">{{ post.title }}</a></li>
{% endif %}
{% endfor %}
</ul>
_layouts/author.md should now look like:
---
layout: default
---
<h2>{{ page.name }}</h2>

{{ content }}

<h2>Posts by {{ page.name }}:</h2>
<ul>
{% for post in site.posts %}
{% if post.author == page.name %}
<li><a href="{{ site.baseurl }}{{ post.url }}">{{ post.title }}</a></li>
{% endif %}
{% endfor %}
</ul>
Now we will ensure author information appears on our existing posts. Any future posts should include this information as well. Navigate to each existing post and add author: on its own line in the front matter if it does not already exist, followed by the post author’s name. This name needs to be written exactly as it appears in the author bio file the site has for you (check the repository’s /_people folder/your-name.md next to its “name” YAML). If you want to change displayed name, first change the “name” field in /_people folder/their-name.md.
The YAML at the top of a post should now look like this:
---
layout: post
author: Amanda Visconti
title:  "A Post about My Research"
date:   2016-11-12
---
You are nearly finished! If you were to look at an individual post on your website, you would see that it already lists the author of the post. But if you were to try to click it, Jekyll will not let you do so. We need to connect that static string of characters listed on the top of each post to the author pages that we created. To do that, you will need to create another layout. Create a new file named “post.md inside /_layouts”. Inside it, add:
---
layout: default
---
<article class="post" itemscope itemtype="http://schema.org/BlogPosting">

  <header class="post-header">
    <h1 class="post-title" itemprop="name headline">{{ page.title | escape }}</h1>
    <p class="post-meta"><time datetime="{{ page.date | date_to_xmlschema }}" itemprop="datePublished">{{ page.date | date: "%b %-d, %Y" }}</time>{% if page.author %} • <span itemprop="author" itemscope itemtype="http://schema.org/Person"><span itemprop="name">
    {% for person in site.people %}
    {% if person.name == page.author %}
    <a href="{{ site.baseurl }}{{ person.url }}">{{ page.author }}</a>
    {% endif %}
    {% endfor %}
    </span></span>{% endif %}</p>
  </header>

  <div class="post-content" itemprop="articleBody">
    {{ content }}
  </div>

</article>
That might seem like a lot, but only a few lines have been changed. When you install Jekyll on your computer you are installing a lot of default files that are hidden from your view but are used by Jekyll to build your site. The result is that your repository will only show the files you actually are working with, but it can obscure what is happening beyond our iew. Minima is the default theme for Jekyll at the time of writing, which means that you are working with a lot of files with decisions that have already been made for you by that theme. If you are interested in seeing the default files for the minima theme, type bundle show minima from the command line. In this case, the lines we modified from the original theme are:
  {% for person in site.people %}
    {% if person.name == page.author %}
    <a href="{{ site.baseurl }}{{ person.url }}">{{ page.author }}</a>
    {% endif %}
    {% endfor %}
At first, the theme only listed the assigned author for the post. We’ve added a loop that checks all the people on the site and, if it finds a name that matches the author of the post, it will link to that person’s author page.
Reviewer permissions
Our review process will rely on GitHub’s “pull request” (aka PR) system. Pull requests are a way to ask that the changes you have made in your “branch” (copy of the website files) be “pulled” (moved) into another branch. In our case, we ask contributors to make a copy of our website files, add or edit posts on that copy, then move those changes back into the default branch of the repository (which controls what visitors to your website see) once the changes are ready to integrate.
Our review adds two features to your publishing workflow. First, the ability to run “checks”: a feature for your pull requests that can alert you to bugs in your new code or (as we will show in this lesson) give you a preview of what your changes will look like before they are moved to the public website. Second, we’re adding the opportunity for review by making it easy to alert one of your collaborators to look over your changes, before moving them to the website. You can require this review if you or your collaborators are concerned about accidentally breaking the site or want everyone in your research team to sign off on writing about shared work. You can also make review optional, if contributors only want to use it when desiring feedback on their writing before it goes public. A workflow like this also helps to make the shared blog more truly collaborative by encouraging collective ownership over the material, and also ensures that your content reaches your audience in the ways you intend.
Caveat: These steps set up a workflow involving pull requests that will ensure collaborative review of your work before making it part of the public record. But it is still possible for an owner to accidentally push (move) changes directly to the gh-pages branch and affect the main site by bypassing this process. In order to restrict who can push to a particular branch on a more granular level than described here, you would need to follow GitHub’s instructions to create a GitHub “organization” (a team container which multiple repositories can live inside; for example, Scholars’ Lab GitHub organization containing all the lab’s repositories). You would then need to make this repository a part of a GitHub organization.
Our instructions assume:
- You created the repository, so you automatically have the “owner” permission setting associated with your GitHub account.
- You are one of the site authors most comfortable with running the site, and therefore do not need someone else to approve your changes before merging them (making them appear on the site).
- One or more other people will also blog on your site, and you want to prevent these collaborators from pushing content to the public site without your checking over and approving their changes (at least until they are more comfortable with the workflow)
Even if you are the only person authoring on your site, using branches and pull requests as discussed in this lesson can help you separate any pieces of work that are proceeding at different paces separate. For example, if you start implementing a new homepage layout, but then want to publish a new blog post while the homepage changes are still in progress. You can put these two sets of work in separate branches, which lets you publish the post with the old homepage layout. Also, using branches lets you run Netlify (also discussed below) to see how your changes look before making them public, without needing to be comfortable with using the command line to run a local version of the site. Owner permissions mean that you do not need to wait for someone else to review your pull request before merging it (that is, making it appear on the live website), although you can always request and wait for review if you want feedback.
Remember to substitute https://github.com/your-username/your-repo-name for https://github.com/scholarslab/CollabDemo in these instructions. To set up your site for our review process:
Each person in addition to you you who will write on the site should create a user account on GitHub.com, if they do not already have one. They will need to share their username with you (or someone else who owns the repository).
Your repository page (for example, https://github.com/scholarslab/CollabDemo) has a horizontal row of links just below the name of the repository. Click on the “settings” link, then click on “Manage Access” in the left menu.
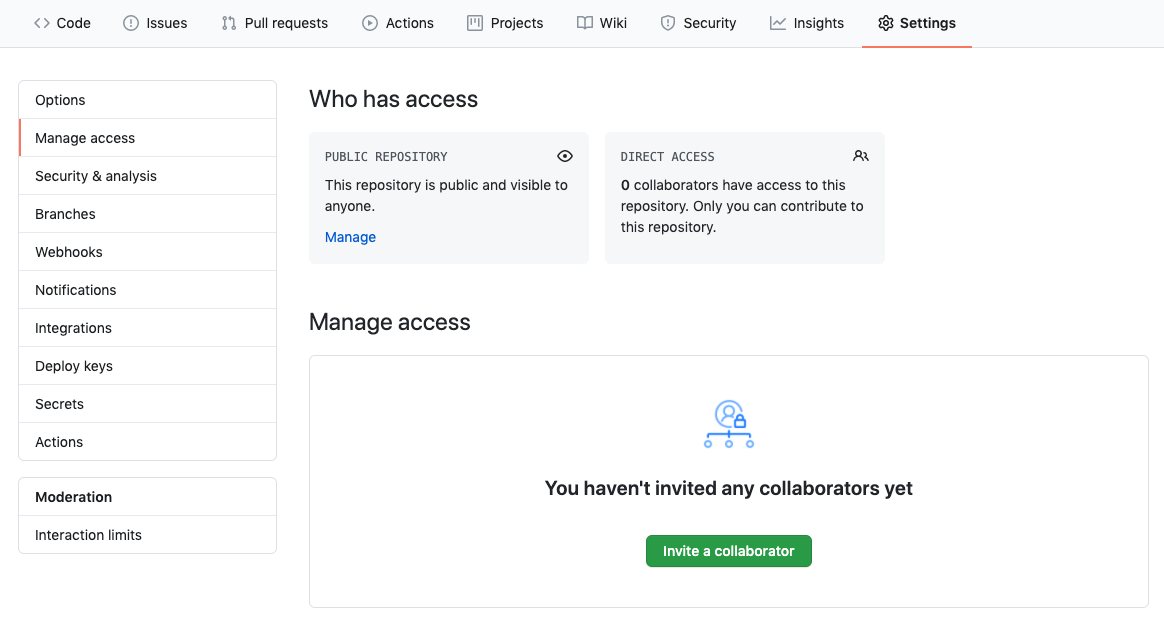
Screenshot of the settings tab in the horizontal row of links just below the name of the repo
You will see a section for “Who has access”, followed by a section for “Manage access.” Inside the “manage access” section, use the “Invite a collaborator” button to raise a search bar for inviting your collaborators. In this search bar, use the “search by username, full name, or email” field to find the GitHub username(s) of people who will share the blog, then click the “invite collaborator” button to give them access.
The collaborator(s) you have added will now be listed in the “manage access” section. GitHub recently updated their settings to allow for two types of users - repository owners and collaborators. There can only be one owner, and everyone else will be a collaborator. This works fine for us. In the Scholars’ Lab, we want new bloggers to need to follow our review process before they can publish to the public website. For more granular control over permissions, you should consider transferring the repository to an organization.
Click on “Integrations” in the left menu. Under “Installed GitHub Apps”, Netlify should be listed; click on the “configure” button to the right of Netlify.
Scroll down to the “Repository access” section. Both options will work: the radio button next to “All repositories” is selected; or if you have other repositories you are not sure you want Netlify to run on, select the radio button next to “Only select repositories”. For the latter choice, your repository should appear in the list immediately below; if it does not, use the “Select repositories” dropdown menu to add your /CollabDemo repository. Click the green “save” button. You might get redirected to Netlify at this point, but we want to keep doing a few other things in the GitHub interface.
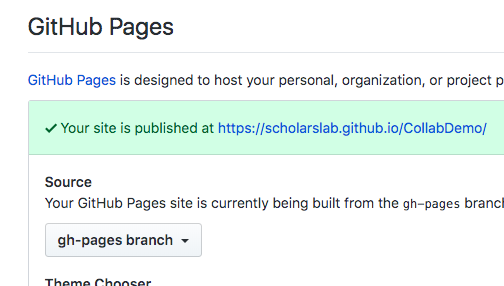
Now we will verify the name of the default branch that GitHub Pages publishes as your website. This should be “gh-pages” if you set up your repository for Netlify according to the earlier instructions. To check this is the case, in your repository settings click on “Options” in the upper left menu, and scroll down to the “GitHub Pages” section to look at what the dropdown under “Source” says. What you see should look similar to the screenshot below, but it might contain a different branch name in the dropdown. Remember whatever branch name is listed here for use in the next step.
Screenshot showing how to check the name of the repository branch that publishes to GitHub Pages
In the upper left menu, click on “Branches”. Scroll past the “Default branch” section to the “Branch protection rules” section. Click the “add rule” button on the far right of “Branch protection rules”.
Under “Branch name pattern”, type the name of your repository branch that is being published by GitHub Pages as a website. If you have followed this lesson closely, the name should be “gh-pages”.
Scroll down to the “Protect matching branches” section and check the checkbox next to “Require pull request reviews before merging”. More information will appear just below this text. Note that the following checkbox options are only displayed after checking this checkbox.
In the dropdown, choose “1”, which will make the dropdown display “Required approving reviews: 1”.
This means that when contributors are ready to publish something, one other person on your team needs to press a button to allow that to happen (with the understanding that they will first read the new material to give feedback and/or fix things such as broken Markdown formatting).
Check the checkbox next to “Dismiss stale pull request approvals when new commits are pushed”.
If someone asks for their blog post to be reviewed, but then makes some changes to that post before the reviewer has a chance to see the post, this means the reviewer will be directed to look at just the latest version of the post up for review. In our setup, people with the “owner” role can already move changes to the public website without needing someone else to approve these first. Anyone can approve a pull request, but the owner is the only one able to do so for their own work.
Check the box next to “Require review from Code Owners”. This will provide a reminder for authors with administrative privileges to wait for a review and/or make certain their code is working before moving it to the public website.
Click the green “create” button at the bottom-left of the page to save your changes.
You will want the site to send notifications if someone on your team requests a reviewer. Each reviewer can receive these notifications by visiting https://github.com/settings/profile and clicking on “notifications” in the left-hand menu. Scroll down to the “email notifications” section, make sure the email account you want to receive notifications is entered correctly, and tick the checkbox next to “Pull Request reviews”.
Your site setup is now complete! Next we explain authoring and editing on your website, including how the review process we just set up works.
Authoring and Editing
In our workflow, there are two parts to authoring on or editing your website:
1. Create a new “branch” and create/edit your post/page there. A branch is a copy of the website’s files, where you can create new posts or change existing pages without these changes showing up on the public website until you are ready for them to be seen. Working in a branch also allows multiple people to work on different posts (or changes to the site; GitHub does not differentiate in how it handles you writing a post or coding a new technical functionality) at the same time. A repository can (and often does) have multiple branches at any one time.
2. “Merge” (move) your work back to the repository’s default branch, which makes your work show up on the website. The default branch is the copy of the website files from which we have told GitHub Pages to build our website. “Merging” means moving any changes/additions you have made in your new branch to another branch (in our case, back to the gh-pages branch from which the site runs).
If you forget what any of these technical terms mean, visit our glossary for a reminder.
The previous Jekyll lesson included a section on how to create and edit posts and pages, so we suggest you review that lesson for a general introduction to blogging in Jekyll8. In what follows, we describe the changes to those instructions that will be required for your site to function better as a collaborative blog. The key differences from the last lesson are:
- the use of branches
- authoring and editing on the GitHub.com website (in your browser) rather than locally (in your computer’s file system)
- several changes to post front matter
- rather than committing directly to your website’s default repository branch, we will show you a different method for review and publishing
Create a branch
Our workflow requires authors to create a new branch before starting new work such as drafting a blog post, editing an existing webpage, or other code changes.
Visit the main page for your website’s “repo” (repository). We will use our demo repo, https://github.com/scholarslab/CollabDemo, as our example. A repository is like a folder of code, and this repository in particular is the place on GitHub.com where we store all the files that make up the CollabDemo website (https://scholarslab.github.io/CollabDemo/).
When you create a new repository, it will start with a single, “default” branch, meaning the repository is the same thing as the default branch. We create branches (copies of the default branch code) so you can make changes to the website (draft a new blog post, edit a page, try out changes with the site’s visual design) without affecting how the live website looks as your changes do not appear publicly until you are ready and without conflicting with simultaneous work others may be doing on the site. To put this another way: the “default” branch is the code producing the website you see, and any other branches you create are spaces where you can draft and experiment without affecting what the public sees on your website.
As discussed above, the default branch you are in at this point should be called gh-pages. When you visit https://github.com/scholarslab/CollabDemo, you will see the default branch of that repository is also named “gh-pages”. This branch contains the code powering the site publicly visible at https://scholarslab.github.io/CollabDemo.
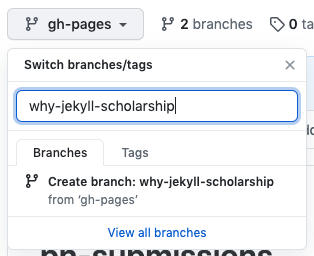
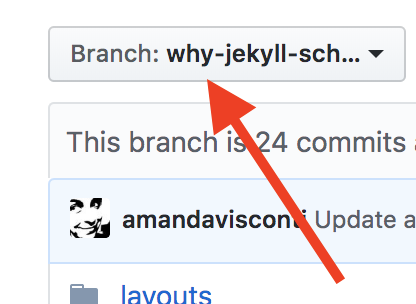
In the middle left side of your browser window, click on the grey “Branch: 🔽” button.
A dropdown appears. In the empty text field (it says “Find or create a branch…” in light grey text in the text field’s background), write a very short descriptive name for your new branch. In our example, we are creating a blog post about using Jekyll to support scholarly blogging, so we named our branch “why-jekyll-scholarship”:
Screenshot showing how to create and name new branch
If your branch name has spaces in it, these will be replaced by hyphens. It is best to keep these names short (1-4 words) so they are easy to see in the narrow width of the dropdown menu. Try not to use branch names like “new-post” because other contributors may also be working on new posts in other branches, so this name could be confusing. Choosing specific and descriptive names helps contributors see what work is happening in the branch, and helps you to remember what you were working on if you take a break and come back later.
When you are creating a branch, please substitute your chosen branch name where we use why-jekyll-scholarhip in this lesson (remember to also change GitHub.com/scholarslab/CollabDemo to match your own username and repository name).
Once you have finished typing your new branch name in the field, you will see a rectangle just below with the words “Create branch: why-jekyll-scholarship”.
When you create a new branch, GitHub automatically moves you there so that any changes you make affect the new branch, rather than the default branch. You can tell what branch you are working in by looking at the branch dropdown to verify that you are in the correct one – in this lesson, we are now in the branch why-jekyll-scholarship. This is that same grey button in the middle left side of the page we clicked before, when we created a new branch. In the screenshot below, you can see that our branch has changed from gh-pages to why-jekyll-scholarship:
Screenshot showing we have switched into our new branch
You can also look at the address bar; the URL will have changed from https://github.com/scholarslab/CollabDemo to https://github.com/scholarslab/CollabDemo/tree/why-jekyll-scholarship.
Now you are on a new branch where you can work without affecting the repository that determines what is on your website so that work-in-progress will not appear publicly.
Authoring and editing on GitHub.com
The previous Jekyll lesson shows how to use Markdown and YAML to write a post or alter a page’s content and front matter. Here, we will explain: how to create, commit, and edit a post on GitHub.com (rather than locally); changes to post front matter to support a collaborative website; and ways to check how your post appears from GitHub.com (that is, when you are not running your website locally).
Create a new post
You should still be in the branch you created to contain your work in progress.
In the repo’s list of files, click on the “_posts” link to move into where the site’s posts are stored.
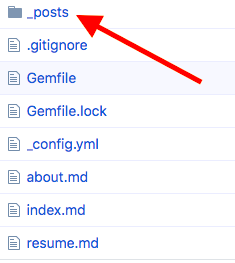
Screenshot of the posts folder you should navigate into
Click on the “Add file” button in the middle upper right side of the page and then select “Create new file “.

Screenshot of the Add file button in GitHub’s interface
You are now in a text editor where you can create your post.
You should fill in the “Name your file” field with a filename in the following format:
- the publication date you wanted associated with the post (formatted as
YYYY-MM-DD) connected by a hyphen to - a “slug” for the post (short descriptive phrase; as with branch naming, it is best to keep the slug text fairly short and use important keywords in it, and you must use hyphens instead of spaces)
- followed by
.mdor.markdown(both are acceptable as the markdown file ending)
For example, one of our example posts’ filenames is 2016-02-29-a-post-about-my-research.md. If it were an actual post with content, it could have a more descriptive filename like 2016-02-29-daily-digital-humanities-personal-research-practices.md.
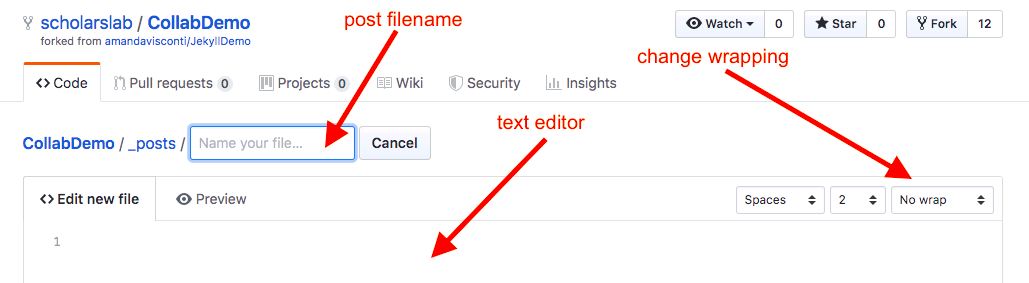
Screenshot of the text editor page
Use the text editor to enter your front matter. Be aware that this post metadata will be different from how it looked in the previous Jekyll lesson; see below for what should change.
You can click on the “No wrap” dropdown in the upper-right of the screen to select “Soft wrap”, which will make your writing experience more pleasant by wrapping text to continue to the next line when it reaches the right margin, instead of extending right until you hit return/move to a new line.
Type some text into the text field so that you can test out the next steps.
Committing – saving your work
GitHub is very forgiving. The most useful element of using git to store and track changes in many versions over time is you can always revert to a previous version. The system for reviewing and merging writing described in this lesson is designed so contributors who are not comfortable with GitHub cannot delete other people’s work or break the website. If a mistake happens, it can be easily corrected by returning to a previous version of how the site looked or functioned.
It is important to note that you can lose text you are currently drafting in the GitHub.com text editor if your tab/browser/computer closes/restarts when you have added new text to the file, but not committed (saved) it yet.
Commit (save) as often as you would save any other work-in-progress. Or, draft your text elsewhere (such as in a GoogleDoc), then paste the final text into the GitHub text editor when you are ready to publish it. You can always switch to the “Preview changes” tab to see how your writing formatting looks (this is especially helpful if you are new to using Markdown formatting):
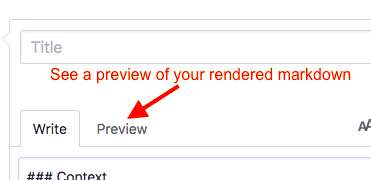
Screenshot of where the text editor’s preview button is found
The previous lesson had you use the GitHub Desktop app to commit and merge, instead we will use the GitHub.com interface. This lets contributors unfamiliar or uncomfortable with the command line or running a site locally do everything from GitHub.com.
To commit your work, scroll down to the bottom of the text editor page.
The commit area is under the text editor area
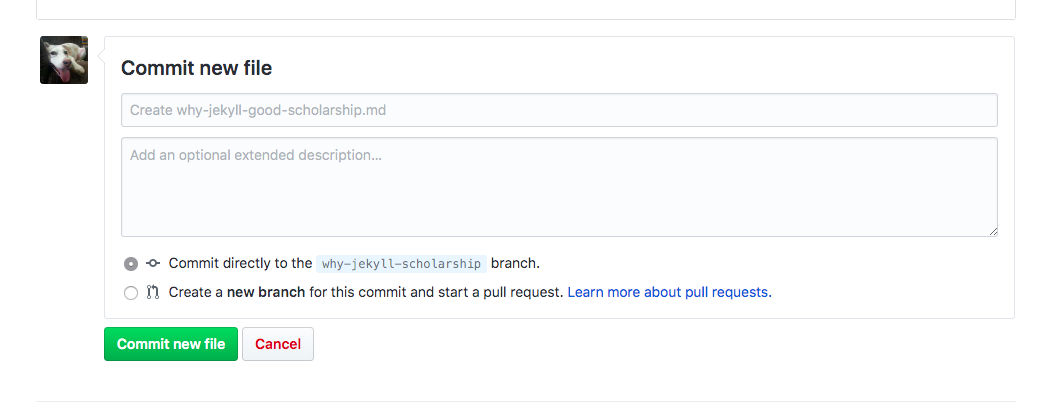
The first text field is a place to write a short description to remind you and inform others about what changes you made to the code (in our case, to your new blog post).
The field will make you stop typing if you attempt to go over the character limit. If you are writing or editing a new blog post, you can opt to write nothing in this field. In that case, the grey default text already in the field (“Create why-jekyll-good-scholarship.md” in the screenshot) is taken as as your commit message. If you are making changes to the site other than blogging, it is helpful to update this field to a short description of what your code has changed or accomplished (such as “Fixed missing author link”).
The larger text box (“Add an optional extended description…”) gives you more space to explain what the code you are committing (saving) does.
If you make changes to the website’s code that others needed to understand, adding text to explain your changes would be useful, but you can ignore it when you are authoring a new blog post. When changing code or editing existing webpages, writing a longer description in this area helps your team easily see who made what changes without having to examine the code itself. These messages will be part of the public record of the repository on GitHub, so be aware that what you write will be visible publicly. If I was writing a blog post, this would be the place where I could leave a note for myself about what I want to write, or to leave a message or notes for collaborators who might see this commit message (such as “I hope you will find this post informative about the problem we discussed earlier”).
Leave the radio buttons as-is (“Commit directly to the [your branch name] branch.” should be selected.
Click the green “Commit new file” button to finish saving your work.
Adjustments to front matter
You will need to make four changes to how the previous lesson directed you to write the front matter of a blog post:
- Add the “author” field (such as “author: Amanda Visconti”)
- Remove the hour, minute, and second info from the “date” YAML (we have not found it useful to track times and it can cause problems and confusion when publishing from different time zones)
- Remove the “categories” YAML field as these lessons do not explain its use
- The post filename does not need to contain a date (for example, “why-jekyll-good-scholarship.md”)
Our front matter should look like:
---
layout: post
author: Amanda Visconti
title:  "A Post about My Research"
date:   2016-11-12
---
“Author” should contain the post author’s name, exactly as written in the author biogarphy file the site has for you (check the repo’s /_people folder/your-name.md next to its “name” YAML). To change how the site display’s an author’s name next to their posts, first change the “name” field in /_people folder/their-name.md.
“Date” should contain the date the post is to be listed as written, using the YYYY-MM-DD format (2018-10-17). Note that the year comes first and hyphens separate the year, month, and day. This date field will affect the URL and metadata for our post and show when it was written. In our current setup, however, the field does not impact when the post is published publicly on our website. This publication happens when the site itself builds, so a post might live on your computer for days before being released to the world, or you might retroactively publish a post dated in the past.
Make a habit of putting quotation marks around your title as this keeps the site from breaking when your title includes unexpected characters like colons.
Edit existing content
To continue to edit your blog post after committing, locate the post file (in the /_posts folder) and click on its link. Then, click on the small pencil icon to the middle right side of the page (if you hover your cursor over the icon, the words “edit this file” appear). This brings you to a text editor, after which you follow the same steps to save your changes as you did when creating a new file.
Screenshot of where to find the edit icon
Checking how your post appears
Although this is not the same as seeing what your post will look like when published to your website, you can either:
- look at the GitHub repository version of your post to see whether your Markdown formatting looks correct (click on the post file link inside the _posts folder and scroll down to see your post)
-
use the “preview post” option, or

Screenshot of how to preview a post
To see what your post looks like on the website (incorporating any special design or functionality), you will either need to refer to the previous Jekyll lesson to learn to run your site locally, or wait until you are ready to publish. The Netlify tool we installed during setup lets you see what your webpage will look like when you are moving your page to the live site, but not when you are still drafting.
Reviewing and Publishing
When you are ready to publish your work, you will initiate a “pull request” and have your content “merged” into the public website by a reviewer.
Create a pull request
Our first step was creating a new branch so that our work happens separately from other changes contributors might want to make to the site at the same time. Now you have committed some changes to our code: either creating a new post or page file, or editing an existing one. In this final step, we will incorporate your work back into the default branch, so your changes show up on the live website.
Some useful terminology:
- Merging: Taking two sets of code (that already have some shared code/text between them, for example our default branch and the duplicated then altered branch we created) and combining them into one set of updated code
- Our workflow for posts and pages is straightforward: we duplicate the default branch of our website code, make changes to the code in a separate branch, and then move the changes into the default branch
- When multiple people are changing the code at different or overlapping times they might be working from branches duplicated when the repository was in a different state of progress, which can make the process much more complicated
- Pull request (PR): Asking that the changes you have made in your branch be moved (“pulled”) into the default branch
- Our repo’s pull request process runs a “check” or “test” on your code and Netlify gives a preview of how your changes will look on the website, before those changes are published publicly
- Review: For our repo, making a pull request notifies our contributors that someone is making a change to our website, allowing the opportunity for feedback on the work.
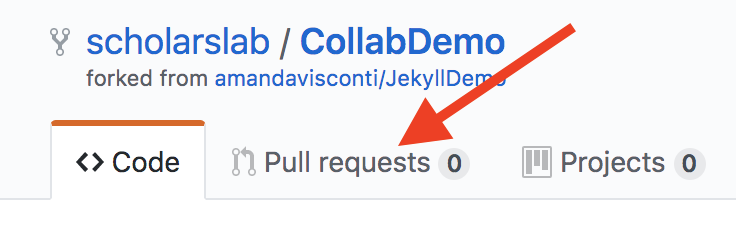
Click the “Pull requests” tab in the upper left of your screen.
Any pull requests that are in-progress (meaning they are undergoing or awaiting review) will also be listed here.
Screenshot of the pull requests tab
Click on the green “New pull request” button on the page’s upper-right.

Screenshot of the ‘New pull request’ button
You are now on the “comparing changes” page, where you can tell GitHub you want to look at the differences between the code in your branch and the code running the website.
The page displays dropdown fields to indicate the branch against which you are comparing your own work. In most cases, this will also be the branch you plan to eventually merge your new work into.
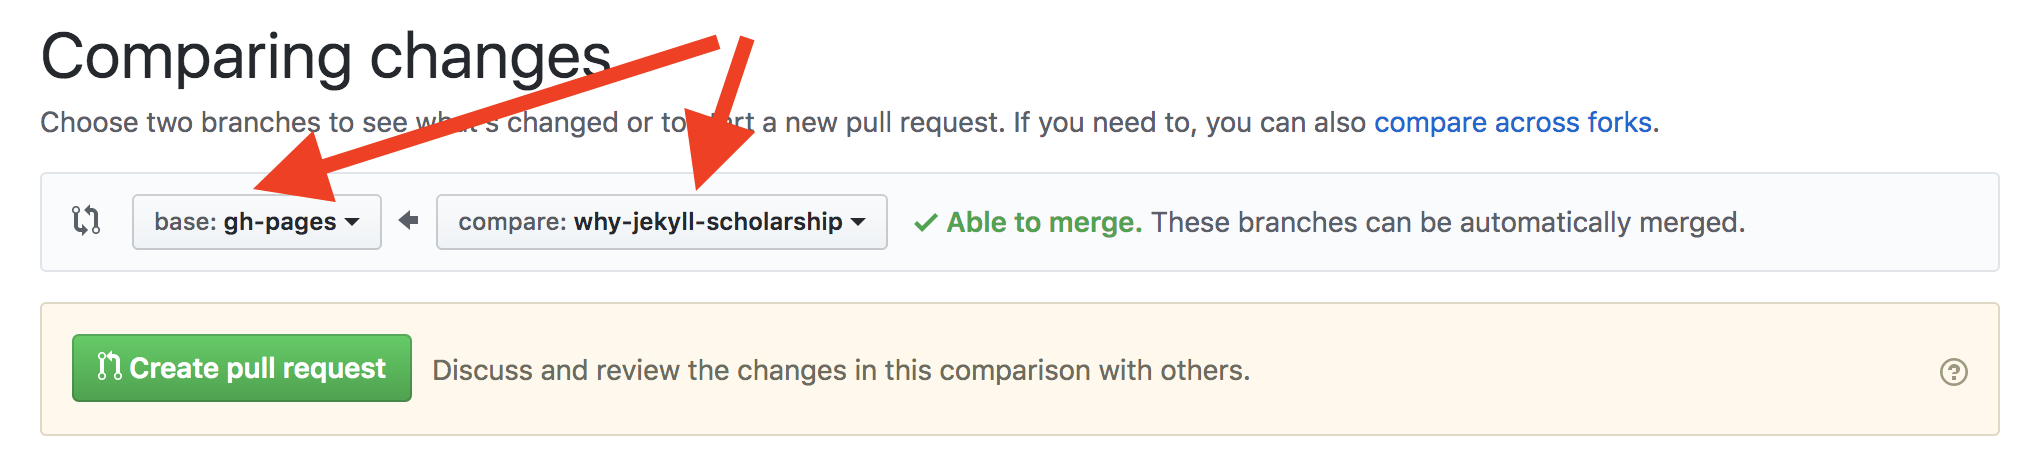
Screenshot showing interface indicating we are comparing our work branch with the website branch
Check that the correct branches are selected.
“Base” should contain the branch that runs your website (see the steps above on verifying which is your default branch if you are not sure) where you want to move your post, and “compare” should contain the branch where you created your post (or made other changes to the website). In our example, “gh-pages” is the default branch that our website runs from, and “why-jekyll-scholarship” is the branch containing a new blog post.
Click on the green “Create pull request.” You will be offered another box to describe your pull request for others. Do so if you would like, and then click “Create pull request” again.
Under the menu on the right, you will find a section labeled “Reviewers”. Click on the word “reviewers” to see a dropdown menu of contributors associated with your repo who you could ask to review your work (added using the reviewer permissions steps). You will want to tag someone to review your work who has owner permissions on your repo. This will notify the site authors who are confident with Jekyll (the people with “owner” privileges) that you are making a change (like adding a blog post) to the website.
If you are not an owner, your work is now done and you are waiting for someone with owner privileges to briefly review your changes, using the steps in “Merging as an owner” below to check for anything that might break part of the site (highly unlikely with a blog post, more likely with changes to other repo code). Then, they will push your content to the live website. If you would like a preview of what the website will look like when your changes are merged, the next section (“Merging as an owner”) will show you how to use Netlify to do this.
Merging a pull request
If you are the one setting up your GitHub and Jekyll combination, you already have owner permissions for your repository. If not, you will need to contact the owner of the repository to give you access using the steps in the Reviewer Permissions section before being able to follow the steps below to merge collaborators’ changes.
Owner permissions mean that you do not need to wait for someone else to review your pull request before merging it (making it appear on the live website). You have the option of following this step below to skip review. If you wish, you can request and wait for a review if you have any concerns about your code or want feedback on a post before publication. The following instructions explain how to review and merge a collaboratorʼs changes.
After someone has used the steps above to create a pull request (PR):
If you are notified a pull request (PR) needs review via a GitHub email notification, that email will contain a link to the PR page. If someone does not provide a link but tells you they have a PR that needs review, you can find the PR page by clicking the “Pull requests” tab in the horizontal menu across the top of the repository, and then clicking on the PR you want to review in the list that appears:
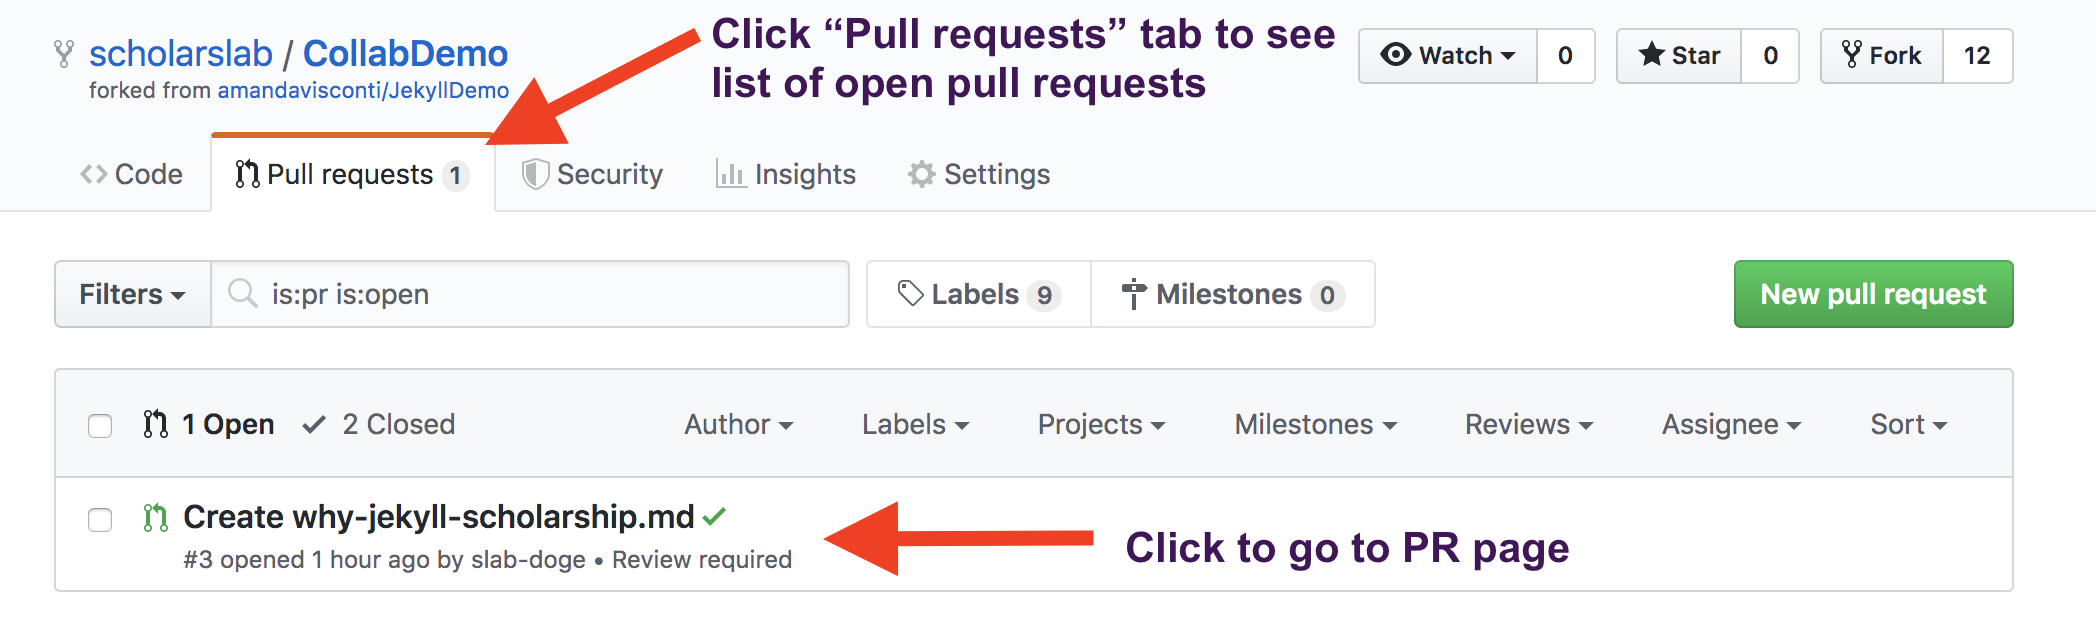
Screenshot of locating the list of open PRs
On a PR page, you will see any comments the PR author left to describe the work you will be reviewing, followed by a list of any commits that author made while working on their branch.
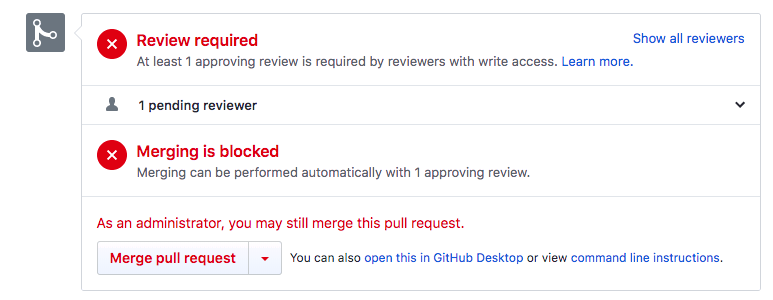
Scroll down until you see the “Review required” section and to see the status of the Netlify checks. You will need to wait until these checks have completed running.
If the PR was just created, it may take up to 30 seconds for the checks to appear, so if you see something like the screenshot below, wait a moment:
Screenshot of the PR before the checks start running
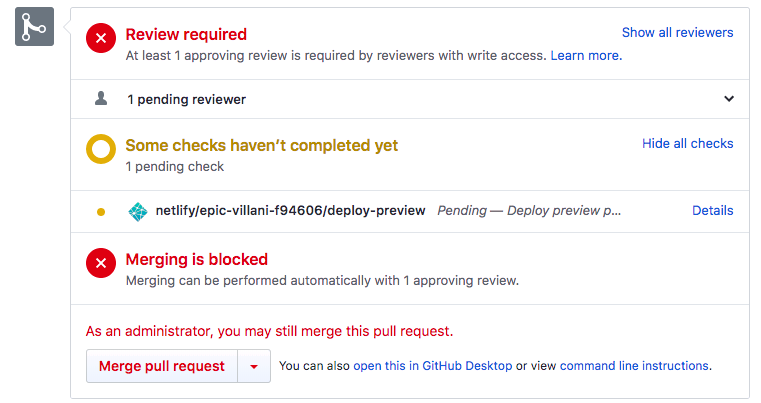
When the checks start running, you will see a yellow circle next to the message “Some checks haven’t completed yet”.
Screenshot of the PR when the checks start running
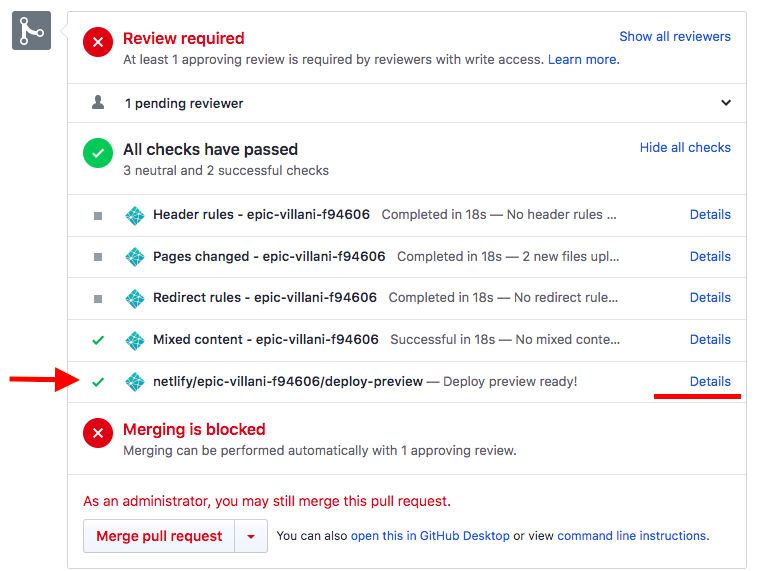
When the checks have finished running, you will see a green circle with a white checkmark inside it next to the words “All checks have passed”, followed by a bullet list (if you don’t see a bullet list, click on the “show all checks” link to the right).
Find the list item that starts “netlify/” followed by some gibberish and then by “Deploy preview ready!” Right-click on the link to its right that says “Details” to open a new tab, which will show you what your site will look like after you merge the PR’s changes.
Screenshot of how to view the Netlify preview
There are three possible next steps, which one you choose depends on how the preview looks and your review of the post.
Option #1: If the preview looks correct, you can click on the “Merge pull request” button in the bottom left of the section. Click the checkbox next to the “Use your administrator privileges to merge this pull request” message that appears, then click the “Confirm merge” button, followed by the “delete branch” button that will appear to the right. (Getting rid of branches once we are done with them helps us keep the repository clean, as we may have multiple branches open at one time that are being actively worked on.)

Screenshot showing deleting branch after pull request
Option #2: If the preview doesn’t look correct, you can leave a review in two ways.
If the PR author added your username to the list of requested reviewers (using the “reviewers” option at the upper-right of the page), you can scroll to the top of the page to see a yellow rectangle stating “[username] requested your review on this pull request”. Click on the green “add your review” button to the right of this message.

Screenshot showing where to add a requested review
If the PR author did not add your username to the list of requested reviewers, you can still leave a review by looking at the top of the “review required” section and clicking the “add your review” link in the section’s upper-right.

Screenshot showing how to add a review
A popup will appear where you can leave a comment; choose one of the three radio buttons to let the author know whether they need to make changes before re-submitting for review. Click the green “submit review” button in the lower left of the popup.
Option #3: If you or the author want to edit the post further before publishing it, visit the post and edit it using the editing steps discussed above. The PR page’s list of commits will update to contain any subsequent commits, and will re-run the Netlify checks after each one. You can follow the process above once you are satisfied with your changes.
Now, you have successfully merged your changes! You will need to wait 1-10 minutes to see your work appear on the updated live website.
Drawbacks and Limitations
This lesson has been deliberately simplified: it introduces how to develop a publication workflow and setups for structuring a collaborative writing environment via Jekyll, but does not address improvements or additions to the environment. Robust content management systems often contain features that facilitate a collaborative blogging environment. Think about all the things you might take for granted when browsing a community blog:
- posts are tagged with particular keywords
- these tags allow you to easily browse all posts sharing common content
- posts can be sorted and searched by date or author
Each of these features can be implemented in something like Jekyll, but each requires work. As you layer more and more complicated data structures and features onto a Jekyll website, you raise the technical burden for contributors. In most cases, anyone seriously considering developing a blogging environment should move the conversation from “what features could we have” to “what are the features we absolutely must have”. If the list grows too long, a static-site generator may not be the best option for your project.
It is also important to remember that the ease of adding plugins and themes to CMSs like WordPress comes with its own additional requirements, such as monthly or weekly code updates and dealing with database security weaknesses and comment spam. As a CMS takes on tasks for you, you and your collaborators may understand less about how your project is operating, and the system administrator supporting your site will have to take on more work.
A number of Jekyll websites share their underlying code on public GitHub repos (such as [https://github.com/scholarslab/scholarslab.org]), which you can read to learn more. Jekyll has friendly information about its various features; for example, if you are interested in creating categories for your posts, Jekyll’s documentation shows you how. If you want to explore similar features, Jekyll offers an example of developing further data structures in their documentation for collections. Although the Scholars’ Lab cannot guide you through adding the same features you can see on our ScholarsLab.org website, you can compare the site with the code in its repo to teach yourself how to make similar changes on your website.
Moving an existing website to Jekyll
Content management systems like WordPress9 have been designed to accommodate a broad variety of uses and users. Because there are so many potential adaptations for something like a WordPress blog, so too is it difficult to identify a universally appropriate method for migrating into something like Jekyll. A thorough guide on how to migrate your own content from WordPress to Jekyll is beyond the scope of this lesson. However, we can offer guidance about how to get started, direct you towards resources, and suggest some points to consider. Jekyll offers its own WordPress importer, for example, and Ben Balter has developed a WordPress plugin specifically for exporting data from WordPress into Jekyll. Depending on your approach, the process might look slightly different when it comes to specific actions, but can be usefully separated into a few steps.
Export your data from WordPress
When you upload content to a WordPress site, your data gets stored in a database that is hidden. So, the first step to transfer a project from WordPress to another format is to retrieve that data. Sometimes, this can be a bit difficult. Interfaces are likely to change after publication of this lesson, so we refer you to [WordPressʼs documentation] (https://en.support.wordpress.com/export/) on the exact steps needed to separate your own content from its CMS. WordPress exports your data in a series of XML files that contain both the content and metadata (information like author, publication date, and tags) for the elements of your site. Please be aware that while these XML files might reference the images and media uploads for a website, the uploaded files themselves must be exported separately.
Migrate the exported data to a format appropriate to a new platform
The results of an export like the one described above are not likely to be immediately usable for web presentation. These XML files require further processing to turn them into the stripped down markdown files expected by something like Jekyll. When the Scholars’ Lab migrated from WordPress to Jekyll, we used Exitwp, a Python script developed by Thomas Frössman, to facilitate the process. The script will accept a folder of XML files and produce a series of markdown files ready for Jekyll use, but, as most WordPress sites adopt specific database configurations, it was necessary to significantly modify the script to meet our particular needs. Our advice is to try an export script, examine the results, and repeat that process as needed. Some programming skills and confidence might be required, and the need for this expertise is likely to increase the more complicated your WordPress setup is.
Manually correct the results to ensure accurate, clean work.
Regardless of the method you select for exporting, your content will need a lot of manual cleanup. Programmatic exporters like these will catch a majority of necessary conversions, but there will inevitably be a vast array of things needing individual clean up. WordPress shortcodes, for example, are unlikely to be readily converted into meaningful syntax for Jekyll, and even basic Markdown syntax errors will likely need to be glossed. This can be a lot of work. We recommend using a robust plain text editor like Atom or Sublime Text to help. Editors like these offer color highlighting and previews for Markdown syntax, and will allow you to quickly identify problems such as whole sections of a document appearing in bold.
Migrating a site from one platform to another is a time-consuming and labor-intensive process. If you are committed to migrating, take care to do this in an organized way. Ensure that you have done all that you can with an exporting tool before beginning to manually clean, otherwise you risk losing time correcting syntax that will be lost with the next, fresh export. For the manual cleaning phase of the process, use project management software (such as Trello and GitHub’s project boards are popular, free options) to track progress, facilitate collaboration if you are working in a team, and log new issues as they inevitably arise. It will also help you develop a roll-out plan that accounts for necessary ongoing work, after the migration is finalized.
Help
Workflow summary
If you have read the longer explanations above already and just want a checklist, you can bookmark this section:
- Create new branch & switch into that branch
- Create new file or edit existing file
- Pull request when you are ready for your work to be published
- Add reviewers
- Pass all checks
- Collaborator merges pull request
- Delete the branch you just merged
- Wait several minutes to see your work on the live site
Cheat sheets
- Glossary of frequently used terms (pull, merge, branch, etc.)
- Overview of what various files in your website folder do
- Scholars’ Lab cheatsheet on basic Markdown formatting, limited to the most frequently used formatting for our particular needs
Troubleshooting
If you run into an a problem, try reading Jekyll ‘s troubleshooting page. Besides search engines, the StackExchange site is a good place to find questions and answers from people who have run into the same problem as you in the past (and, hopefully, recorded how they solved it). You might also join the Digital Humanities Slack (anyone can join, even if you have no DH experience) and ask questions in the #DHanswers channel.
Advanced learning
The following links are helpful for learning more about documentation, inspiration, and further reading about Jekyll:
Introductions to Jekyll and static sites
- Amanda Visconti, “Introducing Static Sites for Digital Humanities Projects (why & what are Jekyll, GitHub, etc.?)”
- Building a static website with Jekyll and GitHub Pages
- Alex Gil, “How (and Why) to Generate a Static Website Using Jekyll, Part 1”
- Eduardo Bouças, “An Introduction to Static Site Generators”
Deeper understanding of Jekyll and GitHub Pages
- Official Jekyll Documentation
- Jekyll “unofficially” links to two Windows + Jekyll resources: http://jekyll-windows.juthilo.com/ and https://davidburela.wordpress.com/2015/11/28/easily-install-jekyll-on-windows-with-3-command-prompt-entries-and-chocolatey/
- https://help.github.com/articles/using-jekyll-with-pages/
- Ben Balter, Jekyll: Where content is truly king
- Using a custom domain with GitHub Pages hosting You can purchase a domain (such as my-own-domain.com; average costs run around $10-20/year) and switch your website to using that instead of username.github.io/repo-name but still use GitHub Pages’ free hosting.
Theming (aka visual appearance)
- Mozilla’s CSS first steps module
- The World Wide Web Consortium’s list of CSS learning articles and tutorials
- Tom Johnson, Getting started with the Documentation Theme for Jekyll: a usable theme, but also useful for cutting and pasting useful and innovative functions
- Jekyll documentation on themes including several theme directories
- Explore themes that are hosted on GitHub repos (for example, this one, as many of these use a Readme file to show you how the theme works and how to customize it
Migrating to Jekyll
- Jekyll’s documentation on migrating existing websites
- Ben Balter’s WordPress plugin for exporting data from WordPress into Jekyll
- WordPress’s documentation on the exact steps to separate your own content from its CMS
- Exitwp, a Python script developed by Thomas Frössman that Scholars’ Lab used to migrate our blog from WordPress to Jekyll
Tools
- Robust plain text editor options: Atom, Sublime Text, Prose content editor (built on Jekyll)
- Project management options: Trello, GitHub’s project boards
Case study links
Acknowledgements
We are grateful for the advice and collaboration of this lesson’s editor, Jessica Parr, as well as our reviewers Jesse Sadler and M. Willis Monroe.
The bulk of this lesson’s text was adapted from internal, context-specific documentation. That original text was co-authored by Scholars’ Lab staff, especially Amanda Visconti, Ronda Grizzle, Brandon Walsh, Laura Miller, and Beth Mitchell, and improved via testing and feedback from numerous Scholars’ Lab staff and students. The authors list for this lesson includes “Scholars’ Lab Community” to acknowledge the contributions of these collaborators to this lesson.
Footnotes
-
Technically, once you commit something (regardless of what branch you are working on), what you have written is publicly visible to anyone who thinks to visit our repo, switch to your particular branch, and look at your commits, or to web crawlers (for example, powering search engines or preserving popular websites). Your work will not appear on your website until you have merged it back into the default branch, though. If you would like to prevent others from seeing your in-progress and finished code in your repo, you can visit your repoʼs settings to change it from “public” to “private”. When this lesson was written, repos with 3 or fewer collaborators can be made private for free, but you must pay to make repos private if you work with more collaborators. ↩
-
See “Ten Hot Topics Around Scholarly Publishing” by Johnathan P. Tennant, et al. ↩
-
See Planned Obsolescence: Publishing, Technology, and the Future of the Academy and Generous Thinking: A Generous Approach to Saving the University, both by Kathleen Fitzpatrick; and Open: The Philosophies and Practices that are Revolutionizing Education and Science, edited by Rajiv S. Jhangiani and Robert Biswas-Diener. The Debates in Digital Humanities series has several contributions that began life as blog posts. ↩
-
Technically, we started off serving ScholarsLab.org from GitHub Pages, but we now use a script that updates the site on our own university servers, whenever we make changes to the default branch on GitHub. Hosting your site on a different server than GitHub Pages is an option that gives you more control over your site, including the ability to run some types of code that GitHub Pages does not allow. As The Programming Historian emphasizes use of free resources such as GitHub Pages, in this lesson we do not cover hosting your site on servers you run yourself or pay a company to run. ↩
-
See Natasha Roth Rowland’s post on ethical reasons you may decide to not use GitHub (or GitLab, or other technology). ↩
-
Usually, if you want to build something on the code of an existing repository you fork that repo. For this lesson, we decided working from a fork would be too confusing because 1) opening a pull request defaults to comparing changes between two repos rather than two branches, and 2) when actually building your own site (rather than the demonstration copy created in this lesson) you will not be dealing with forks. ↩
-
If making these changes locally produces gem dependency or version errors you can’t easily solve, switching to making these changes via the GitHub.com interface will let you proceed with the lesson instead. ↩
-
If you would really like all instructions in one place, you may wish to fork and customize Scholars’ Lab’s documentation for staff and student blogging on our ScholarsLab.org site. This offers all steps and definitions in one place. The downside is it has a number of details particular to our specific setup that you would need to change to fit your circumstances. ↩
-
This particular lesson and case study will focus on exporting from WordPress, but Jekyll offers official documentation on how to migrate from a variety of platforms. ↩