
Contents
- Introduction
- Data Prep and NetworkX Installation
- Getting Started
- Metrics available in NetworkX
- Exporting Data
- Drawing Conclusions
Introduction
Lesson Goals
In this tutorial, you will learn:
- To use the NetworkX package for working with network data in Python; and
- To analyze humanities network data to find:
- Network structure and path lengths,
- Important or central nodes, and
- Communities and subgroups
n.b.: This is a tutorial for exploring network statistics and metrics. We will therefore focus on ways to analyze, and draw conclusions from, networks without visualizing them. You’ll likely want a combination of visualization and network metrics in your own project, and so we recommend this article as a companion to this earlier Programming Historian tutorial.
Prerequisites
This tutorial assumes that you have:
- a basic familiarity with networks and/or have read “From Hermeneutics to Data to Networks: Data Extraction and Network Visualization of Historical Sources” by Martin Düring here on Programming Historian;
- Installed Python 3, not the Python 2 that is installed natively in Unix-based operating systems such as Macs (If you need assistance installing Python 3, check out the Hitchhiker’s Guide to Python); and
- Installed the
pippackage installer.1
It’s possible to have two versions of Python (2 and 3) installed on your computer at one time. For this reason, when accessing Python 3 you will often have to explicitly declare it by typing python3 and pip3 instead of simply python and pip. Check out the Programming Historian tutorials on installing Python and working with pip for more information.
What might you learn from network data?
Networks have long interested researchers in the humanities, but many recent scholars have progressed from a largely qualitative and metaphoric interest in links and connections to a more formal suite of quantitative tools for studying mediators, hubs (important nodes), and inter-connected structures. As sociologist Mark Granovetter pointed out in his important 1973 article “The Strength of Weak Ties,” it’s rarely enough to notice that two people were connected with one another. Factors such as their structural relation to further people and whether those additional people were themselves connected to one another have decisive influence on events. Insofar as even the most perceptive of scholars has difficulty perceiving, say, the overall shape of a network (its network “topology”) and identifying the nodes most significant for connecting groups, quantitative network analysis offers scholars a way to move relatively fluidly between the large scale social object (the “graph”) and the minute particularities of people and social ties.
This tutorial will help you answer questions such as:
- What is the overall structure of the network?
- Who are the important people, or hubs, in the network?
- What are the subgroups and communities in the network?
Our example: the Society of Friends
Before there were Facebook friends, there was the Society of Friends, known as the Quakers. Founded in England in the mid-seventeenth century, the Quakers were Protestant Christians who dissented from the official Church of England and promoted broad religious toleration, preferring Christians’ supposed “inner light” and consciences to state-enforced orthodoxy. Quakers’ numbers grew rapidly in the mid- to late-seventeenth century and their members spread through the British Isles, Europe, and the New World colonies—especially Pennsylvania, founded by Quaker leader William Penn and the home of your four authors.
Since scholars have long linked Quakers’ growth and endurance to the effectiveness of their networks, the data used in this tutorial is a list of names and relationships among the earliest seventeenth-century Quakers. This dataset is derived from the Oxford Dictionary of National Biography and from the ongoing work of the Six Degrees of Francis Bacon project, which is reconstructing the social networks of early modern Britain (1500-1700).
Data Prep and NetworkX Installation
Before beginning this tutorial, you will need to download two files that together constitute our network dataset. The file quakers_nodelist.csv is a list of early modern Quakers (nodes) and the file quakers_edgelist.csv is a list of relationships between those Quakers (edges). To download these files, simply right-click on the links and select “Save Link As…”.
It will be extremely helpful to familiarize yourself with the structure of the dataset before continuing. For more on the general structure of network datasets, see this tutorial. When you open the node file in the program of your choice, you will see that each Quaker is primarily identified by their name. Each Quaker node also has a number of associated attributes including historical significance, gender, birth/death dates, and SDFB ID—a unique numerical identifier that will enable you to cross-reference nodes in this dataset with the original Six Degrees of Francis Bacon dataset, if desired. Here are the first few lines:
Name,Historical Significance,Gender,Birthdate,Deathdate,ID
Joseph Wyeth,religious writer,male,1663,1731,10013191
Alexander Skene of Newtyle,local politician and author,male,1621,1694,10011149
James Logan,colonial official and scholar,male,1674,1751,10007567
Dorcas Erbery,Quaker preacher,female,1656,1659,10003983
Lilias Skene,Quaker preacher and poet,male,1626,1697,10011152
Notice that though the columns don’t line up correctly like they do in a spreadsheet, the commas keep everything separated appropriately.
When you open the edge file, you will see that we use the names from the node file to identify the nodes connected by each edge. These edges begin at a source node and end at a target node. While this language derives from so-called directed network structures, we will be using our data as an undirected network: if Person A knows Person B, then Person B must also know Person A. In directed networks, relationships need not be reciprocal (Person A can send a letter to B without getting one back), but in undirected networks the connections are always reciprocal, or symmetric. Since this is a network of who knew whom rather than, say, a correspondence network, an undirected set of relations is the most fitting. The symmetric relations in undirected networks are useful any time you are concerned with relationships that stake out the same role for both parties. Two friends have a symmetric relationship: they are each a friend of the other. A letter writer and recipient have an asymmetric relationship because each has a different role. Directed and undirected networks each have their own affordances (and sometimes, their own unique metrics), and you’ll want to choose the one that best suits the kinds of relationships you are recording and the questions you want to answer. Here are the first few edges in the undirected Quaker network:
Source,Target
George Keith,Robert Barclay
George Keith,Benjamin Furly
George Keith,Anne Conway Viscountess Conway and Killultagh
George Keith,Franciscus Mercurius van Helmont
George Keith,William Penn
Now that you’ve downloaded the Quaker data and had a look at how it’s structured, it’s time to begin working with that data in Python. Once both Python and pip are installed (see Prerequisites, above) you’ll want to install NetworkX, by typing this into your command line:2
pip3 install networkx==3.1
A quick note on versioning: this tutorial uses NetworkX 3.1, but the library is in active development and is updated frequently. We recommend using the installation command above to ensure your version of NetworkX matches the code below (rather than simply installing the latest version). If you have an older version of NetworkX already installed, you should run pip3 install networkx==3.1 --upgrade before trying the tutorial.
And that’s it! You’re ready to start coding.
Getting Started
Reading files, importing data
Start a new, blank plaintext file in the same directory as your data files called quaker_network.py (For more details on installing and running Python, see this tutorial). At the top of that file, import the libraries you need. You’ll need three libraries—the one we just installed, and two built-in Python libraries. You can type:
import csv
from operator import itemgetter
import networkx as nx
from networkx.algorithms import community #This part of networkx, for community detection, needs to be imported separately.
Now you can tell the program to read your CSV files and retrieve the data you need. Ironically, reading files and reorganizing data often requires more complex code than the functions for running social network analysis, so please bear with us through this first code block. Here’s a set of commands for opening and reading our nodelist and edgelist files:
with open('quakers_nodelist.csv', 'r') as nodecsv: # Open the file
    nodereader = csv.reader(nodecsv) # Read the csv
    # Retrieve the data (using Python list comprhension and list slicing to remove the header row, see footnote 3)
    nodes = [n for n in nodereader][1:]

node_names = [n[0] for n in nodes] # Get a list of only the node names

with open('quakers_edgelist.csv', 'r') as edgecsv: # Open the file
    edgereader = csv.reader(edgecsv) # Read the csv
    edges = [tuple(e) for e in edgereader][1:] # Retrieve the data
This code performs similar functions to the ones in this tutorial but uses the CSV module to load your nodes and edges. You’ll go back and get more node information later, but for now you need two things: the full list of nodes and a list of edge pairs (as tuples of nodes).3 These are the forms NetworkX will need to create a “graph object,” a special NetworkX data type you’ll learn about in the next section.
At this stage, before you start using NetworkX, you can do some basic sanity checks to make sure that your data loaded correctly using built-in Python functions and methods. Typing
print(len(node_names))
and
print(len(edges))
and then running your script will show you how many nodes and edges you successfully loaded in Python. If you see 119 nodes and 174 edges, then you’ve got all the necessary data.
Basics of NetworkX: Creating the Graph
Now you have your data as two Python lists: a list of nodes (node_names) and a list of edges (edges). In NetworkX, you can put these two lists together into a single network object that understands how nodes and edges are related. This object is called a Graph, referring to one of the common terms for data organized as a network [n.b. it does not refer to any visual representation of the data. Graph here is used purely in a mathematical, network analysis sense.] First you must initialize a Graph object with the following command:
G = nx.Graph()
This will create a new Graph object, G, with nothing in it. Now you can add your lists of nodes and edges like so:
G.add_nodes_from(node_names)
G.add_edges_from(edges)
This is one of several ways to add data to a network object. You can check out the NetworkX documentation for information about adding weighted edges, or adding nodes and edges one-at-a-time.
Finally, you can get basic information about your newly-created network by printing the G variable:
print(G)
This tells you your network’s type (in this case, it’s a standard Graph object) and the number of nodes and edges in the network. The output should look like this:
Name:
Type: Graph
Number of nodes: 119
Number of edges: 174
Average degree:   2.9244
This is a quick way of getting some general information about your graph, but as you’ll learn in subsequent sections, it is only scratching the surface of what NetworkX can tell you about your data.
To recap, by now your script will look like this:
import csv
from operator import itemgetter
import networkx as nx
from networkx.algorithms import community

# Read in the nodelist file
with open('quakers_nodelist.csv', 'r') as nodecsv:
    nodereader = csv.reader(nodecsv)
    nodes = [n for n in nodereader][1:]

# Get a list of just the node names (the first item in each row)
node_names = [n[0] for n in nodes]

# Read in the edgelist file
with open('quakers_edgelist.csv', 'r') as edgecsv:
    edgereader = csv.reader(edgecsv)
    edges = [tuple(e) for e in edgereader][1:]

# Print the number of nodes and edges in our two lists
print(len(node_names))
print(len(edges))

G = nx.Graph() # Initialize a Graph object
G.add_nodes_from(node_names) # Add nodes to the Graph
G.add_edges_from(edges) # Add edges to the Graph
print(G) # Print information about the Graph
So far, you’ve read node and edge data into Python from CSV files, and then you counted those nodes and edges. After that you created a Graph object using NetworkX and loaded your data into that object.
Adding Attributes
For NetworkX, a Graph object is one big thing (your network) made up of two kinds of smaller things (your nodes and your edges). So far you’ve uploaded nodes and edges (as pairs of nodes), but NetworkX allows you to add attributes to both nodes and edges, providing more information about each of them. Later on in this tutorial, you’ll be running metrics and adding some of the results back to the Graph as attributes. For now, let’s make sure your Graph contains all of the attributes that are currently in our CSV.
You’ll want to return to a list you created at the beginning of your script: nodes. This list contains all of the rows from quakers_nodelist.csv, including columns for name, historical significance, gender, birth year, death year, and SDFB ID. You’ll want to loop through this list and add this information to our graph. There are a couple ways to do this, but NetworkX provides two convenient functions for adding attributes to all of a Graph’s nodes or edges at once: nx.set_node_attributes() and nx.set_edge_attributes(). To use these functions, you’ll need your attribute data to be in the form of a Python dictionary, in which node names are the keys and the attributes you want to add are the values.4 You’ll want to create a dictionary for each one of your attributes, and then add them using the functions above. The first thing you must do is create five empty dictionaries, using curly braces:
hist_sig_dict = {}
gender_dict = {}
birth_dict = {}
death_dict = {}
id_dict = {}
Now we can loop through our nodes list and add the appropriate items to each dictionary. We do this by knowing in advance the position, or index, of each attribute. Because our quaker_nodelist.csv file is well-organized, we know that the person’s name will always be the first item in the list: index 0, since you always start counting with 0 in Python. The person’s historical significance will be index 1, their gender will be index 2, and so on. Therefore we can construct our dictionaries like so:5
for node in nodes: # Loop through the list, one row at a time
    hist_sig_dict[node[0]] = node[1]
    gender_dict[node[0]] = node[2]
    birth_dict[node[0]] = node[3]
    death_dict[node[0]] = node[4]
    id_dict[node[0]] = node[5]
Now you have a set of dictionaries that you can use to add attributes to nodes in your Graph object. The set_node_attributes function takes three variables: the Graph to which you’re adding the attribute, the dictionary of id-attribute pairs, and the name of the new attribute. The code for adding your six attributes looks like this:
nx.set_node_attributes(G, hist_sig_dict, 'historical_significance')
nx.set_node_attributes(G, gender_dict, 'gender')
nx.set_node_attributes(G, birth_dict, 'birth_year')
nx.set_node_attributes(G, death_dict, 'death_year')
nx.set_node_attributes(G, id_dict, 'sdfb_id')
Now all of your nodes have these six attributes, and you can access them at any time. For example, you can print out all the birth years of your nodes by looping through them and accessing the birth_year attribute, like this:
for n in G.nodes(): # Loop through every node, in our data "n" will be the name of the person
    print(n, G.nodes[n]['birth_year']) # Access every node by its name, and then by the attribute "birth_year"
From this statement, you’ll get a line of output for each node in the network. It should look like a simple list of names and years:
Anne Camm 1627
Sir Charles Wager 1666
John Bellers 1654
Dorcas Erbery 1656
Mary Pennyman 1630
Humphrey Woolrich 1633
John Stubbs 1618
Richard Hubberthorne 1628
Robert Barclay 1648
William Coddington 1601
The steps above are a common method for adding attributes to nodes that you’ll be using repeatedly later on in the tutorial. Here’s a recap of the codeblock from this section:
# Create an empty dictionary for each attribute
hist_sig_dict = {}
gender_dict = {}
birth_dict = {}
death_dict = {}
id_dict = {}

for node in nodes: # Loop through the list of nodes, one row at a time
    hist_sig_dict[node[0]] = node[1] # Access the correct item, add it to the corresponding dictionary
    gender_dict[node[0]] = node[2]
    birth_dict[node[0]] = node[3]
    death_dict[node[0]] = node[4]
    id_dict[node[0]] = node[5]

# Add each dictionary as a node attribute to the Graph object
nx.set_node_attributes(G, hist_sig_dict, 'historical_significance')
nx.set_node_attributes(G, gender_dict, 'gender')
nx.set_node_attributes(G, birth_dict, 'birth_year')
nx.set_node_attributes(G, death_dict, 'death_year')
nx.set_node_attributes(G, id_dict, 'sdfb_id')

# Loop through each node, to access and print all the "birth_year" attributes
for n in G.nodes():
    print(n, G.nodes[n]['birth_year'])
Now you’ve learned how to create a Graph object and add attributes to it. In the next section, you’ll learn about a variety of metrics available in NetworkX and how to access them. But relax, you’ve now learned the bulk of the code you’ll need for the rest of the tutorial!
Metrics available in NetworkX
When you start work on a new dataset, it’s a good idea to get a general sense of the data. The first step, described above, is to simply open the files and see what’s inside. Because it’s a network, you know there will be nodes and edges, but how many of each are there? What information is appended to each node or edge?
In our case, there are 174 edges and 119 nodes. These edges don’t have directions (that is, there’s a symmetric relationship between people) nor do they include additional information. For nodes, we know their names, historical significance, gender, birth and death dates, and SDFB ID.
These details inform what you can or should do with your dataset. Too few nodes (say, 15), and a network analysis is less useful than drawing a picture or doing some reading; too many (say, 15 million), and you should consider starting with a subset or finding a supercomputer.
The network’s properties also guide your analysis. Because this network is undirected, your analysis must use metrics that require symmetric edges between nodes. For example, you can determine what communities people find themselves in, but you can’t determine the directional routes through which information might flow along the network (you’d need a directed network for that). By using the symmetric, undirected relationships in this case, you’ll be able to find sub-communities and the people who are important to those communities, a process that would be more difficult (though still possible) with a directed network. NetworkX allows you to perform most analyses you might conceive, but you must understand the affordances of your dataset and realize some NetworkX algorithms are more appropriate than others.
The Shape of the Network
After seeing what the dataset looks like, it’s important to see what the network looks like. They’re different things. The dataset is an abstract representation of what you assume to be connections between entities; the network is the specific instantiation of those assumptions. The network, at least in this context, is how the computer reads the connections you encoded in a dataset. A network has a topology, or a connective shape, that could be centralized or decentralized; dense or sparse; cyclical or linear. A dataset does not, outside the structure of the table it’s written in.
The network’s shape and basic properties will give you a handle on what you’re working with and what analyses seem reasonable. You already know the number of nodes and edges, but what does the network ‘look’ like? Do nodes cluster together, or are they equally spread out? Are there complex structures, or is every node arranged along a straight line?
The visualization below, created in network visualization tool Gephi, will give you an idea of the topology of this network.6 You could create a similar graph in Palladio following this tutorial.
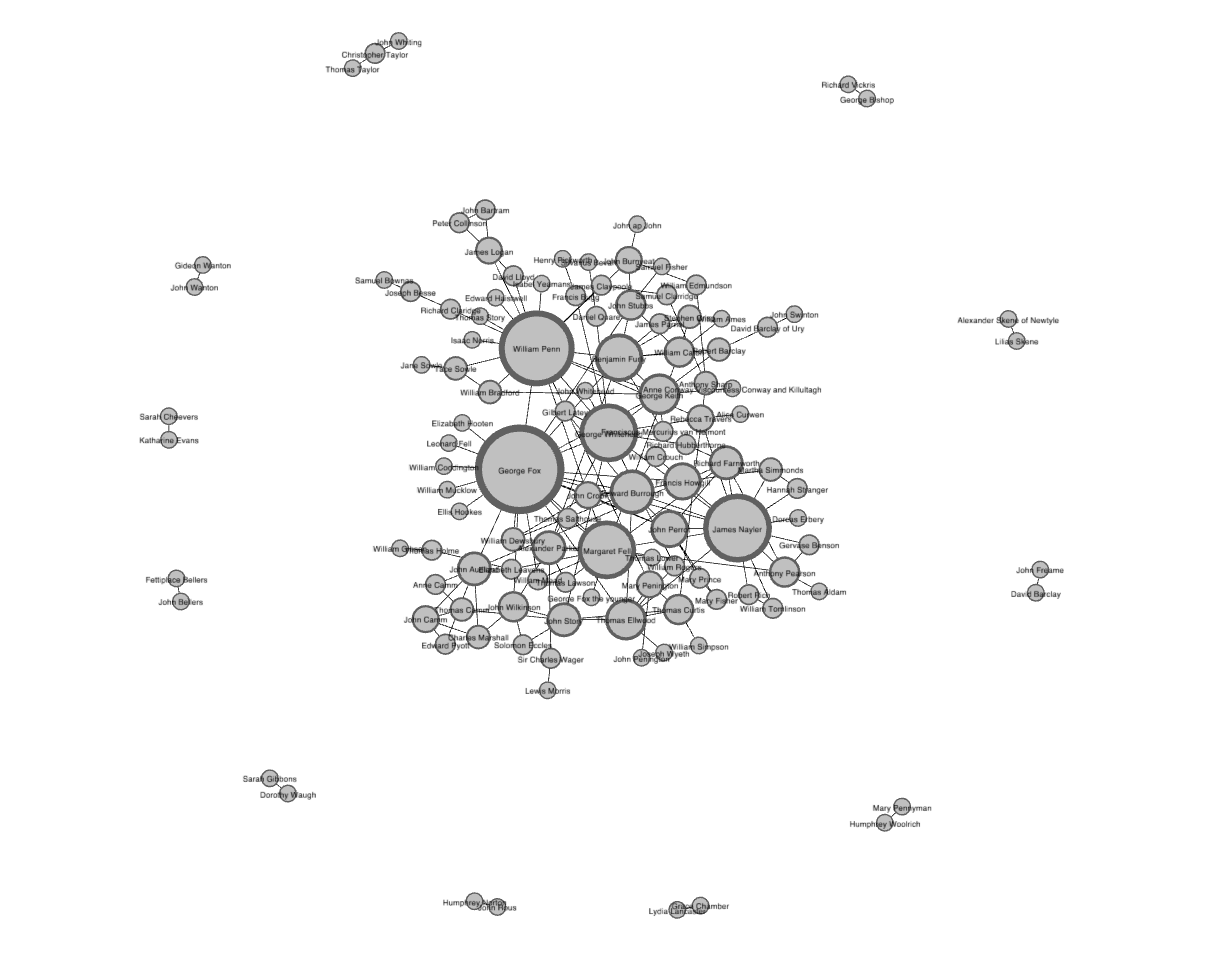
Force-directed network visualization of the Quaker data, created in Gephi
There are lots of ways to visualize a network, and a force-directed layout, of which the above image is an example, is among the most common. Force-directed graphs attempt to find the optimum placement for nodes with a calculation based on the tension of springs in Hooke’s Law, which for smaller graphs often creates clean, easy-to-read visualizations. The visualization embedded above shows you there is a single large component of connected nodes (in the center) and several small components with just one or two connections around the edges. This is a fairly common network structure. Knowing that there are multiple components in the network will usefully limit the calculations you’ll want to perform on it. By displaying the number of connections (known as degree, see below) as the size of nodes, the visualization also shows that there are a few nodes with lots of connections that keep the central component tied together. These large nodes are known as hubs, and the fact that they show up so clearly here gives you a clue as to what you’ll find when you measure centrality in the next section.
Visualizations, however, only get you so far. The more networks you work with, the more you realize most appear similar enough that it’s hard to tell one from the next. Quantitative metrics let you differentiate networks, learn about their topologies, and turn a jumble of nodes and edges into something you can learn from.
A good metric to begin with is network density. This is simply the ratio of actual edges in the network to all possible edges in the network. In an undirected network like this one, there could be a single edge between any two nodes, but as you saw in the visualization, only a few of those possible edges are actually present. Network density gives you a quick sense of how closely knit your network is.
And the good news is many of these metrics require simple, one-line commands in Python. From here forward, you can keep building on your code block from the previous sections. You don’t have to delete anything you’ve already typed, and because you created your network object G in the codeblock above, all the metrics from here on should work correctly.
You can calculate network density by running nx.density(G). However the best way to do this is to store your metric in a variable for future reference, and print that variable, like so:
density = nx.density(G)
print("Network density:", density)
The output of density is a number, so that’s what you’ll see when you print the value. In this case, the density of our network is approximately 0.0248. On a scale of 0 to 1, not a very dense network, which comports with what you can see in the visualization.7 A 0 would mean that there are no connections at all, and a 1 would indicate that all possible edges are present (a perfectly connected network): this Quaker network is on the lower end of that scale, but still far from 0.
A shortest path measurement is a bit more complex. It calculates the shortest possible series of nodes and edges that stand between any two nodes, something hard to see in large network visualizations. This measure is essentially finding friends-of-friends—if my mother knows someone that I don’t, then mom is the shortest path between me and that person. The Six Degrees of Kevin Bacon game, from which our project takes its name, is basically a game of finding shortest paths (with a path length of six or less) from Kevin Bacon to any other actor.
To calculate a shortest path, you’ll need to pass several input variables (information you give to a Python function): the whole graph, your source node, and your target node. Let’s find the shortest path between Margaret Fell and George Whitehead. Since we used names to uniquely identify our nodes in the network, you can access those nodes (as the source and target of your path), using the names directly.
fell_whitehead_path = nx.shortest_path(G, source="Margaret Fell", target="George Whitehead")

print("Shortest path between Fell and Whitehead:", fell_whitehead_path)
Depending on the size of your network, this could take a little while to calculate, since Python first finds all possible paths and then picks the shortest one. The output of shortest_path will be a list of the nodes that includes the “source” (Fell), the “target” (Whitehead), and the nodes between them. In this case, we can see that Quaker Founder George Fox is on the shortest path between them. Since Fox is also a hub (see degree centrality, below) with many connections, we might suppose that several shortest paths run through him as a mediator. What might this say about the importance of the Quaker founders to their social network?
Python includes many tools that calculate shortest paths. There are functions for the lengths of shortest paths, for all shortest paths, and for whether or not a path exists at all in the documentation. You could use a separate function to find out the length of the Fell-Whitehead path we just calculated, or you could simply take the length of the list minus one,8 like this:
print("Length of that path:", len(fell_whitehead_path)-1)
There are many network metrics derived from shortest path lengths. One such measure is diameter, which is the longest of all shortest paths. After calculating all shortest paths between every possible pair of nodes in the network, diameter is the length of the path between the two nodes that are furthest apart. The measure is designed to give you a sense of the network’s overall size, the distance from one end of the network to another.
Diameter uses a simple command: nx.diameter(G). However, running this command on the Quaker graph will yield an error telling you the Graph is “not connected.” This simply means that your graph, as you already saw, has more than one component. Because there are some nodes that have no path at all to others, it is impossible to find all of the shortest paths. Take another look at the visualization of your graph:
Force-directed network visualization of the Quaker data, created in Gephi
Since there is no available path between nodes of one component and nodes of another, nx.diameter() returns the “not connected” error. You can remedy this by first finding out if your Graph “is connected” (i.e. all one component) and, if not connected, finding the largest component and calculating diameter on that component alone. Here’s the code:
# If your Graph has more than one component, this will return False:
print(nx.is_connected(G))

# Next, use nx.connected_components to get the list of components,
# then use the max() command to find the largest one:
components = nx.connected_components(G)
largest_component = max(components, key=len)

# Create a "subgraph" of just the largest component
# Then calculate the diameter of the subgraph, just like you did with density.
#

subgraph = G.subgraph(largest_component)
diameter = nx.diameter(subgraph)
print("Network diameter of largest component:", diameter)
Since we took the largest component, we can assume there is no larger diameter for the other components. Therefore this figure is a good stand in for the diameter of the whole Graph. The network diameter of this network’s largest component is 8: there is a path length of 8 between the two farthest-apart nodes in the network. Unlike density which is scaled from 0 to 1, it is difficult to know from this number alone whether 8 is a large or small diameter. For some global metrics, it can be best to compare it to networks of similar size and shape.9
The final structural calculation you will make on this network concerns the concept of triadic closure. Triadic closure supposes that if two people know the same person, they are likely to know each other. If Fox knows both Fell and Whitehead, then Fell and Whitehead may very well know each other, completing a triangle in the visualization of three edges connecting Fox, Fell, and Whitehead. The number of these enclosed triangles in the network can be used to find clusters and communities of individuals that all know each other fairly well.
One way of measuring triadic closure is called clustering coefficient because of this clustering tendency, but the structural network measure you will learn is known as transitivity.10 Transitivity is the ratio of all triangles over all possible triangles. A possible triangle exists when one person (Fox) knows two people (Fell and Whitehead). So transitivity, like density, expresses how interconnected a graph is in terms of a ratio of actual over possible connections. Remember, measurements like transitivity and density concern likelihoods rather than certainties. All the outputs of your Python script must be interpreted, like any other object of research. Transitivity allows you a way of thinking about all the relationships in your graph that may exist but currently do not.
You can calculate transitivity in one line, the same way you calculated density:
triadic_closure = nx.transitivity(G)
print("Triadic closure:", triadic_closure)
Also like density, transitivity is scaled from 0 to 1, and you can see that the network’s transitivity is about 0.1694, somewhat higher than its 0.0248 density. Because the graph is not very dense, there are fewer possible triangles to begin with, which may result in slightly higher transitivity. That is, nodes that already have lots of connections are likely to be part of these enclosed triangles. To back this up, you’ll want to know more about nodes with many connections.
Centrality
After getting some basic measures of the entire network structure, a good next step is to find which nodes are the most important ones in your network. In network analysis, measures of the importance of nodes are referred to as centrality measures. Because there are many ways of approaching the question “Which nodes are the most important?” there are many different ways of calculating centrality. Here you’ll learn about three of the most common centrality measures: degree, betweenness centrality, and eigenvector centrality.
Degree is the simplest and the most common way of finding important nodes. A node’s degree is the sum of its edges. If a node has three lines extending from it to other nodes, its degree is three. Five edges, its degree is five. It’s really that simple. Since each of those edges will always have a node on the other end, you might think of degree as the number of people to which a given person is directly connected. The nodes with the highest degree in a social network are the people who know the most people. These nodes are often referred to as hubs, and calculating degree is the quickest way of identifying hubs.
Calculating centrality for each node in NetworkX is not quite as simple as the network-wide metrics above, but it still involves one-line commands. All of the centrality commands you’ll learn in this section produce dictionaries in which the keys are nodes and the values are centrality measures. That means they’re ready-made to add back into your network as a node attribute, like you did in the last section. Start by calculating degree and adding it as an attribute to your network.
degree_dict = dict(G.degree(G.nodes()))
nx.set_node_attributes(G, degree_dict, 'degree')
You just ran the G.degree() method on the full list of nodes in your network (G.nodes()). Since you added it as an attribute, you can now see William Penn’s degree along with his other information if you access his node directly:
print(G.nodes['William Penn'])
But these results are useful for more than just adding attributes to your Graph object. Since you’re already in Python, you can sort and compare them. You can use the built-in function sorted() to sort a dictionary by its keys or values and find the top twenty nodes ranked by degree. To do this you’ll need to use itemgetter, which we imported back at the beginning of the tutorial. Using sorted and itemgetter, you can sort the dictionary of degrees like this:
sorted_degree = sorted(degree_dict.items(), key=itemgetter(1), reverse=True)
There’s a lot going on behind the scenes here, but just concentrate on the three input variables you gave to sorted(). The first is the dictionary, degree_dict.items(), you want to sort. The second is what to sort by: in this case, item “1” is the second item in the pair, or the value of your dictionary. Finally, you tell sorted() to go in reverse so that the highest degree nodes will be first in the resulting list. Once you’ve created this sorted list, you can loop through it, and use list slicing3 to get only the first 20 nodes:
print("Top 20 nodes by degree:")
for d in sorted_degree[:20]:
    print(d)
As you can see, Penn’s degree is 18, relatively high for this network. But printing out this ranking information illustrates the limitations of degree as a centrality measure. You probably didn’t need NetworkX to tell you that William Penn, Quaker leader and founder of Pennsylvania, was important. Most social networks will have just a few hubs of very high degree, with the rest of similar, much lower degree.11 Degree can tell you about the biggest hubs, but it can’t tell you that much about the rest of the nodes. And in many cases, those hubs it’s telling you about (like Penn or Quakerism co-founder Margaret Fell, with a degree of 13) are not especially surprising. In this case almost all of the hubs are founders of the religion or otherwise important political figures.
Thankfully there are other centrality measures that can tell you about more than just hubs. Eigenvector centrality is a kind of extension of degree—it looks at a combination of a node’s edges and the edges of that node’s neighbors. Eigenvector centrality cares if you are a hub, but it also cares how many hubs you are connected to. It’s calculated as a value from 0 to 1: the closer to one, the greater the centrality. Eigenvector centrality is useful for understanding which nodes can get information to many other nodes quickly. If you know a lot of well-connected people, you could spread a message very efficiently. If you’ve used Google, then you’re already somewhat familiar with Eigenvector centrality. Their PageRank algorithm uses an extension of this formula to decide which webpages get to the top of its search results.
Betweenness centrality is a bit different from the other two measures in that it doesn’t care about the number of edges any one node or set of nodes has. Betweenness centrality looks at all the shortest paths that pass through a particular node (see above). To do this, it must first calculate every possible shortest path in your network, so keep in mind that betweenness centrality will take longer to calculate than other centrality measures (but it won’t be an issue in a dataset of this size). Betweenness centrality, which is also expressed on a scale of 0 to 1, is fairly good at finding nodes that connect two otherwise disparate parts of a network. If you’re the only thing connecting two clusters, every communication between those clusters has to pass through you. In contrast to a hub, this sort of node is often referred to as a broker. Betweenness centrality is not the only way of finding brokerage (and other methods are more systematic), but it’s a quick way of giving you a sense of which nodes are important not because they have lots of connections themselves but because they stand between groups, giving the network connectivity and cohesion.
These two centrality measures are even simpler to run than degree—they don’t need to be fed a list of nodes, just the graph G. You can run them with these functions:
betweenness_dict = nx.betweenness_centrality(G) # Run betweenness centrality
eigenvector_dict = nx.eigenvector_centrality(G) # Run eigenvector centrality

# Assign each to an attribute in your network
nx.set_node_attributes(G, betweenness_dict, 'betweenness')
nx.set_node_attributes(G, eigenvector_dict, 'eigenvector')
You can sort betweenness (or eigenvector) centrality by changing the variable names in the sorting code above, as:
sorted_betweenness = sorted(betweenness_dict.items(), key=itemgetter(1), reverse=True)

print("Top 20 nodes by betweenness centrality:")
for b in sorted_betweenness[:20]:
    print(b)
You’ll notice that many, but not all, of the nodes that have high degree also have high betweenness centrality. In fact, betweeness centrality surfaces two women, Elizabeth Leavens and Mary Penington, whose significance had been obscured by the degree centrality metric. An advantage of doing these calculations in Python is that you can quickly compare two sets of calculations. What if you want to know which of the high betweenness centrality nodes had low degree? That is to say: which high-betweenness nodes are unexpected? You can use a combination of the sorted lists from above:
#First get the top 20 nodes by betweenness as a list
top_betweenness = sorted_betweenness[:20]

#Then find and print their degree
for tb in top_betweenness: # Loop through top_betweenness
    degree = degree_dict[tb[0]] # Use degree_dict to access a node's degree, see footnote 2
    print("Name:", tb[0], "| Betweenness Centrality:", tb[1], "| Degree:", degree)
You can confirm from these results that some people, like Leavens and Penington, have high betweenness centrality but low degree. This could mean that these women were important brokers, connecting otherwise disparate parts of the graph. You can also learn unexpected things about people you already know about—in this list you can see that Penn has lower degree than Quaker founder George Fox, but higher betweenness centrality. That is to say, simply knowing more people isn’t everything.
This only scratches the surface of what can be done with network metrics in Python. NetworkX offers dozens of functions and measures for you to use in various combinations, and you can use Python to extend these measures in almost unlimited ways. A programming language like Python or R will give you the flexibility to explore your network computationally in ways other interfaces cannot by allowing you to combine and compare the statistical results of your network with other attributes of your data (like the dates and occupations you added to the network at the beginning of this tutorial!).
Advanced NetworkX: Community detection with modularity
Another common thing to ask about a network dataset is what the subgroups or communities are within the larger social structure. Is your network one big, happy family where everyone knows everyone else? Or is it a collection of smaller subgroups that are only connected by one or two intermediaries? The field of community detection in networks is designed to answer these questions. There are many ways of calculating communities, cliques, and clusters in your network, but the most popular method currently is modularity. Modularity is a measure of relative density in your network: a community (called a module or modularity class) has high density relative to other nodes within its module but low density with those outside. Modularity gives you an overall score of how fractious your network is, and that score can be used to partition the network and return the individual communities.12
Very dense networks are often more difficult to split into sensible partitions. Luckily, as you discovered earlier, this network is not all that dense. There aren’t nearly as many actual connections as possible connections, and there are several altogether disconnected components. Its worthwhile partitioning this sparse network with modularity and seeing if the result make historical and analytical sense.
Community detection and partitioning in NetworkX requires a little more setup than some of the other metrics. There are some built-in approaches to community detection (like minimum cut, but modularity is not included with NetworkX. Fortunately there’s an additional python module you can use with NetworkX, which you already installed and imported at the beginning of this tutorial. You can read the full documentation for all of the functions it offers, but for most community detection purposes you’ll only want best_partition():
communities = community.greedy_modularity_communities(G)
The method greedy_modularity_communities() tries to determine the number of communities appropriate for the graph, and groups all nodes into subsets based on these communities. Unlike the centrality functions, the above code will not create a dictionary. Instead it creates a list of special “frozenset” objects (similar to lists). There’s one set for each group, and the sets contain the names of the people in each group. In order to add this information to your network in the now-familiar way, you must first create a dictionary that labels each person with a number value for the group to which they belong:
modularity_dict = {} # Create a blank dictionary
for i,c in enumerate(communities): # Loop through the list of communities, keeping track of the number for the community
    for name in c: # Loop through each person in a community
        modularity_dict[name] = i # Create an entry in the dictionary for the person, where the value is which group they belong to.

# Now you can add modularity information like we did the other metrics
nx.set_node_attributes(G, modularity_dict, 'modularity')
As always, you can combine these measures with others. For example, here’s how you find the highest eigenvector centrality nodes in modularity class 0 (the first one):
# First get a list of just the nodes in that class
class0 = [n for n in G.nodes() if G.nodes[n]['modularity'] == 0]

# Then create a dictionary of the eigenvector centralities of those nodes
class0_eigenvector = {n:G.nodes[n]['eigenvector'] for n in class0}

# Then sort that dictionary and print the first 5 results
class0_sorted_by_eigenvector = sorted(class0_eigenvector.items(), key=itemgetter(1), reverse=True)

print("Modularity Class 0 Sorted by Eigenvector Centrality:")
for node in class0_sorted_by_eigenvector[:5]:
    print("Name:", node[0], "| Eigenvector Centrality:", node[1])
Using eigenvector centrality as a ranking can give you a sense of the important people within this modularity class. You’ll notice that some of these people, especially William Penn, William Bradford (not the Plymouth founder you’re thinking of), and James Logan, spent lots of time in America. Also, Bradford and Tace Sowle were both prominent Quaker printers. With just a little bit of digging, we can discover that there are both geographical and occupational reasons that this group of people belongs together. This is an indication that modularity is probably working as expected.
In smaller networks like this one, a common task is to find and list all of the modularity classes and their members.13 You can do this by looping through the communities list:
for i,c in enumerate(communities): # Loop through the list of communities
    if len(c) > 2: # Filter out modularity classes with 2 or fewer nodes
        print('Class '+str(i)+':', list(c)) # Print out the classes and their members
Notice in the code above that you are filtering out any modularity classes with two or fewer nodes, in the line if len(c) > 2. You’ll remember from the visualization that there were lots of small components of the network with only two nodes. Modularity will find these components and treat them as separate classes (since they’re not connected to anything else). By filtering them out, you get a better sense of the larger modularity classes within the network’s main component.
Working with NetworkX alone will get you far, and you can find out a lot about modularity classes just by working with the data directly. But you’ll almost always want to visualize your data (and perhaps to express modularity as node color). In the next section you’ll learn how to export your NetworkX data for use in other programs.
Exporting Data
NetworkX supports a very large number of file formats for data export. If you wanted to export a plaintext edgelist to load into Palladio, there’s a convenient wrapper for that. Frequently at Six Degrees of Francis Bacon, we export NetworkX data in D3’s specialized JSON format, for visualization in the browser. You could even export your graph as a Pandas dataframe if there were more advanced statistical operations you wanted to run. There are lots of options, and if you’ve been diligently adding all your metrics back into your Graph object as attributes, all your data will be exported in one fell swoop.
Most of the export options work in roughly the same way, so for this tutorial you’ll learn how to export your data into Gephi’s GEXF format. Once you’ve exported the file, you can upload it directly into Gephi for visualization.
Exporting data is often a simple one-line command. All you have to choose is a filename. In this case we’ll use quaker_network.gexf. To export type:
nx.write_gexf(G, 'quaker_network.gexf')
That’s it! When you run your Python script, it will automatically place the new GEXF file in the same directory as your Python file.14
Drawing Conclusions
Having processed and reviewed an array of network metrics in Python, you now have evidence from which arguments can be made and conclusions drawn about this network of Quakers in early modern Britain. You know, for example, that the network has relatively low density, suggesting loose associations and/or incomplete original data. You know that the community is organized around several disproportionately large hubs, among them founders of the denomination like Margaret Fell and George Fox, as well as important political and religious leaders like William Penn. More helpfully, you know about women with relatively low degree, like Elizabeth Leavens and Mary Penington, who (as a result of high betweenness centrality) may have acted as brokers, connecting multiple groups. Finally you learned that the network is made of one large component and many very small ones. Within that largest component, there are several distinct communities, some of which seem organized around time or place (like Penn and his American associates). Because of the metadata you added to your network, you have the tools to explore these metrics further and to potentially explain some of the structural features you identified.
Each of these findings is an invitation to more research rather than an endpoint or proof. Network analysis is a set of tools for asking targeted questions about the structure of relationships within a dataset, and NetworkX provides a relatively simple interface to many of the common techniques and metrics. Networks are a useful way of extending your research into a group by providing information about community structure, and we hope you’ll be inspired by this tutorial to use these metrics to enrich your own investigations and to explore the flexibility of network analysis beyond visualization.
-
In many (but not all) cases,
piporpip3will be installed automatically with Python3. ↩ -
Some installations will only want you to type
pipwithout the “3,” but in Python 3,pip3is the most common. If one doesn’t work, try the other! ↩ -
There are a couple Pythonic techniques this code makes use of. The first is list comprehensions, which embed loops (
for n in nodes) to create new lists (in brackets), like so:new_list = [item for item in old_list]. The second is list slicing, which allows you to subdivide or “slice” a list. The list slicing notation[1:]takes everything except for the first item in the list. The 1 tells Python to begin with the second item in the list (in Python, you start counting at 0), and the colon tells Python to take everything up to the end of the list. Since the first line in both of these lists is the header row of each CSV, we don’t want those headers to be included in our data. ↩ ↩2 -
Dictionaries are a built-in datatype in Python, made up of key-value pairs. Think of a key as the headword in a dictionary, and the value as its definition. Keys have to be unique (only one of each per dictionary), but values can be anything. Dictionaries are represented by curly braces, with keys and values separate by colons:
{key1:value1, key2:value2, ...}. Dictionaries are one of the fastest ways to store values that you know you’ll need to look up later. In fact, a NetworkX Graph object is itself made up of nested dictionaries. ↩ -
Note that this code uses brackets in two ways. It uses numbers in brackets to access specific indices within a node list (for example, the birth year at
node[4]), but it also uses brackets to assign a key (alwaysnode[0], the ID) to any one of our empty dictionaries:dictionary[key] = value. Convenient! ↩ -
For the sake of simplicity, we removed any nodes that are not connected to any others from the dataset before we began. This was simply to reduce clutter, but it’s also very common to see lots of these single nodes in your average network dataset. ↩
-
But keep in mind this is the density of the whole network, including those unconnected components floating in orbit. There are a lot of possible connections there. If you took the density of only the largest component, you might get a very different number. You could do so by finding the largest component as we show you in the next section on diameter, and then running the same density method on only that component. ↩
-
We take the length of the list minus one because we want the number of edges (or steps) between the nodes listed here, rather than the number of nodes. ↩
-
The most principled way of doing this kind of comparison is to create random graphs of identical size to see if the metrics differ from the norm. NetworkX offers plenty of tools for generating random graphs. ↩
-
Why is it called transitivity? You might remember the transitive property from high school geometry: if A=B and B=C, the A must equal C. Similarly, in triadic closure, if person A knows person B and person B knows person C, then person A probably knows person C: hence, transitivity. ↩
-
Those of you with a stats background will note that degree in social networks typically follows a power law, but this is neither unusual nor especially helpful to know. ↩
-
Though we won’t cover it in this tutorial, it’s usually a good idea to get the global modularity score first to determine whether you’ll learn anything by partitioning your network according to modularity. To see the overall modularity score, take the communities you calculated with
communities = community.best_partition(G)and runglobal_modularity = community.modularity(communities, G). Then justprint(global_modularity). ↩ -
In larger networks, the lists would probably be unreadably long, but you could get a sense of all the modularity classes at once by visualizing the network and adding color to the nodes based on their modularity class. ↩
-
Every file format that is exportable is also importable. If you have a GEXF file from Gephi that you want to put into NetworkX, you’d type
G = nx.read_gexf('some_file.gexf'). ↩