Contents
- Introduction
- Prerequisites and Terminology
- Downloading and Setting up the Geoparser
- Setting up Mapping
- Geo-parsing a Text File
- Other Useful Options for Running the Geoparser
- Credits and Citation
- References
Introduction
This is a lesson on how to use the Edinburgh Geoparser. The Geoparser allows you to process a piece of English-language text and extract and resolve the locations contained within it. Among other uses, geo-resolution of locations makes it possible to map the data.
The Geoparser works best on running text, as it considers locations in context for disambiguation. For example, if you would like to get a sense of the place names mentioned in a piece of text, the Geoparser can be used to identify terms in a document that are likely to refer to place names. It will then provide its best guess as to where those places are in terms of latitute/longitude coordinates.
In December 2015, the Edinburgh Geoparser was released under the University of Edinburgh’s GPL license to be used by other researchers in the field of text mining and natural language processing as well as scholars who are interested in geoparsing text. More information on its documentation, publications using it and how to download it can be found here.
A simple online demo of the vanilla Edinburgh Geoparser can be tried out here. It provides only the visual interface to the Geoparser output after uploading a text file and selecting a gazetteer. The demo is otherwise not configurable and should only be used to try out small examples and not for geo-parsing a large number of files.
The following lesson explains how the Edinburgh Geoparser works under the hood and contains information on:
- Prerequisites and terminology
- Downloading and setting up the Edinbugh Geoparser
- Setting up mapping
- Geo-parsing a text file
- Other useful options for running the Geoparser
- Geo-parsing multiple text files
- Extracting geo-resolution output to TSV
Prerequisites and Terminology
This lesson requires users to be familiar with the command line. If not then you should first follow the lesson Introduction to the Bash Command Line.
The Geoparser works on MacOS or Linux but is not supported for Windows. The following lesson provides command line instructions for MacOSX users and equivalent commands for Linux users (only if different to the Mac versions).
The terms geo-parsing and geo-referencing are used interchangeably in this lesson and refer to the entire process of identifying place names in text (place name recognition) and disambiguating them by assigning their most likely latitude/longitude pairs (geo-resolution).
The Edinburgh Geoparser is used in conjunction with various gazetteers. The term gazetteer here refers to a list of place names and information about them (e.g. their latitude/longitude coordinates, population size and country they are contained in). More information on Using Gazetteers to Extract Sets of Keywords from Free-Flowing Texts can be found in Adam Cryble’s Programming Historian lesson. His lesson focusses on matching gazetteer entries in text to identify place names. The Edinburgh Geoparser goes beyond string matching as it applies a large number of rules to identify place names and other types of named entities in text and goes on to ground the extracted entities (either by geo-resolution or date normalisation).
Downloading and Setting up the Geoparser
The current Edinburgh Geoparser download can be found at https://www.ltg.ed.ac.uk/software/geoparser/.
Go to the Download section and click on The Edinburgh Geoparser link. All you need to do then is accept the license, fill in some personal details, and then press Download. A compressed file called geoparser-1.3.tar.gz will be downloaded to your Download directory or to wherever you specified the download to go. Note that this file name will change when new versions of the tool are released.
Some machines will automatically decompress the .gz file and create the directory geoparser-1.3. If this happens, and you see the geoparser-1.3 directory appear, move this new directory to wherever you want it to be installed and go to step 2. If this does not happen, and your machine does not decompress the .tar.gz file and create a new directory automatically, follow step 1 first. (Note that version 1.3 is the current release but this number will change in the future.)
Installation Steps via the GUI interface
1. Go to the download of the Geoparser and move it to the directory of your choice (e.g. into the Software directory). Then double-click on the .gz or .tar file (if is was already decompressed automatically). A new directory called geoparser-1.3 will appear (see Figure 1).
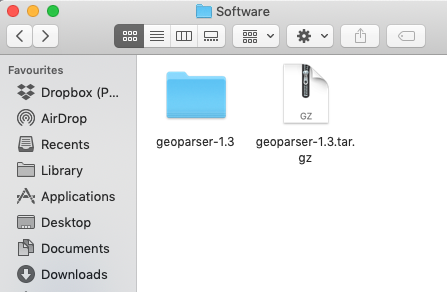
Figure 1: The new geoparser-1.3 directory.
If you double-click on the geoparser-1.3 folder you can see the content of the Geoparser (see Figure 2). That’s it. You’re ready to geo-parse.
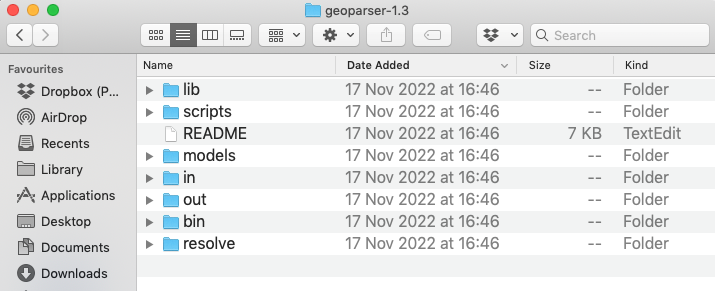
Figure 2: Content of the Geoparser.
Installation Steps for the Command Line
1. Move (mv) the .tar.gz file to the directory where you want to install the Geoparser. In this case, I’d like the Geoparser to be installed in my Software directory inside the Documents directory. If you don’t have a Software directory, create it first:
mkdir ~/Documents/Software
Then type:
mv ~/Downloads/geoparser-1.3.tar.gz ~/Documents/Software/
For this lesson it is assumed that the geoparser is now located inside the ~/Documents/Software directory. You may however want to specify a different directory you’d like to install it in and adjust these commands by specifying the place where the Geoparser was downloaded and save at. For example if you’d like to create a new directory called geoparsing in your home directory and put the Geoparser there, then you would type:
mkdir ~/geoparsing
mv ~/Downloads/geoparser-1.3.tar.gz ~/geoparsing/
2. Next, you need to change into the directory containing the geoparser-1.3.tar.gz file so that the following command is local to that directory and you do not have to specify the entire path leading to it. To do that you use the command cd (change directory), e.g.:
cd ~/Documents/Software/
3. Run the following command on the command line to decompress the download:
tar -xvf geoparser-1.3.tar.gz
You should see a long list of files appear on screen that are part of the distribution. The Software directory will now contain a new directory called geoparser-1.3. It contains:
README:a file with basic instructions for how to run the Geoparserbin:a set of executables, programs to be run by a computer, for different operating systems. There are executables for Linux (x86_64) and MacOSX.in:a directory with example input fileslib:a set of libraries required for various processing stepsmodelsa directory containing the part-of-speech tagging modelout:a directory with example output filesresolve:a directory containing programs required for geo-resolutionscripts:a directory with a set of scripts to run the Geoparser
You can list (ls) and check its content by typing:
ls ./geoparser-1.3
Congratulations! You have successfully downloaded and set up the Geoparser, and you can now begin geo-parsing.
Setting up Mapping
The visualisation component of the Geoparser uses Leaflet mapping software in conjunction with either Mapbox or OpenStreetMap map tiles.
Out of the box the Geoparser uses OpenStreetMap tiles for mapping. You can run the Geoparser (see next Section) as is without setting the environment variable GEOPARSER_MAP_KEY. If GEOPARSER_MAP_KEY is not set, OpenStreetMap tiles will be used by default. The main disadvantage of this - from the point of view of an English-language geoparser - is that OpenStreetMap generally displays maps in the language of the area, rather than English.
To use the Geoparser with Mapbox tiles you will need a Mapbox key (access token) which can be obtained from www.mapbox.com. When you create a Mapbox account you are automatically assigned a public access token. You can use that or create a new one. Before running the Geoparser you should set the environment variable GEOPARSER_MAP_KEY to your access token. To do that you have to type the following command into your terminal, replacing “TOKEN” with your Mapbox access token:
export GEOPARSER_MAP_KEY=TOKEN
You can also assign this variable in the same way in your .bashrc, .profile or .bash_profile file depending on your operating system and setup, which will set this variable every time a terminal is started up.
Note that Mapbox now also requires you to provide a credit card number when creating an account, and you may not want to do this in which case you still have the default OpenStreetMap mapping option.
Geo-parsing a Text File
In this section you will learn how to geo-parse a simple text file. Use the cd command to go the geoparser’s script directory:
cd ./geoparser-1.3/scripts
and try out one of the examples provided as part of the distribution by running the following two commands:
cat ../in/172172.txt | ./run -t plain -g geonames -o ../out 172172
For those not so familiar with working on the command line, let’s look at the syntax used here. Firstly, it is useful to know that the pipe character (|) is used to concatenate different commands.
In the previous example the first command is:
cat ../in/172172.txt
The command cat prints a file (in this case the file is called 172172.txt and it is located in the in directory of the geoparser) to your screen (or to standard out or short stdout). The pipe character (|) is used to send the standard output of one command to the next command which can then use it as standard in (or short stdin).
The second command is:
./run -t plain -g geonames -o ../out 172172
It takes the stdout from the first command and runs the Geoparser with the following options (-t, -g and -o):
-
-tspecifies the format of your input. Text input (plain) is recommended for geo-parsing. -
-gspecifies the gazetteer that should be queried. In the above example, the gazetteer selected is GeoNames (geonames), a large global gazetteer. You can also specify other gazetteers, for example the DEEP gazetteer of historical placenames in England (deep) or the Pleiades+ gazetteer of ancient places (plplus). For more information on the types of gazetteers offered as part of the distribution see the Geoparser documentation here. -
-ospecifies two pieces of information, the output directory (../out) which is located within thegeoparser-1.3directory and a prefix for the output file name (in this case172172, the same prefix as that of the input file name). Once the command is run and the Geoparser is finished, the result files appear in the output directory (../out) starting with the specified prefix.
When running the Geoparser, the specified text file is going through a series of processing steps which are combined into one pipeline. It is first tokenised, part-of-speech-tagged and lemmatised. After these initial steps, named entity recognition is performed to identify location and person names as well as dates. It was found that identifying location and person names in parallel helps to distinguish some ambiguous cases (like the string “Lewis” which could refer to a first name or the Scottish island) and where their context helps to distinguish between them. The extracted locations are then resolved to latitude/longitude coordinate pairs. The text is then further processed by identifying syntactic phrases (chunking) and temporal relations. The latter two steps are not very relevant to this lesson and will therefore not be explained in detail. Finally, visualisations are created to be able to inspect the file and the Geoparser output using a map interface in a browser. For more information on each of the sub-components of the Geoparser, see the documentation here.
Note that when using the Geoparser in combination with the GeoNames gazetteer some historical place names will not be identified as they are missing from the gazetteer. Also the Geoparser team can provide additional pre-processing to improve the quality of optical-character recognised output (e.g. to fix soft-hyphen splitting or to deal with the long “s” character). Those scripts are not distributed with the standard distribution but available on request.
To see the output files, go to the out directory:
cd ../out
Now you can see all the files that the Geoparser has produced from the original 172172.txt file. Use the ls command and the * wildcard operator to see all the files beginning witht the prefix 172172, like so:
ls 172172*

172172.display.html 172172.gazlist.html 172172.nertagged.xml
172172.events.xml 172172.gazmap.html 172172.out.xml
172172.gaz.xml 172172.geotagged.html 172172.timeline.html
The most relevant Geoparser output files contain the following information:
172172.out.xml: This is the XML file containing the text of the file in XML including all linguistic processing information specified in line with the text as well as the named entity recognition and the geo-resolution output. In this file only the top-ranked geo-coordinates per resolved location are stored. If you are not familiar with XML, looking at this file might be quite daunting. I will explain below how to extract the geo-resolution information to TSV (tab separated values) format.172172.gaz.xml: This is an XML file containing a ranked list of geo-resolution candidates for each extracted location mention. The gazetteer (e.g. GeoNames) may contain more than one location per location mention and therefore all candidates are listed here. By default, the number of location candidates returned is capped at 20 if more candidates are present in the gazetteer. Increasing the number of candidates to be considered by the Geoparser does not increase performance considerably but increases processing time significantly (Alex et al., 2015).172172.display.html: This is a visual display of the geo-parsed text file containing the text, a map and a list of geo-coordinates for each extracted location.
You can view 172172.display.html in your browser by typing:
- On MacOSX:
open 172172.display.html -
On Linux:
xdg-open 172172.display.html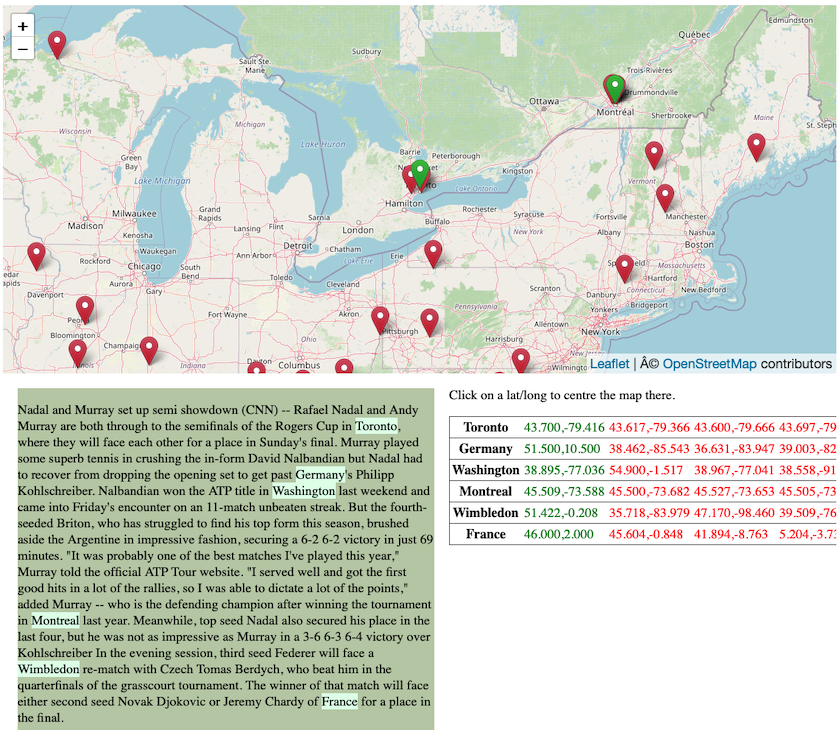
Figure 3: Display of file 172172.display.html in a browser.
At the top of the browser window (see Figure 3) you will see a Google map interface with green and red pins. At the bottom left is a window containing the text of the geo-parsed file with recognised locations highlighted in light green and at the bottom right there is a window containing the different geo-coordinate pairs for all the candidates considered per extracted location mention. The ones in green are the top-ranked coordinate pairs which correspond to the green pins on the map. The red pairs are lower ranked alternatives which correspond to the red pins on the map.
You can also specify the option -top on the command line. This creates output files which only contain the top-ranked location candidates, so only the green geo-coordinate pairs and pins are displayed (see Figure 4).
cat ../in/172172.txt | ./run -t plain -g geonames -top -o ../out 172172
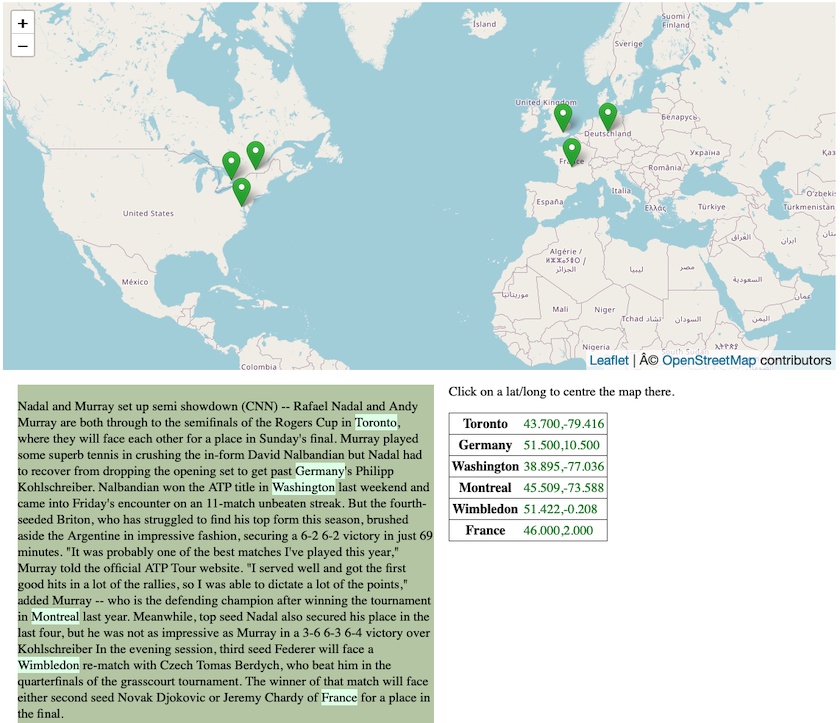
Figure 4: Display of file 172172.display.html in a browser with only top location candidates displayed.
The vanilla download works most accurately with running English text. It even works on individual sentences. Geo-resolution accuracy increases however if the Geoparser has access to more context, including other place names. On the other hand, the Geoparser is not well suited to process large documents made up of several sub-texts, e.g. a journal issue made up of articles. In the latter case it would be better to split the document into the articles first and geo-parse each article individually.
Other Useful Options for Running the Geoparser
Giving Preference to a Geographical Area
If you know that your text is about a particular geographical area you can instruct the Geoparser to give this area higher weighting during the geo-resolution step. For example, if you know that your data is mostly set in Canada then it may make sense to give candidate locations inside Canada higher preference. By doing so the Geoparser will prefer places within the specified area but it will still consider locations outside it if other factors give them higher weighting.
A bounding area can be specified as a circle (-l locality) or a box (-lb locality box). To specify a circular locality use the following command:
-l lat long radius score
where:
latandlongare in decimal degrees (i.e. 57.5 for 57 degrees 30 mins)radiusis specified in kmscoreis a numeric weight assigned to locations within the area (else 0).
To specify a locality box use:
-lb W N E S score
where
W(est)N(orth)E(ast)S(outh) are decimal degreesscoreis the same as for option-l.
You can grab the coordinates of a bounding box for a particular area using this online BoundingBox tool. For example, a bounding box for Canada is [W:-141.002701, N:83.110619, E:-52.620201, S:41.681019] (see Figure 5)
.](/images/geoparsing-text-with-edinburgh/geoparser_figure03.png)
Figure 5: Bounding box for Canada drawn on BoundingBox.
To specify this bounding box using the previous example, go back to the scripts directory and run the following command:
cat ../in/172172.txt | ./run -t plain -g geonames -lb -141.002701 83.110619 -52.620201 41.681019 2 -o ../out 172172
Here, the score has been set to 2. This gives a location within the bounding box twice as much weight as for example the population size of a location during geo-resolution.

Figure 6: Display of file 172172.display.html after geo-parsing with a specified bounding box.
In this case, all place names (including Washington, Wimbledon, Germany and France) were resolved to locations within the bounding box (see Figure 6). The locality option should therefore be used with care and should ideally only be applied to documents where you are relatively certain that all or most locations appear within the specified area.
Specifying a Document Date
As well as identifying locations and person names within text, the Geoparser also recognises temporal expressions (dates and times) in textual data and normalises them. Normalisation here means that the temporal expressions are enriched with additional information of when exactly they occurred. For example, it computes which the exact calendar date the expression “last Friday” refers to.
In order to do this well, it is preferable to provide the Geoparser with the date of the document (if known). To try this out using the previous example, type the following command:
cat ../in/172172.txt | ./run -t plain -g geonames -d 2010-08-10 -o ../out 172172
-dspecifies the document date (YEAR-MONTH-DATE). This option is optional. It is used for normalisation (or grounding) of temporal expressions in the document, for example to compute which particular calendar date the string “Sunday” refers to.
The document date specified on the command line is stored in the XML output and all relative temporal expression will be automatically interpreted with respect to it. The document date (docdate) is stored in the meta section at the top of the XML output file. Use the head command to list the first 5 lines of the output file where you can see it:
head -n 5 ../out/172172.out.xml

<?xml version="1.0" encoding="UTF-8"?>
<document version="3">
<meta>
<attr name="docdate" id="docdate" year="2010" month="08" date="10" sdate="2010-08-10" day-number="733993" day="Tuesday" wdaynum="2">20100810</attr>
<attr name="tokeniser_version" date="20151216"/></meta>
Using the example output file, the first recognised date string in the named entity output is “Sunday” which appears in the sentence:
“Rafael Nadal and Andy Murray are both through to the semifinals of the Rogers Cup in Toronto, where they will face each other for a place in Sunday’s final.”
Since the document date is Aug 8th 2010 which was a Tuesday, the Sunday referred to in this text is Aug 15th 2010. The output of the correct temporal resolution for this example can be seen in the entity output in the standoff section of the 172172.out.xml file:
<ent date="15" month="08" year="2010" sdate="2010-08-15" day-number="733998" id="rb7" type="date" day="Sunday" wdaynum="7">
   <parts>           <part ew="w204" sw="w204">Sunday</part>        </parts>     </ent>
Besides the obvious date, month, year and day attributes:
sdaterefers to the grounded date expressed as a string,day-numberrefers to a unique day number where 1 corresponds to the 1st of January 1 AD, andwdaynumrefers to the week day number where 1 corresponds to Monday, 2 to Tuesday etc.
This type of normalisation makes it possible to plot the events mentioned in a piece of text on a timeline. A timeline view is automatically created at the end of each geoparser run. To view the one for our example 172172, open the 172172.timeline.html file in Firefox (this view is not configured for other browsers at the moment).
On MacOSX:
open -a Firefox ./out/172172.timeline.html
On Linux:
xdg-open ./out/172172.timeline.html
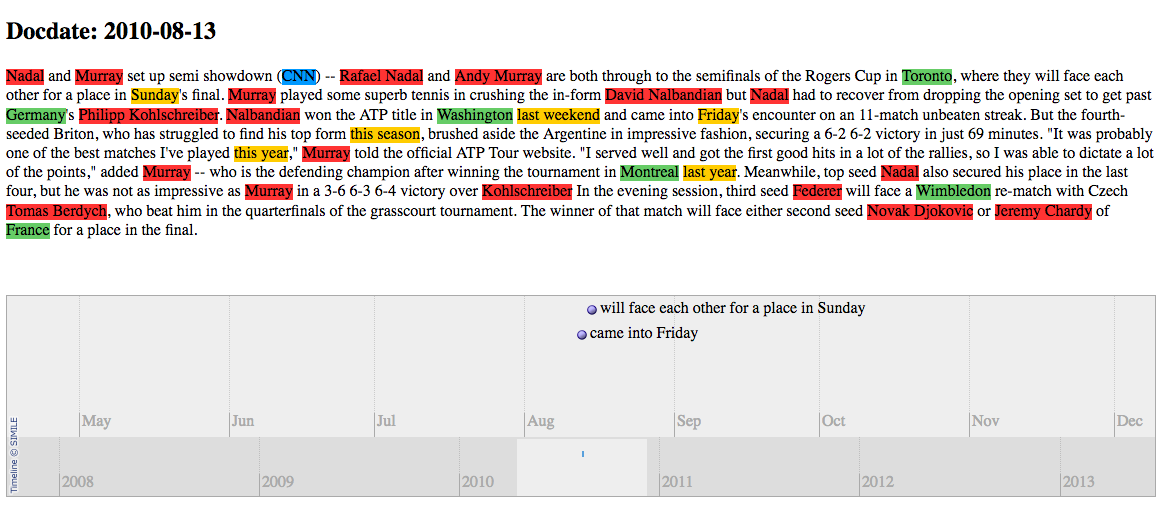
Figure 7: Timeline view for the example 172172 displayed in Firefox. You can see that the dates are normalised to the timeline at the bottom of the screen.
Figure 7 is a screenshot of the timeline view in Firefox. At the top of the screen you can see the text of the example with different entity types (person, location, organisation and temporal expression) marked up in different colours. Underneath you can see the timeline view with normalised dates and their events pinned to the calendar.
If the document date is not specified all temporal expressions will be interpreted relative to the date when the Geoparser is run. While this setting does not affect the performance of the geo-resolution of place names in this release, one could imagine a possible extension where the document date affects the type of gazetteer used or the location name variants that should be considered as place names change over time.
Geo-parsing Multiple Text Files
Now that you know how to geo-parse one file, you may want to do the same thing for a set of documents all at once. You can download a simple shell script which geo-parses multiple files here. Please refer to the Geoparser workshop slides for more information on how to make this script executable, run and it and adapt it to your needs.
Extracting Geo-Resolution Output to TSV
The output of the Geoparser is in XML format. This is useful as XML can store various types of information present in text along with it. For example, it can store low-level information like the boundaries of words, their part-of-speech tags and lemmas. It can also store more complex information like phrases and entities occurring in the text as well as links between them, for example the subject and object of a sentence or the location (e.g. birthplace) of a person. The advantage is that all the computed structural and linguistic information computed for a piece of text is stored along with it and downstream natural language processing tools have all the information available.
While XML is easy to process by a machine it is difficult to read by human readers. You may also not be interested in all the information computed by the Geoparser and might only want to see which locations were identified along with their coordinates. So rather than dealing with an XML file, you might find it easier to work with the Geoparser output in a form such as tab-separated values (TSV) in order to inspect it in a spreadsheet or use it with an application such as QGIS or Google Maps/Google Earth for which there are already useful Programming Historian lessons available (Installing QGIS 2.0 and Adding Layers and Intro to Google Maps and Google Earth).
The Geoparser is distributed with a useful set of XML processing tools called LT-XML2, authored by Richard Tobin, which can be used to extract the location entities in a Geoparser XML output file and to present them in tab-separated value (TSV) format. The executables for these tools are located in the ./geoparser/bin directory, inside:
sys-i386-64: if you are using a 64 bit Linux machine orsys-i386-snow-leopard: if you’re using MacOSX. Don’t be confused by the name of this directory. The executables should work for all MacOSX installations and not just on Snow Leopard.
All the executables starting with lx are LT-XML tools which work in combination with Xpath expressions to process or manipulate XML. Going in detail over Xpath is beyond the scope of this lesson, so I will give clear examples to show how things work. If you are interested in XML data manipulation you will find further detail in Transforming Data for Reuse and Re-publication.
The best tool for printing XML content in a different format is lxprintf. Depending on your operating system, go to the geoparser directory and run lxprintf as follows:
On Linux use:
./bin/sys-i386-64/lxprintf -e "ent[@type='location']" "%s\t%s\t%s\t%s\t%s\n" "normalize-space(parts/part)" "@gazref" "@in-country" "@lat" "@long" < ./out/172172.out.xml> ./out/172172.out.tsv
and on MacOSX type:
./bin/sys-i386-snow-leopard/lxprintf -e "ent[@type='location']" "%s\t%s\t%s\t%s\t%s\n" "normalize-space(parts/part)" "@gazref" "@in-country" "@lat" "@long" < ./out/172172.out.xml> ./out/172172.out.tsv
The previous lxprintf command reads through a geo-parsed XML output file, extracts all location entities identified by the Geoparser and presents them in TSV format. In the example above, the XML input file (containing the location entities) is ./out/172172.out.xml, and the TSV file is ./out/172172.out.tsv. The < symbol signifies “standard in” (or stdin) which tells the script to read in the file that follows it and the > symbol signifies standard out (or stdout) which specifies sending the output to the file that follows it.
The way this command works is that lxprintf looks for XML entities specified after the option -e. In this case, entities of type location are to be extracted ("ent[@type='location’]”). Here is an example of an entity of type location in the XML:
<ent id="rb6" type="location" lat="43.70011" long="-79.4163" gazref="geonames:6167865" in-country="CA" feat-type="ppla" pop-size="4612191">
  <parts>
    <part ew="w148" sw="w148">Toronto</part>
  </parts>
</ent>
The next part of the command (“%s\t%s\t%s\t%s\t%s\n”) specifies how the output should be printed. In this case, each specified string (%s) is delimited by a tab (\t) character and the last string is followed by a new line. In this case, the following 5 strings for each location entity are specified:
"normalize-space(parts)"refers to the location mention recognised in the text. normalize() removes any unnecessary whitespace."@gazref”refers to the ID reference of the location in the gazetteer, if resolved."@in-country”refers to the country the location appears in, if this information was identified."@lat”refers to the latitude of the location, if this information was identified."@long”refers to the longitude of the location, if this information was identified.
When printed to screen, the content of the TSV output file is therefore the following:
cat ./out/172172.out.tsv

Toronto geonames:6167865        CA      43.70011        -79.4163
Germany geonames:2921044        DE      51.5    10.5
Washington      geonames:4140963        US      38.89511        -77.03637
Montreal        geonames:6077243        CA      45.50884        -73.58781
Wimbledon       geonames:4668339        US      35.71814        -83.97907
France  geonames:3017382        FR      46      2
If you open ./out/172172.out.tsv in Excel, for example, you can see that the information is now presented in column format, in this case listing the place name, the GeoNames ID, the country code, the latitude and the longitude (see Figure 8).

Figure 8: Geo-parsed location information from the example 172172 displayed in Excel.
Once you have extracted the geo-location information from the *out.xml file(s) you can read it into a data frame and use it as input into your favourite mapping tool though you will have to adjust the format depending on your needs.
Credits and Citation
The Geoparser and its demo were developed over a number of years in a team effort by members of the Edinburgh Language Technology Group, including Claire Grover, Richard Tobin, Kate Byrne and myself (Beatrice Alex).
If you found this lesson useful for your work, please cite it as:
Beatrice Alex, “Geoparsing English-Language Text with the Edinburgh Geoparser,” Programming Historian 6 (2017), https://doi.org/10.46430/phen0067.
or cite one of the publications listed here.
The lesson is also available in workshop form. If you’re interested in running a workshop on how to use the Edinburgh Geoparser, do get in touch.
The Geoparser team also welcomes suggestions for future collaboration to tailor the Geoparser to different needs. Please get in touch if you have ideas about how it could be applied.
In the past the Geoparser was used to identify place names for different purposes and in different types of data (e.g. Grover et al., 2010 and Alex et al., 2015). For example, it was adapted to perform fine-grained geo-parsing for literature set in Edinburgh (Palimpsest) presented in the LitLong interface. It was used to geo-parse
- volumes of the Survey of English Place Names (DEEP, see Grover and Tobin, 2014),
- large historical collections related to commodity trading in the 19th century British Empire (Trading Consequences) and
- 19th century British newspapers by Prof. Ian Gregory’s group at Lancaster University.
The Geoparser was also adapted to the ancient world for the Google Ancient Places project (e.g. see Isaksen et al., 2011), with its GapVis interface. More recently, the Geoparser was used to geo-parse Twitter user profile locations (Alex et al, 2016) and the mass digitised text, including the Gazetteers of Scotland (Filgueira et al., 2020) and Encyclopaedia Britannica (Filgueira et al., 2021)
References
Beatrice Alex, Clare Llewellyn, Claire Grover, Jon Oberlander and Richard Tobin (2016). Homing in on Twitter users: Evaluating an Enhanced Geoparser for User Profile Locations. 2016. In the Proceedings of the 10th Language Resources and Evaluation Conference (LREC), 23-28 May 2016. [pdf]
Beatrice Alex, Kate Byrne, Claire Grover and Richard Tobin (2015). Adapting the Edinburgh Geoparser for Historical Georeferencing. International Journal for Humanities and Arts Computing, 9(1), pp. 15-35, March 2015.[pdf]
Rosa Filgueira, Claire Grover, Vasilios Karaiskos, Beatrice Alex, Sarah Van Eyndhoven, Lisa Gotthard, and Melissa Terras (2021). Extending defoe for the efficient analysis of historical texts at scale. In 2021 IEEE 17th International Conference on eScience (eScience), pp. 21-29.
Rosa Filgueira, Claire Grover, Melissa Terras, and Beatrice Alex (2020). Geoparsing the historical Gazetteers of Scotland: accurately computing location in mass digitised texts. In Proceedings of the 8th Workshop on Challenges in the Management of Large Corpora, pages 24–30, Marseille, France. European Language Resources Association.
Claire Grover and Richard Tobin (2014). A Gazetteer and Georeferencing for Historical English Documents. In Proceedings of LaTeCH 2014 at EACL 2014. Gothenburg, Sweden. https://doi.org/10.3115/v1/W14-0617
Claire Grover, Richard Tobin, Kate Byrne, Matthew Woollard, James Reid, Stuart Dunn, and Julian Ball (2010). Use of the Edinburgh Geoparser for georeferencing digitised historical collections. Philosophical Transactions of the Royal Society A. [pdf]
Leif Isaksen, Elton Barker, Eric C. Kansa, Kate Byrne (2012). GAP: A NeoGeo Approach to Classical Resources. Leonardo 45 (1): 82–83. [pdf]