Contents
- Lesson Goals
- Software Requirements
- What is Version Control and Why Use It?
- What are Git and GitHub?
- Getting Started
- Version Controlling a Plain Text Document
- Managing Conflicts
- Version Control in a Plain Text Workflow
- Further Resources
This lesson was written for an older version of GitHub Desktop for OS X. Since then, GitHub has released an entirely new version of GitHub Desktop with a significantly different interface.
This lesson only refers to the OS X version now known as “GitHub Desktop Classic” that may be downloaded here.
Lesson Goals
In this lesson you will be introduced to the basics of version control, understand why it is useful and implement basic version control for a plain text document using GitHub Desktop. By the end of this lesson you should understand:
- what version control is and why it can be useful
- the differences between Git and GitHub
- how to implement version control using ‘GitHub Desktop,’ a Graphical User Interface for GitHub
- be aware of other resources that will help you implement version control in your academic writing
Software Requirements
GitHub Desktop Classic is currently only available for Mac. If you use Linux you will probably already be familiar with the command line and will be able to use the Command Line version of Git.
What is Version Control and Why Use It?
It is helpful to understand what version control is and why it might be useful for the work you are doing prior to getting stuck into the practicalities. At a basic level version control involves taking ‘snapshots’ of files at different stages. Many people will have introduced some sort of version control systems for files. Often this is done by saving different versions of the files. Something like this:
mydocument.txt
mydocumentversion2.txt
mydocumentwithrevision.txt
mydocumentfinal.txt
The system used for naming files may be more or less systematic. Adding dates makes it slightly easier to follow when changes were made:
mydocument2016-01-06.txt
mydocument2016-01-08.txt
Though this system might be slightly easier to follow, there are still problems with it. Primarily this system doesn’t record or describe the changes that took place between these two saves. It is possible that some of these changes were small typo fixes but the changes could also have been a major re-write or re-structuring of a document. If you have a change of heart about some of these changes you also need to work out which date the changes were made in order to go back to a previous version.
Version control tries to address problems like these by implementing a systematic approach to recording and managing changes in files. At its simplest, version control involves taking ‘snapshots’ of your file at different stages. This snapshot records information about when the snapshot was made but also about what changes occurred between different snapshots. This allows you to ‘rewind’ your file to an older version. From this basic aim of version control a range of other possibilities are made available.
Why Version Control Text Documents?
As research increasingly makes use of digital tools and storage it becomes important to consider how to best manage our research data. This becomes especially important when we want to collaborate with other people. Though version control was originally designed for dealing with code there are many benefits to using it to with text documents too. Though not all of these benefits will be covered in this lesson, version controlling your document allows you to:
- Track developments and changes in your documents
- Record the changes you made to your document in a way that you will be able to understand later
- Experiment with different versions of a document while maintaining the original version
- ‘Merge’ two versions of a document and manage conflicts between versions
- Revert changes, moving ‘backwards’ through your history to previous versions of your document
Version control is particularly useful for facilitating collaboration. One of the original motivations behind version control systems was to allow different people to work on large projects together, in the case of Git to manage the Linux kernel source code. Using version control to collaborate allows for a greater deal of flexibility and control then many other solutions. As an example it would be possible for two people to work on a document at the same time and then merge these documents. If there were ‘conflicts’ between the two versions version control systems would allow you to see these conflicts and make an active decision about how to ‘merge’ these different versions into a new ‘third’ document. With this approach you would also retain a ‘history’ of the previous version should you wish to revert back to one of these later on.
Version control will not be necessary for all of the documents you write. However there are times when version control will be very useful. For substantial work such as articles, books, or dissertations, version control makes a lot of sense.
The implementation of version control we are going to use in this lesson will be publicly available, but it is possible to use version control and keep your documents hidden permanently or until you decide to make them available.
What are Git and GitHub?
Though often used synonymously, Git and GitHub are two different things. Git is a particular implementation of version control originally designed by Linus Torvalds as a way of managing the Linux source code. Other systems of version control exist though they are used less frequently. Git can be used to refer both to a particular approach taken to version control and the software underlying it.
GitHub is a company which hosts Git repositories (more on this below) and provides software for using Git. This includes ‘GitHub Desktop’ which will be covered in this tutorial. GitHub is currently the most popular host of open source projects by number of projects and number of users.
Although GitHub’s focus is primarily on source code, other projects, such as the Programming Historian, are increasingly making use of version control systems like GitHub to manage the work-flows of journal publishing, open textbooks and other humanities projects. Becoming familiar with GitHub will be useful not only for version controlling your own documents but will also make it easier to contribute and draw upon other projects which use GitHub. In this lesson the focus will be on gaining an understanding of the basic aims and principles of version control by uploading and version controlling a plain text document. This lesson will not cover everything but will provide a starting point to using version control.
Why Not use Dropbox or Google Drive?
Dropbox, Google Drive and other services offer some form of version control in their systems. There are times when this may be sufficient for your needs. However there are a number of advantages to using a version control system like Git:
- Language support: Git supports both text and programming languages. As research moves to include more digital techniques and tools it becomes increasingly important to have a way of managing and sharing both the ‘traditional’ outputs (journal articles, books, etc.) but also these newer outputs (code, datasets etc.)
- More control: a proper version control systems gives you a much greater deal of control over how you manage changes in a document.
- Useful history: using version control systems like Git will allow you to produce a history of your document in which different stages of the documents can be navigated easily both by yourself and by others.
Academic Projects Using Version Control
Using version control has become pretty well established in some scientific disciplines, though its adoption is still far from universal. In the humanities and social sciences the use of version control systems like Git are much less common. The projects below show some possible ways of using Git in academic setting:
- The Programming Historian which uses GitHub in the work-flow of managing the journal, lessons and producing the site.
- Python Programming for the Humanities is a tutorial introducing the Python programming language.
- ProfHacker has posts on various projects on using GitHub in an academic context.
New projects pop up regularly and many open source tools which you may use in for digital humanities will be hosted on GitHub, so understanding GitHub may also be useful for using these tools more easily.
Getting Started
GitHub Desktop will allow us to easily start using version control. GitHub Desktop offers a Graphical User Interface (GUI) to use Git. A GUI allows users to interact with a program using a visual interface rather than relying on text commands. Though there are some potential advantages to using the command line version of Git in the long run, using a GUI can reduce the learning curve of using version control and Git. If you decide you are interested in using the command line you can find more resources at the end of the lesson.
A Note on Terminology
One of the trickiest aspects of using GitHub is the new terminology. Some of the commands are fairly self-explanatory, others less so. This tutorial will try and briefly summarise new terms. It may also be helpful to have a glossary on hand to refer to. But in general it can be best to pick up terminology through using GitHub rather than trying to understand all of the terms before you begin using it.
Register for a GitHub Account
Since we are going to be using GitHub we will need to register for an account at GitHub if we don’t already have one. For students and researchers GitHub offers free private repositories. These are not necessary but might be appealing if you want to keep some work private.
Install GitHub Desktop
You can download GitHub Desktop “Classic” for OS X here. Once you have downloaded the file, unzip it and open the app, following the instructions for logging in to your GitHub account. Once you have installed GitHub Desktop and followed the setup instructions we can start using the software with a text document.
Version Controlling a Plain Text Document
Version control systems like Git work best with plain text files. Plain text files are files with minimal encoding, whereas word and other word processors produce a lot of code that is not human readable. The same text saved in a ‘.txt’ file opens equally well in Word, LibreOffice or Notepad. This ‘portability’ of plain text files is a major benefit: they will open and display the text properly on almost any computer.
Although there are many benefits to writing our documents in plain text files we quickly come across some limitations. We may want to emphasise parts of text with italics or with bold words. We may want to include headings or include quotations. This is where ‘markdown’ comes in.
Markdown is a way of including formatting into a plain text document. You may have come across HTML or LaTeX in the past. These markup languages also express information about the formatting and structure of plain text. Markdown, however, tries to minimize the syntax. This makes it easier to focus on the content of writing without the markup getting in the way—hence the name ‘markdown.’
The Markdown syntax won’t be covered in this lesson in order to keep the length short. However, it makes sense to explore Markdown once you have gone through this lesson and are comfortable with the basics of version control. GitHub integrates its own version of Markdown syntax. If you add Markdown syntax to documents you version control with GitHub Desktop these will be rendered on the GitHub website. Arguably the best way to learn Markdown is to begin using it. The Getting Started with Markdown lesson by Sarah Simpkin provides an overview of Markdown while the lesson Sustainable Authorship in Plain Text using Pandoc and Markdown by Dennis Tenen and Grant Wythoff explains how to utilise Markdown in combination with Pandoc to use plain text for your academic writing.
Text Editors
To write in plain text we want to use a text editor. There are a huge number of free and paid text editors available. Some of these are very straightforward and simple to use while others have a learning curve and potential uses beyond simple text editing. In the long run using a more advanced and extendable text editor like Vim or Emacs may save you time but for now we can start with a simpler editor. Atom is a good option for getting started. Atom is a text editor built by GitHub and includes syntax highlighting for Markdown alongside integration with GitHub. It is free and open source, a full ‘flight manual’, including installation instructions, is available here.
If you don’t want to install any new software then you can use your system’s included text editor: TextEdit for Mac and Notepad for windows. If you decide to use Markdown beyond this tutorial then you will benefit from a text editor which includes syntax highlighting for Markdown alongside other features useful for writing.
Creating a Document
We can begin with a very simple document.
Hello world!
Include the above text or something similar in a new plain text document. Once you have done this save the file with a file extension ‘.md’. This is the most popular file extension used for markdown files though others are sometimes used. Make sure that it is saved in plain text format in a new folder. Sometimes your text editor will default to Rich Text Format. You should be able to change this in the preferences or options of your chosen text editor. Make sure to name the file and folder with something meaningful. This may seem slightly confusing. The ‘.md’ file extension lets GitHub (and other software) know that we are using markdown syntax. However, we still want to ensure that the encoding of the file is in ‘plain text’. Once you are setup with a text editor you like then the encoding of documents will not usually be an issue.
To most effectively use Git to version control it is important to organize projects in folders. Git tracks the contents of a folder by creating a repository in the folder. The repository is made up of all the files in the folder that are ‘watched’ for changes by Git. It is best to create one repository for each major project you are working on, i.e., one repository for an article, one for a book, and one for some code you are developing. These folders are like the normal folders you would have on your computer for different projects, though the files in the folders have to be deliberately added to the repository in order to be version controlled.
Adding a Document
There are a number of different ways to add files for GitHub Desktop to track. We can drag the folder containing the file onto GitHub Desktop. When you do this you will be asked whether you want to create a repository for this folder. Alternatively we can click on the ‘plus’ icon to open a finder window to choose folders we want to add.
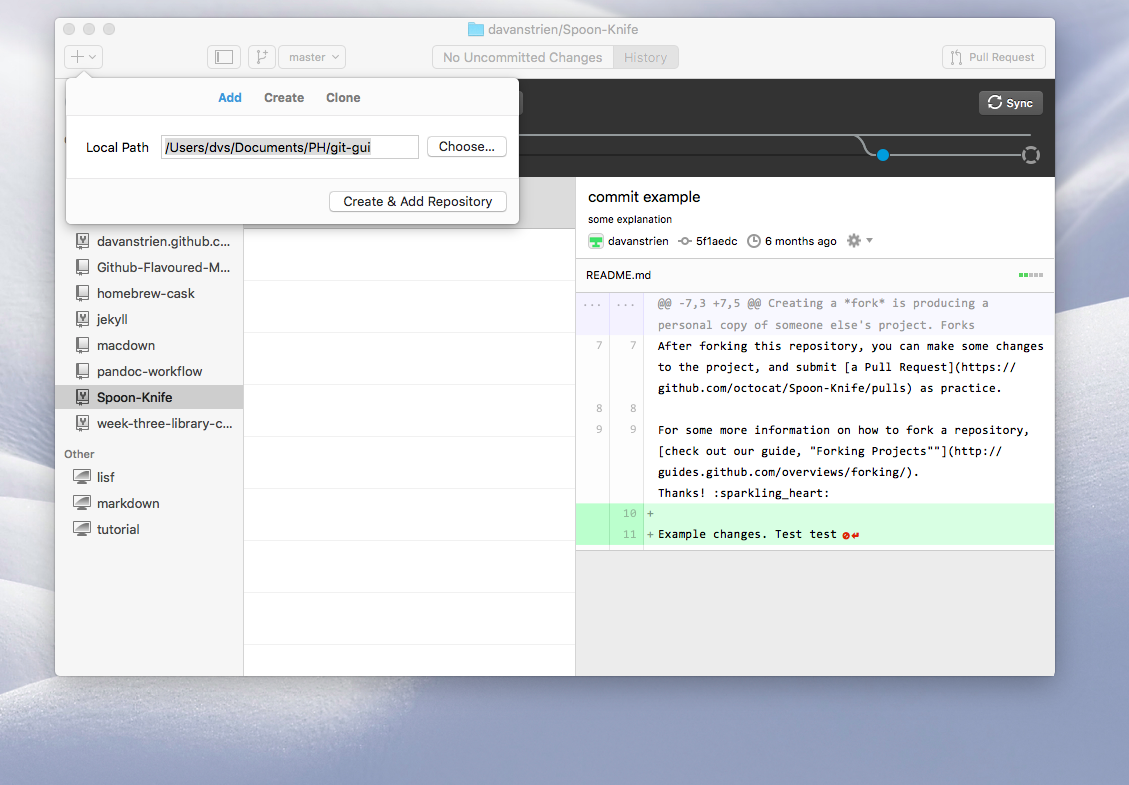
Adding a folder to GitHub Desktop
Once we have added our folder we will be able to see it in a list of repositories on the left column.
Adding a folder to GitHub Desktop
If we choose the repository we just added we will see the files contained in that repository. From this menu we can choose which files we want to version control. (There might be times when we are working on projects in which files are produced which we don’t need or want to version control.) On the right we will see the current document.
If we show hidden folders in the folder we have just added to GitHub you will see that the folder now contains an extra folder with the name ‘.git’. This folder is how GitHub desktop tracks changes we make within our version controlled folder whether these changes be adding new files or modifying existing ones.
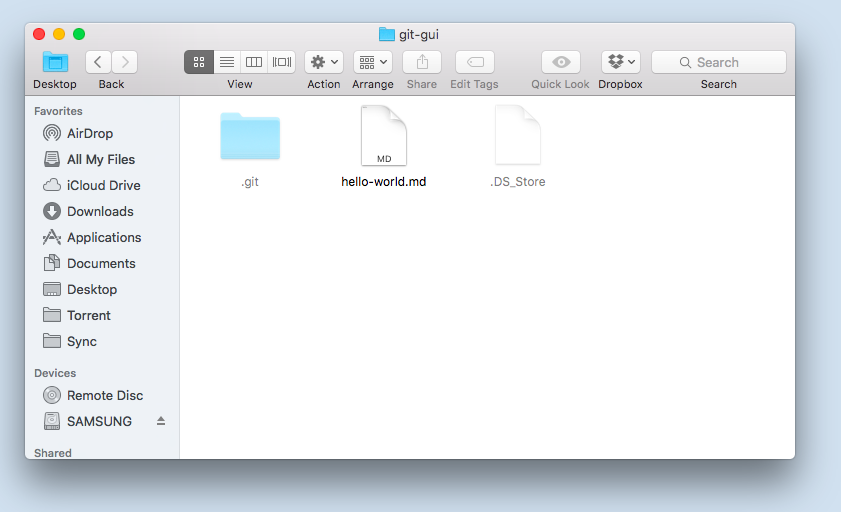
The folder being watched by GitHub desktop
Lets go back to the document in our text editor and add something new.
Hello world!
a second line
Save the changes to your file and go back to GitHub Desktop. You will see that these new lines of text appear. This lets us know that GitHub is able to see changes in your file but at the moment these changes haven’t been recorded in an official ‘snapshot’ of your repository.
To do this we need to commit our changes.
Committing Changes
A commit tells Git that you made some changes which you want to record. Though a commit seems similar to saving a file, there are different aims behind ‘committing’ changes compared to saving changes. Though people sometimes save different versions of a document, often you are saving a document merely to record the version as it is when it is saved. Saving the document means you can close the file and return to it in the same state later on. Commits, however, take a snapshot of the file at that point and allow you to document information about the changes made to the document.
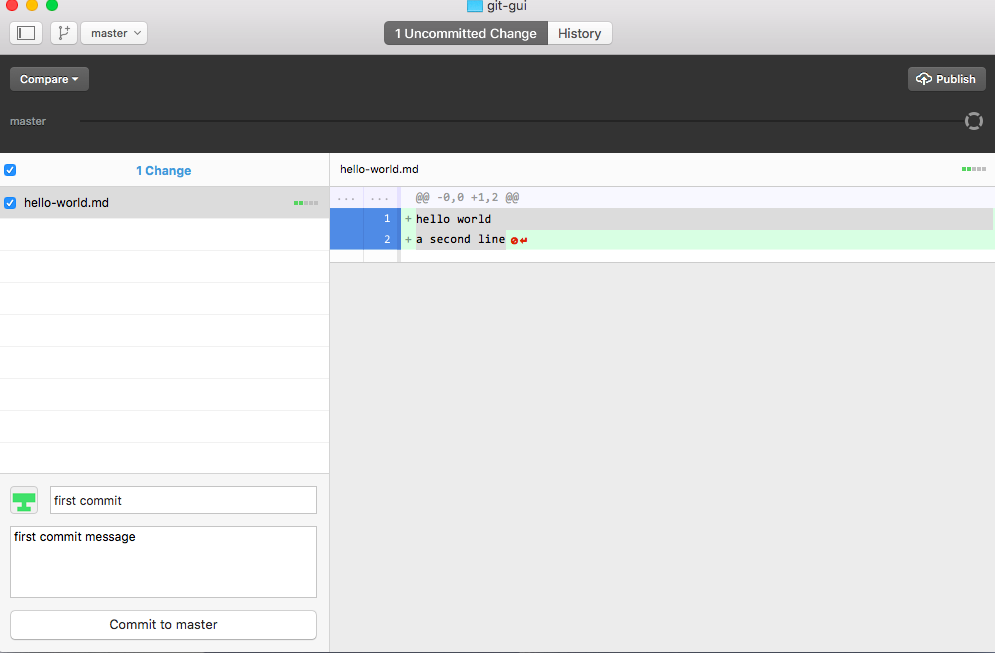
Committing changes
To commit changes you must give a summary of the changes and include an optional message. It is important that you think carefully about when to make commits. The advantages of version control taking snapshots of your changes regularly relies on you making commits. It is often tempting to just commit changes when you have finished working on a document but this might not reflect when important changes occurred.
When you commit you will see ‘commit to master’. This refers to the ‘master branch’. Within a Git repository it is possible to have multiple ‘branches.’ These different branches are essentially different places in which to work. Often they are used to test new ideas or work on a particular feature. Initially it is not necessary to use the branches feature of GitHub, but you may want to learn to use it in the future, particularly if you want to use GitHub to collaborate on a repository with other people.
A useful way to think about commits is as the ‘history’ of your document. Each commit records a development or change made to the documents in your repository; the history of the document can be traced by looking at all of the commits. For this history to be useful later on, either for ourselves or for someone else, it is important that this history is recorded at relevant points. Trying to make commits ‘atomic’ is an important consideration. What this means is that each commit ‘makes sense’ on its own. The changes in the commit and the message are understandable without having to look at surrounding commits.
Thinking about how version control is used for code can make this idea more clear. When a new feature, or a bug fix, is added to some software it is important that these features can be isolated. If a commit includes changes to different aspects of the code it makes it hard to isolate when problems were introduced. It is also makes it difficult to remove a single change that is causing problems if other changes are included in the commit.
There are differences between using version control for code and text which will impact on how you make commits. However, the aim of making commits ‘atomic’ can still be used. For example, it would make sense to commit changes to the structure of a document separately to grammar and spelling fixes. If you later decided to change the structure you would likely still want to maintain your other fixes.
Commit Messages
It is important that you use meaningful commit summaries and messages. Writing good commit messages requires some prior thought. Messages that make sense to you as an explanation of changes when you make a commit may no longer make sense to you in the future. If you are going to use version control in collaboration with other people it is especially important that other people can understand your commit messages. Version control as a system for managing changes to documents works best when active thought goes into using the software. It is therefore particularly important when collaborating with other that there is a shared understanding and approach to using version control.
One way of addressing this is to try to follow a ‘commit style’. One influential suggestion for a commit style has been made by Tim Pope. The style suggestions made by Tim Pope are partly ‘built in’ to the GitHub Desktop commit message interface but understanding the format will help ensure a consistent approach. The following commit message paraphrases Tim Pope’s suggested format to focus on commits relating to text rather than code:
Capitalized, short (50 chars or less) summary

More detailed explanatory text, if necessary. In some contexts, the first line is treated as the subject of an email and the rest of the text as the body.

Write your commit message in the present tense: "Fix typos" and not "Fixed
typos."  This convention matches with other aspects Git commands.

Further paragraphs come after blank lines.

- Bullet points are okay, too

- Typically a hyphen or asterisk is used for the bullet, preceded by a
  single space, with blank lines in between, but conventions vary here
The GitHub Desktop interface takes care of some of these ‘style’ issues but it is good to be conscious about how you write commit messages. It will not always be necessary to write an extensive commit message but is important that the message is clear about the changes being made and that the commits and the commit message are useful ‘atomically’.
An example of a short but clear commit message in the context of written work:
Reorder document outline

Move the methods section below the sources section in the document outline.
Why? Some of the methods discussion doesn't make sense without a description
of the sources being used.
A potentially useful parallel to writing good commit messages is the messages included when you edit a Wikipedia or Wiki page. When writing these messages it is important to explain the changes you made to the page and the reasoning behind these changes so that other people who see the changes can understand your reasoning. Approaching commit messages as if they will be read not only by yourself but also by others will help you write clear and meaningful commit messages.
Building a Good Repository
The benefits of using version control rely to a large degree on using the system effectively. This means thinking about when to make commits and how to best convey the changes in that commit in a message. Focusing on making both your messages and your commits ‘atomic’ will make it easier to ‘move’ through different stages of your repositories history. A good repository will allow you to easily understand changes that were made at different stages, will be understood by other people and will help you reflect on the changes you make to a document.
There is some difference between how you would manage a repository primarily focused on code and one focused on text. Both, however, benefit from clear and logical organisation. This is something that is important to do with your research data regardless of whether you are version controlling it and/or making it public. For a useful introduction to managing research data see James Baker’s lesson Preserving Your Research Data.
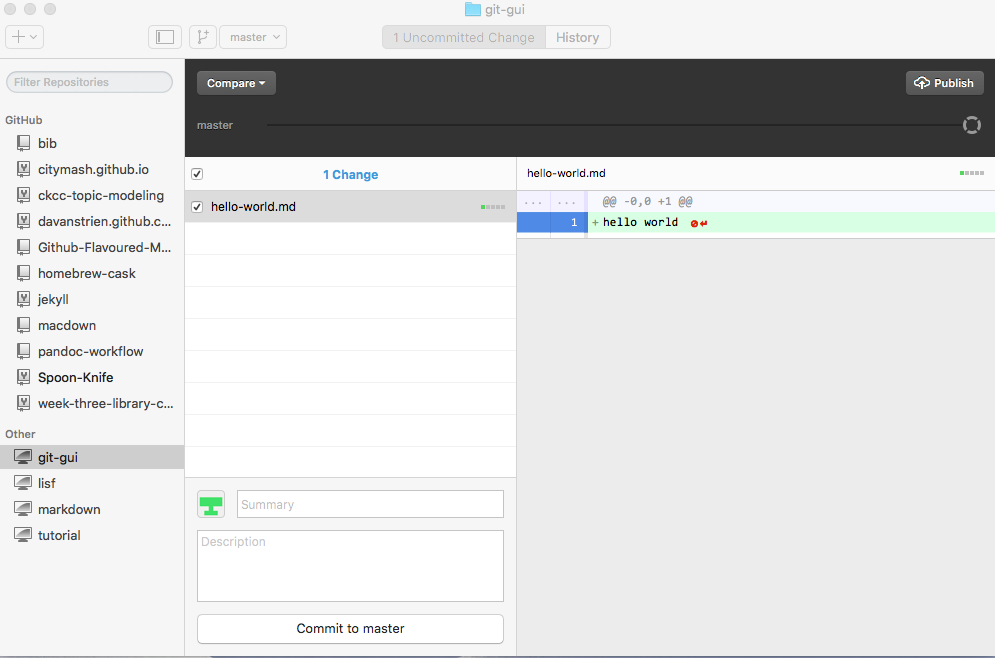
Publishing Your Repository
At the moment we are only recording our changes locally. We may be happy to only store our changes locally (it is still important to back our files up) but we may want to upload our repository onto GitHub to make it public or to have it stored outside of our computer. The process of doing this through GitHub Desktop is straightforward. On GitHub desktop you ‘publish’ repositories. This will push your repository from your computer to the GitHub website and set up a remote repository in the process.
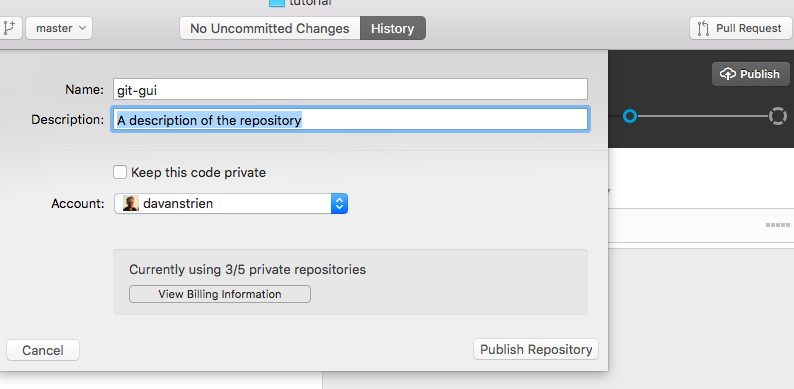
Publishing a repository
Once you have ‘published’ your repository it will be viewable on your profile at GitHub’s website. It is possible to setup a private repository on GitHub but this requires you to have either signed up as a student or researcher or to pay for a GitHub subscription. If you haven’t signed up for one of these options you will not be able to create a private repository without first signing up for a subscription. Unless you need to start a subscription you can safely ignore the ‘billing information’ section. For this lesson it will be fine to publish a public repository. To quickly view your repository online you can use the repository menu and choose ‘View on GitHub’. This will bring you to your repository online in your browser.
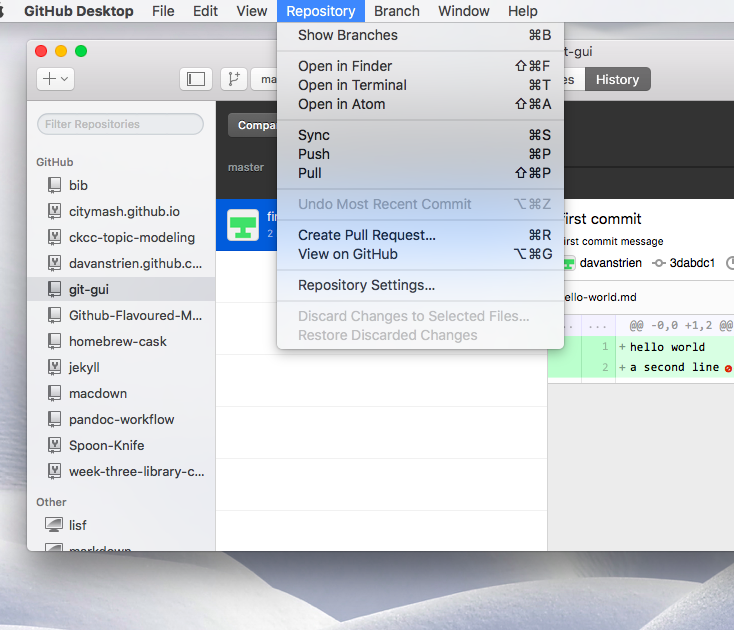
Repository menu
You can now see your document in your online repository.
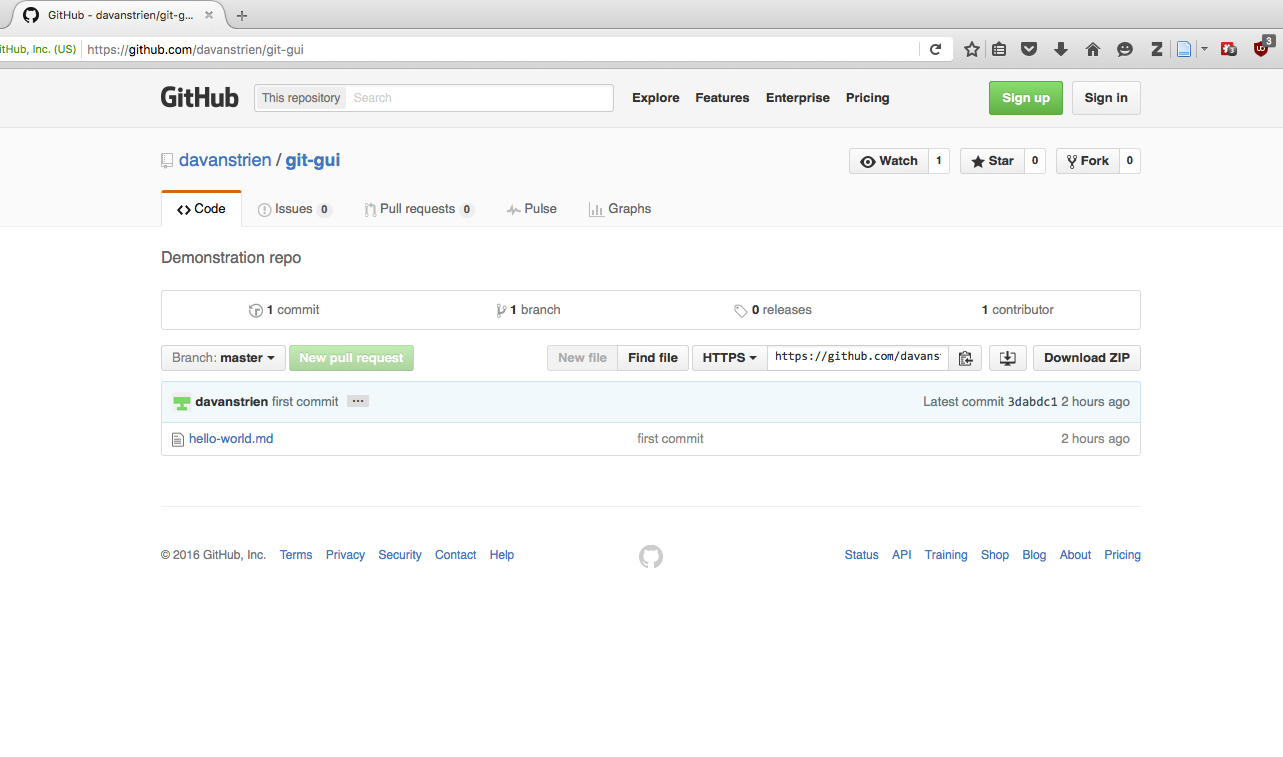
The online repository you have published
Once your document is online, you can continue to make local changes to your file. But you will have to sync your local changes to reflect these changes in the published GitHub repository. GitHub stores changes both locally (on your computer) and remotely (on their servers). It is important to keep these changes in sync. On GitHub Desktop this process is simplified by using a sync option rather than by using the push and pull commands used on the command line. You will see a ‘sync’ button on GitHub Desktop. This will ensure your local (computer) and remote (GitHub server) repositories are the same. If you want to work on your document before ‘publishing it’ you can choose to make commits without syncing. This will allow you to implement version control early on whilst keeping the changes local to your computer initially.
Making Changes Remotely
It is also possible to make a change to your repository on the web interface. Clicking on the name of the file will take you to a new page showing your document.
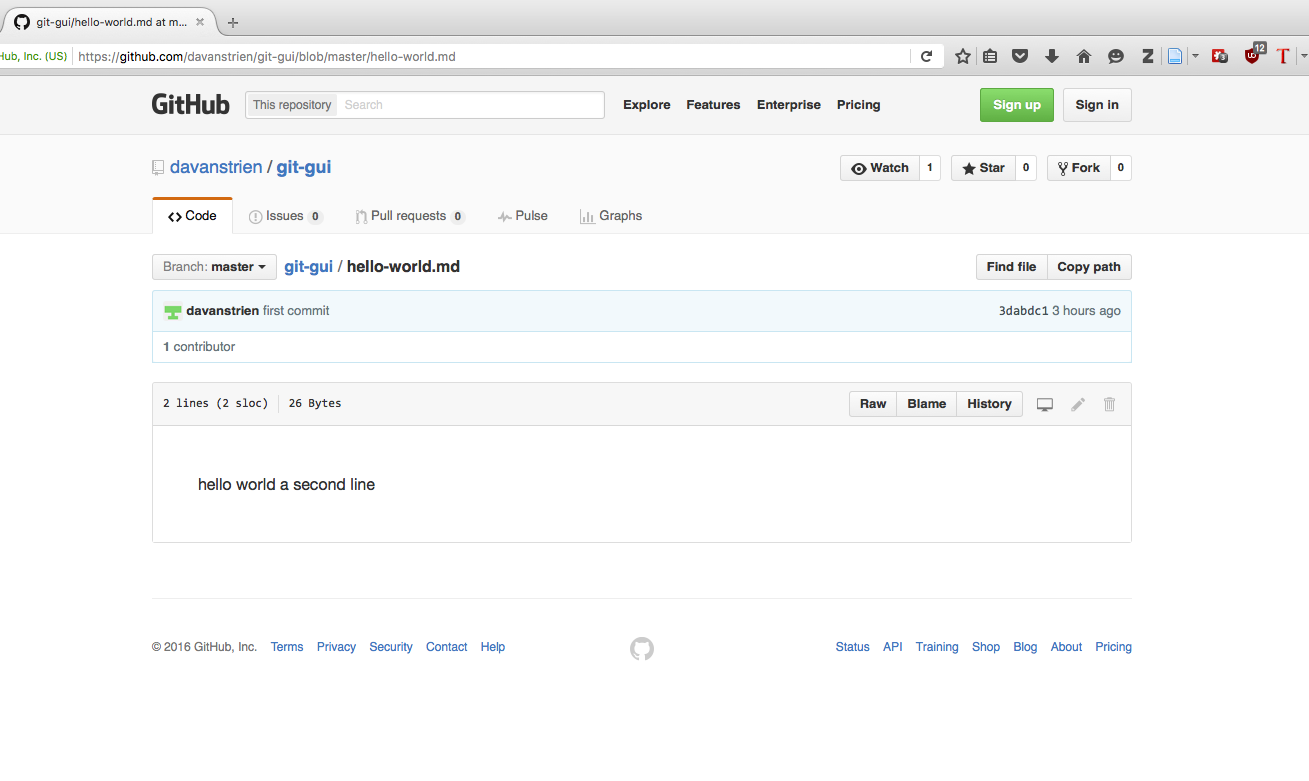
The view of your document online
(Note: At this point it might seem strange that all the text appears on one line, when your local file had two lines. This is because in Markdown, syntax paragraphs must be broken using a blank line; two consecutive lines are interpreted as a single paragraph. If we had used the file extension ‘.txt’ we would have had a line break appear here, but using the extension ‘.md’ told the GitHub web interface to preview the document using Markdown rules. This is another reason that using a text editor which includes facilities for rendering your Markdown file will be useful when you are first using the format.)
From the web interface you have a variety of options available to you, including viewing the history of changes, viewing the file in GitHub Desktop, and deleting it. You can also see some other options next to ‘code’. These options will not be so important to begin with but you may want to use them in the future. For now we will try editing a file in the web interface and syncing these changes to our local repository.
Click on the edit option.
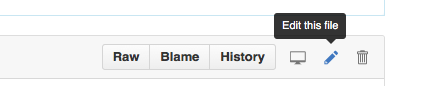
The edit link
You will now be able to edit the file and add some new text.
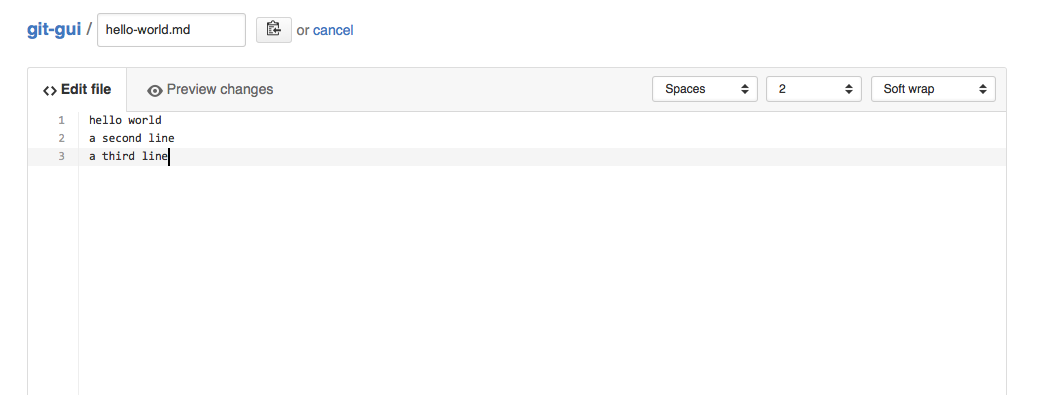
The editing view
Once you have made some changes to your file, you will again see the option to commit changes at the bottom of the text entry box.
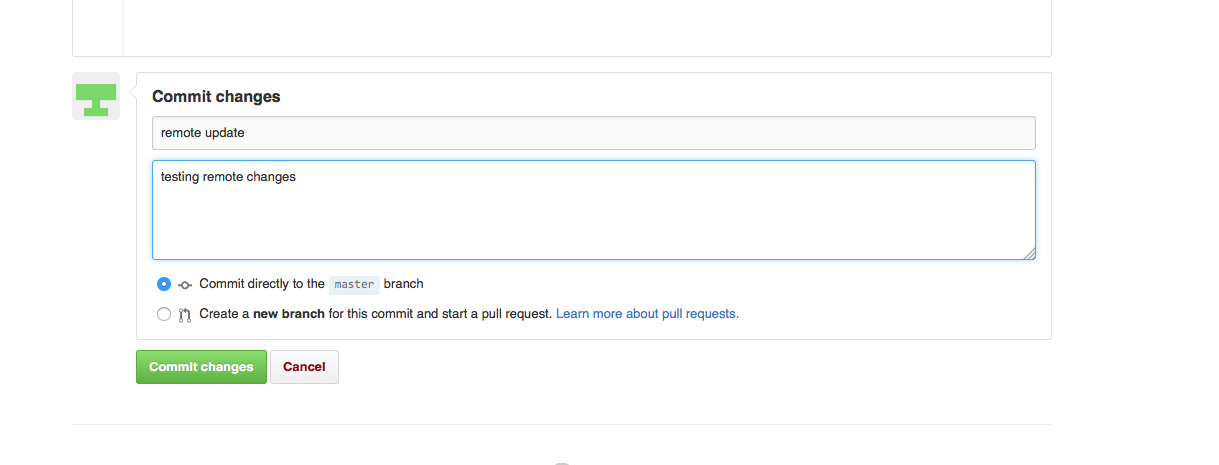
The remote commit view
Once you have committed these changes they will be stored on the remote repository. To get them back onto our computer we need to sync our these changes. We will see the ‘sync’ button on GitHub Desktop.
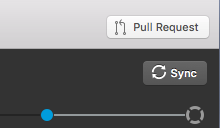
The sync button
We now have our remote changes synced back onto our computer.
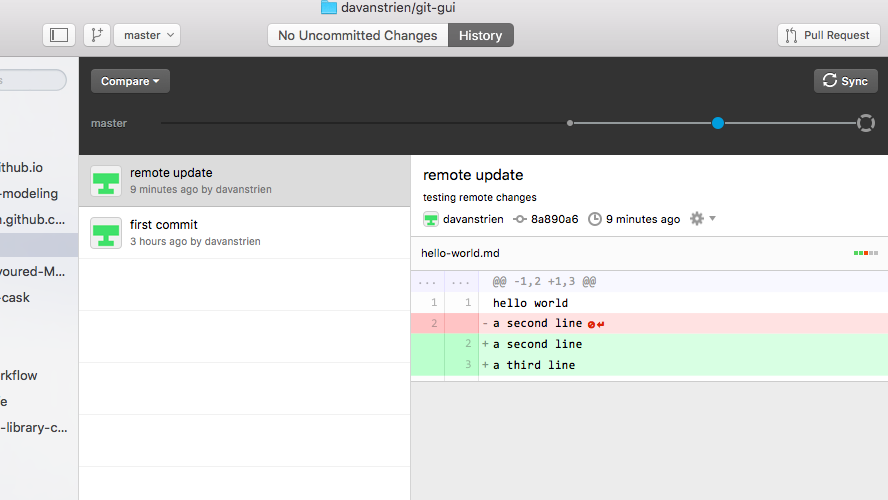
Our document with remote changes synced
You can see from this view that we now have the text with changes highlighted in green and red. Red indicates where things have been removed while green indicates additions. This can be useful for viewing the edits you have made before making a commit and helps you spot whether all the changes are ones you want to commit. On the left you will see a history of the changes you have made. At the moment this is very brief but as you work on a project the history might become much longer. Being able to see the changes you have made at different stages can be very useful.
Managing Conflicts
A ‘conflict’ emerges when you try to merge or ‘sync’ two versions of a document with changes which conflict with each other. If you are careful about committing and syncing local changes (on your computer) then it is unlikely you will run into this issue, but if you do it can be resolved fairly easily.
The most likely way a conflict will emerge is if you make a change remotely (on the GitHub website), and then make a subsequent change on your local machine without first synching the changes from the website. If you make changes in different parts of a document these changes can be ‘merged’ or synced together without any conflict. But these changes might conflict with one another (i.e. if you try and change the same line of the document in two different ways).
An example will help illustrate how conflicts can emerge and how to deal with them. Say we add a change to our remote repository (on the GitHub website).
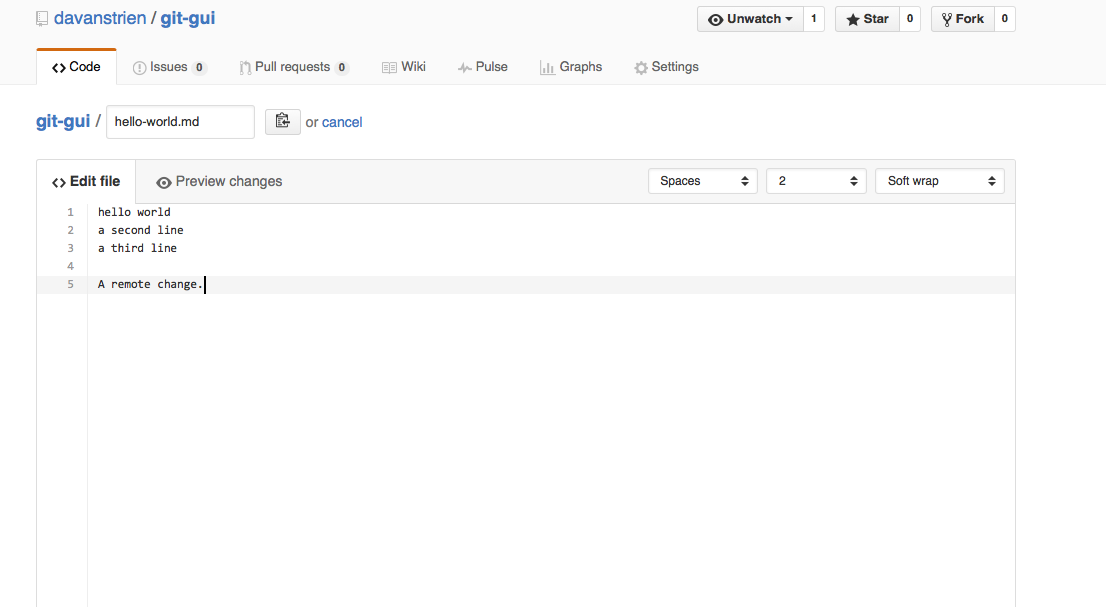
A remote change to our document
We commit this change on the website and subsequently make a change to the document on our local machine.
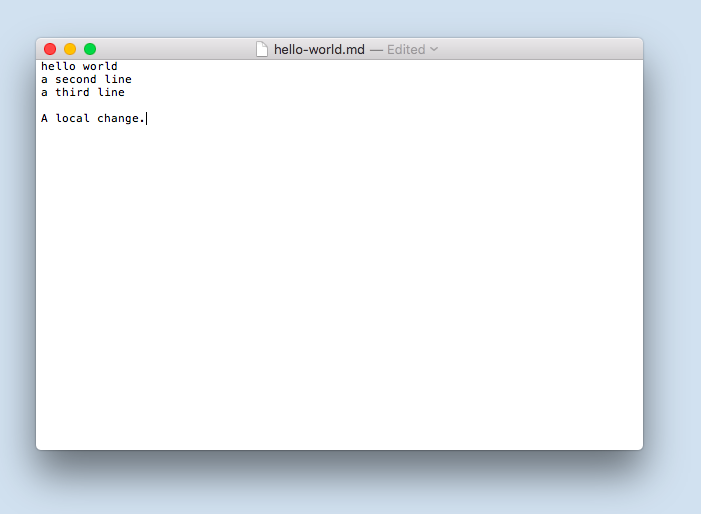
A local change to our document
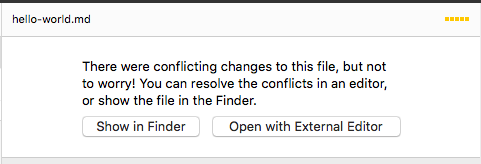
If we now commit our local changes and then sync our changes we get a message warning us about sync conflicts.
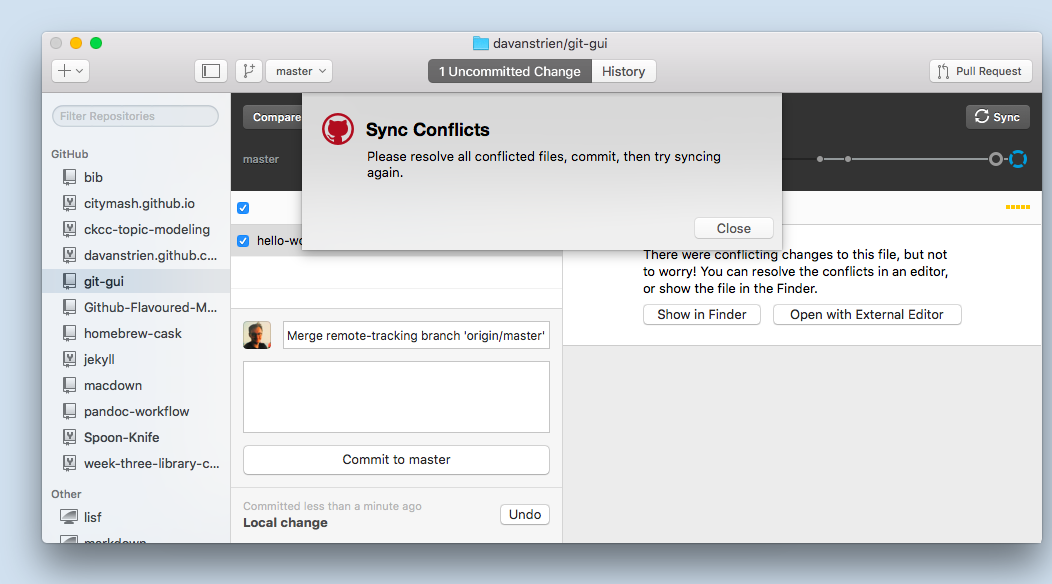
GitHub desktop warning of sync conflicts
This is not a big problem. What you will need to do is manage these conflicts. GitHub desktop offers you the option of opening the file with the sync conflicts.
GitHub desktop options for opening file containing conflicts
If we choose to open file with an external editor the document will open with whichever text editor/application we have chosen as the default for opening markdown files. If you haven’t set a default application you can choose to ‘show in finder’. This will show the folder with your file. From here you can open it with your preferred editor.
If we take a look at the file we will see Git has highlighted the conflicting section.
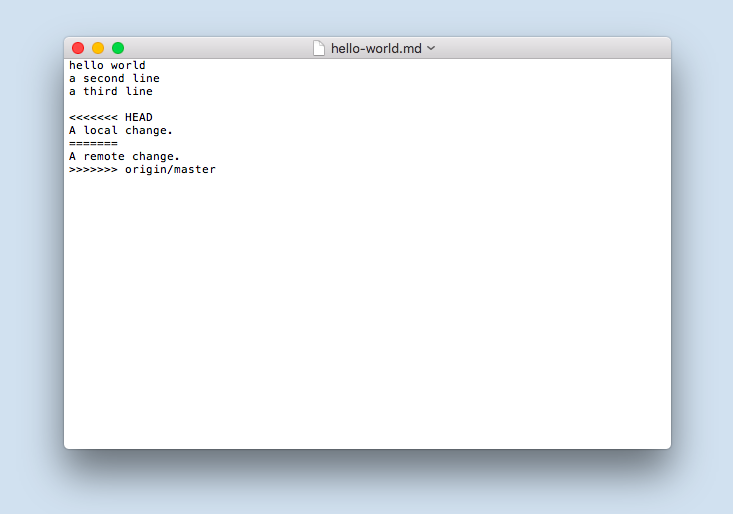
Conflicts highlighted in our document
You will see that the conflicting section is marked with <<<<<<< and ends with >>>>>>>. These are known as the conflict markers. The two conflicting blocks are divided by a ======= line. There are a number of approaches to dealing with a conflict. You could choose to go with either of the changes by deleting the version you no longer want and removing the conflict markers. You could also decide to change the section entirely and not choose either of the options. Once you have ‘resolved’ the conflict you can go onto commit and sync your changes as usual. When you go to commit your changes you see that GitHub desktop specifies that the commit is to merge a conflict. This is useful if you later want to go back and review how you managed any conflicts.
This may seem like a convoluted approach to dealing with conflicts but it is very useful because of the control given to you in dealing with conflicts. If conflicts emerge on a system like Dropbox the result is two files being created. Although this is better than potentially loosing important changes, it also means you still have to look at these two documents and decide how you are going to merge them. If you are careful about always syncing changes you will be able to avoid having to deal with conflicts. When collaborating the likelihood for conflicts increases so it is useful to be aware of how to deal with conflicts before you begin to collaborate using GitHub.
Version Control in a Plain Text Workflow
So far we have only implemented version control with a very basic document. Learning more about Markdown and writing in plain text will allow you to use version control in more the sorts of documents you would use in your day-to-day work. Version controlling a Markdown document will allow you to learn the Markdown syntax while reinforcing your understanding of version controlling documents. Sustainable Authorship in Plain Text using Pandoc and Markdown by Dennis Tenen and Grant Wythoff will provide you with an understanding of how you could use plain text for academic writing using Pandoc and Markdown. Pandoc allows you to convert Markdown formated Plain Text files into numerous different formats including HTML, PDF and Word. The combination of Markdown, Pandoc and Version Control will provide a powerful, sustainable and flexible approach to academic writing.
The workflow introduced in this lesson can also be used as a foundation to create static websites hosted on GitHub. Once you are comfortable using GitHub Desktop, you may wish to proceed to Amanda Visconti’s lesson, Building a Static Website with Jekyll and GitHub Pages.
Further Resources
GitHub Desktop offers an easy way of getting started with GitHub and version control. Depending on your use case GitHub desktop may be sufficient for your needs. If you are already familiar with using the Command Line then using Git on the Command Line may offer some advantages. Version control systems like Git have a lot of features available to use. Some of these will only be applicable in very specific contexts, others will be more commonly useful. Alongside the lesson suggested above the resources below will allow you to gain a deeper understanding of version control.
- GitHub provides extensive support in the form of guides and help.
- GitHub Glossary outlines the most commonly used GitHub/Git terminology.
- Atlassian: Some in-depth but clear tutorials on using git. There is a focus on explaining the differences between git and other version control systems which may not be relevant but will help you understand the inner workings of git in greater detail.
- Pro Git: A book on Git. Begins with the basics and later covers more advanced usage of Git.
- For students and researchers GitHub offers free private repositories. These repositories may be useful for early drafts of work or for managing notes which are never intended to becoming public. Note: it might not be a good idea to store things which are very sensitive on GitHub even in a private repository.
- ProfHacker has posts on various projects on using GitHub in an academic context.
- GitHub, Academia, and Collaborative Writing discusses using GitHub for collaborative writing.
- Introduction to the Bash Command Line introduces the command line which will be useful preparation for using GitHub on the command line.
