Contents
- Scope
- Contents
- Software requirements
- What is Application Programming Interface (API)?
- Europeana API
- XAMPP installation
- API template
Scope
Application Programming Interfaces (APIs) are frequently used as a means of accessing or distributing Open Data. Indeed, over the last few years, many humanities researchers have started to share their data on the web with APIs. As a result, there are a large number of valuable datasets available. However, APIs are often tailored for developers, and it is still not easy for the researchers with little technical experience to work on them.
This tutorial offers readers the possibility to quickly learn the basics of APIs without prior knowledge of programming, to start accessing a vast amount of data (often freely) available on the web. In particular, we learn basic HTML and PHP to build a simple website to display API query results of cultural heritage collections, using Europeana API. As the technique is generic, we also create a short template to test it with Harvard Art Museums API. In the tutorial, some other concepts such as metadata and web servers are explained to understand APIs in a broad context.
PHP is a programming language especially suited for web development, while HTML is a markup language to create webpages and applications. The exampes in this lesson uses some basic programming, however it is usually also possible to use copy and paste when working with API at a basic level.
Contents
The tutorial consists of two parts. The first part provides the basic theory of APIs:
- What is an API? and a brief history of the web
- Why is it useful?
A practical example starts in the second part with:
- Registering for a Europeana API key
- Viewing Europeana API data on a web browser
- Installing XAMPP
- Using a local web server and creating a web page with PHP and HTML
- Developing a web page for a Europeana API with PHP and HTML
- Creating an API template to access a Harvard Art Museums API
Software requirements
- A web browser (Firefox, Internet Explorer, Chrome, Safari etc)
- A text editor (Atom is recommended)
- XAMPP
XAMPP is a free PHP development platform. It includes two important packages for this tutorial: Apache web server and PHP. In this way, you can create a test website on a web server and simulate access to APIs on your personal computer.
What is Application Programming Interface (API)?
Internet Story so Far
In this tutorial, we talk about web APIs (APIs used on the web), because they are used more often in humanities research. To explain web APIs, let’s briefly go back to the time when the World Wide Web (WWW) was born in 1989 (by Sir Tim Berners-Lee). The WWW was initially designed for human-to-machine (computer) communication. We humans created websites on our computers, and other humans saw them on their computers by using web browsers. At that time, they were mostly static web pages, because they were documents and the contents were fixed by webmasters. We were just happy to passively view somebody’s web pages with texts (interconnected with hyperlinks) and photos with a Graphical User Interface (GUI). The interaction was mostly between humans and machines, or we could say that machines “coordinated” the human communications.
Then, we started to create dynamic web pages where human users could interact with each other. Web pages were dynamic, because the content was not fixed, but dynamically changed by the actions of the users. Social media are typical examples. We not only consume web content, but also generate it. To manage such web resources, we needed database systems behind websites, so that we could store and manage data properly and efficiently. The popularity of user-generated content has led to the creation of large databases, and a huge amount of data: millions and billions of websites and datasets.
At this stage, we realised we need more machine-to-machine communication. As we sometimes have far more data than humans can actually browse and work on, we needed a method for machines to smoothly communicate with each other. This method is called a web service. APIs are typical web services. There are different types of APIs. Not only can machines request and obtain data, but also process data they submit. In this tutorial, we focus on obtaining useful data for research purposes.
Let’s think about a real situation. You maintain a ski website and want an update weather forecast for your ski fields every half an hour. You receive the forecast from a meteorological website which contains weather data. Instead of checking such a website on your own and updating data manually, it is easier to build a website which can automatically fetch the weather data and display them at regular intervals. In other words, a website communicates with another website. This machine-to-machine data exchange and automation is possible when we use APIs. You can regard the API of the meteorological website as a kind of (database) service.
There is a difference between creating a website with an API and embedding a snippet of a website on your website. APIs normally offer standardised raw data and access methods, meaning it is easier to manipulate and customise the data. For instance, APIs make it possible to convert Fahrenheit to Celsius, or show a line chart instead of a bar chart, which is not possible with embedding. In addition, APIs enable web developers to separate data from design, which is a great benefit when building flexible websites.
It is important to know that a website can offer both web pages and APIs. For instance, while a human user visits a Wikipedia website to read a pre-designed article, Wikipedia also offers APIs for other users to let them develop an app, which uses Wikipedia’s machine-readable raw data. As creating APIs is voluntary, there are many websites without APIs. However, the number of APIs is growing considerably.
Why are APIs Useful for Researchers?
Apart from the technical advantages of APIs described above, what are the benefits for ordinary research users? For example, they may be interested to use:
- More data
- Related data
- Interlinking data
- Remote data
- Up-to-date data
- Different types of data (interdisciplinary study)
- Data with better quality
- Data not obtainable (by yourself)
- Data with a low price, or gratis
In general, researchers are keen to take advantage of the power of the Internet, by sharing and reusing data. Therefore, “Open Data” and “data-driven research” have been under the spotlight of academia and industries for the last several years. APIs are one of the growing areas of this movement. By accessing a wide range of large datasets, we can do much more than we could do before, which leads to enormous change in our research practice, and hopefully more new discoveries and innovations.
In the following sections, we start our journey with an API in a real scenario.
Europeana API
The first API we will try is Europeana. It is one of the biggest sources of information for cultural heritage in Europe. It collects data from museums, archives, and libraries from all over Europe. At the time of writing it contains over 50 million objects. There are photos, paintings, books, newspapers, letters, sculptures, coins, specimens, 3D visualisations, and more.
The goal of this section is to create a website which requests and then displays Europeana API data. To complete the task step by step, we learn how to register with the Europeana API, to access API data with a web browser, to install XAMPP, to make a simple web page, and to develop another web page to show the API data.
You could read through the documentation of Europeana APIs here, but it is recommended to do it after having completed the tutorial.
API registration
In order to use the Europeana API you need to register for a key. This is free and is done via their website:
- Fill your personal information at the Europeana API website
- Click Request Key button
- In your email inbox, you will find an API key, which is a series of alpha-numeric characters unique to you.
The first Go with API
Your first API request should be as easy as possible. You can do so with your API key and a web browser. So, let’s forget about technological aspects for the time being, and just copy and paste the following URL to the address bar of your web browser. Note that you have to replace YOUR_API_KEY with the actual key you get in your email.
https://www.europeana.eu/api/v2/search.json?wskey=YOUR_API_KEY&query=London
What do you see? You should see a lot of texts. If so, congratulations. This is your first data view. You are using the Europeana API already. If you see an error message “Invalid API key”, make sure you have copied your API key correctly into the URL
If you Firefox 66.0.5 or later, you may see more organised structured data. If you use Internet Explorer or other browsers, you may get a message (below). In this case, save the file and open it in a text editor (such as Notepad or Atom).

Save the JSON file, if it does not work on your browser
Let’s have a closer look at what you typed into your browser URL box the example above. It is just a URL. Exactly the same as what you do when viewing a website. For example, to see Europeana website, you type a URL https://www.europeana.eu. There are some difference, though. You use your API key after wskey=, which means you are granted personalised access to this web address. It is followed by query=London. You are right. We are querying the Europeana database and our search keyword is “London”. Europeana offers different types of APIs, but we used the search API for this tutorial.

Untidy JSON data structure (raw data) in Chrome
Understanding API Data (in JSON)
If your browser does not support a tidy JSON view (the latest Firefox should have a pre-installed JSON viewer), please copy and paste the entire data to an online JSON viewer. It allows us to view the data more easily by expanding (+ button) and collapsing (- button) the data hierarchy.
Online JSON viewer
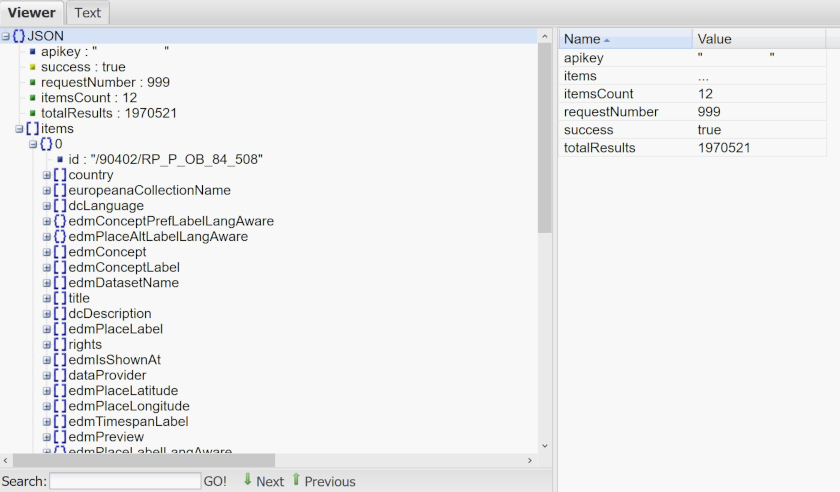
Now, if you look carefully at the first lines of the data, you may notice something understandable:
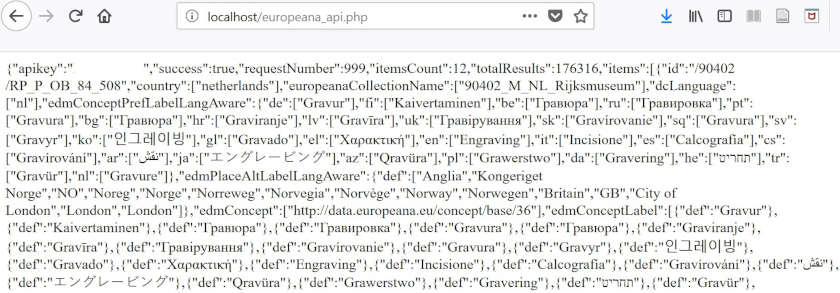
{"apikey":"YOUR_API_KEY","success":true,"requestNumber":999,"itemsCount":12,"totalResults":1967341,
You read literally: "apikey" is your API key. Your API access is successful. We can ignore what requestNumber is, but only the first 12 items (records) are returned (to avoid a flood of data) out of the totalResults of 1967431. After that, you have actual data from the collection (i.e. the 12 items).
In order to organise the data, Europeana uses a particular format/structure, called JSON (JavaScript Object Notation). The data are wrapped with curly brackets (which is called Object). It always starts with { and ends with }. Inside, the data are represented with pairs of strings. Each pair has two components separated by a colon (:). For instance, "totalResults":1967341. We call this format name-value pair. In our case, the name is "totalResults" and 1967341 is the data value. If there are more than one pair, name-value pairs are separated by comma (,). To sum up, the simplest JSON data look like this:
{
"name 1": "value 1",
"name 2": "value 2"
}
By specifying a name, we are able to make a query to retrieve a corresponding data value. As you can see, JSON is a very simple data format, therefore, it is not only easy for humans to understand, but also for machines (computers) to process. This is why machine-to-machine communication is easier, as long as everybody follows this data format. For this reason it is used in many APIs. Name-value (also known as “key-value”) pairs are often used in programming to store data, so it is good to be aware of this structure.
In the Europeana search API, the actual data of users’ interest are stored within items. Here, you see a slightly different structure. It contains numbers with square brackets with numbers ([0], [1], [2]...). Each bracket is an item/record and we have 12 records. The square bracket represents an ordered list of values, called an array. The first entry is 0. It is a bit strange at first, but this is a rule, so take it as it is. The array is one of the data types of JSON (see also PHP data types later). Similar to name-value pairs, we can simply specify a number to retrieve data in the list. Inside each array, we have name-value pairs. Sometimes the name may have a nesting structure, so that arrays can be repeated. In the Europeana API, this part depends on each record. Some records have more data than others, so the data structure and values may not be consistent.
As there can be a long list of names in a record, let me explain some of the names:
| Names | Explanation | Example value |
|---|---|---|
| id | Identifier of this item | /9200309/BibliographicResource_3000093757119_source |
| country | Country of the data provider | Belgium |
| dataProvider | Data provider of this item | Royal Library of Belgium |
| rights | Predefined rights statement (Creative Commons etc) | http://rightsstatements.org/vocab/InC/1.0/ |
| title | Title of this item | Stand Not Upon The Order Of Your Going, But Go At Once Shakespeare Macbeth 3-4 Enlist Now |
| edmPreview | URL of the preview of this item in Europeana | https://www.europeana.eu/api/v2/thumbnail-by-url.json?uri=http%3A%2F%2Fuurl.kbr.be%2F1017835%2Fthumbs%2Fs&size=LARGE&type=IMAGE |
| edmIsShownAt | URL (web page) of this item at the website of the data provider | http://uurl.kbr.be/1017835 |
| edmIsShownBy | URL (media file) of this item at the website of the data provider | https://www.rijksmuseum.nl/nl/collectie/RP-P-OB-84.508 |
| type | The type of the item | IMAGE |
| guid | URL of the item page in Europeana | http://www.europeana.eu/portal/record/90402/RP_P_OB_84_508.html |
It is outside of the scope of this tutorial to explain the data model of Europeana (Europeana Data Model: EDM), but a short explanation would be handy, because all records are based on it. It consists of different descriptions (i.e. metadata) about cultural heritage items, including:
-
Dublin Core metadata to describe a cultural heritage object (stored in museums, libraries and archives). It includes the description of mostly physical aspects of the object such as title (Mona Lisa), creator (Leonardo da Vinci), size (77 cm × 53 cm), date (1503-1517?), place (France), owner (Louvre museum), and type (painting). In the Europeana API, it is often specified with prefix
dc. -
Metadata about digital versions of the physical object. It may include URLs where user can view the object (both at the Europeana website and external website), digital formats (jpg), and licensing information (Creative Commons).
To know more about EDM, you can consult their documentation.
As you have already seen in the example above, to view data via APIs, you only need a web browser. In the case of Europeana, you can also use Europeana Rest API Console where you can set parameters (e.g. “London” as a search keyword) and check the data without any additional software installation.
Searching and viewing Europeana datasets is good, but it is not very convenient, because we can only view raw data and/or the default data view. So, let’s move away from the web browser and try to customise the data view.
For the next step we will be developing a web page. Note that it is a good idea to keep the API data view open in a web browser when doing this development work, because you often need to examine the data in this way.
XAMPP installation
Now, we have to set up a new development environment. Please go to XAMPP website, download the software for your operating system, and install it. The current version is 7.2.9. If you follow the instructions below, it should be pretty straightforward to install, but remember where you install XAMPP as you will have to run it.
Windows
- Double-click the downloaded file (exe) to start the installation process
- By default, XAMPP should be installed at: C:\xampp
- See a full tutorial here
Mac OSX
- Double-click the downloaded file (dmg) to start the installation process
- By default, XAMPP should be installed at: /Applications/XAMPP
- See a full tutorial here
Linux
- Change permission (
chmod 755 xampp-linux-*-installer.run) - Run installer (sudo
./xampp-linux-*-installer.run) - By default, XAMPP should be installed at: /opt/lampp folder
- See a full tutorial here
XAMPP and the first Attempt with PHP
When your installation is complete, let’s get started building our website that can access Europeana data. First, open XAMPP. On Windows, go to the start menu and click XAMPP Control Panel. In case of MAC, open XAMPP Control. The name of the XAMPP Control is “manager-osx”.
If you do not see a green highlight for “Apache Module”, please click the buttons to start Apache. Then, we can use them on our local machines.
For Linux users
- Use the following command to start XAMPP Control Panel
cd /opt/lampp sudo ./manager-linux.run (or manager-linux-x64.run) - See more details in XAMPP help page
If you use Skype XAMPP may not work as Skype may use the same port (80 and 443). In that case, close the application, or change ports (See solutions)
Click Start button for Apache LModule, and it is started (User interface may look a bit different depending on your OS)
 in your browser to see if Apache is working](/images/introduction-to-populating-a-website-with-api-data/website-api5.jpg)
Go to http://localhost/dashboard in your browser to see if Apache is working
If you see the screens like above, everything should be OK. Go to the installation folder, you will find an “htdocs” folder (for Mac OSX, /Applications/XAMPP/xamppfiles/htdocs). I suggest creating a shortcut on the desktop. We must use this folder to put all the necessary files to create our website, so it is best if it is conveniently located. Right now there are only default files in this folder that XAMPP has prepared for us, so let’s create a brand new PHP file. Inside the “htdocs” folder, create a new text file using your text editor and save it as helloworld.php.
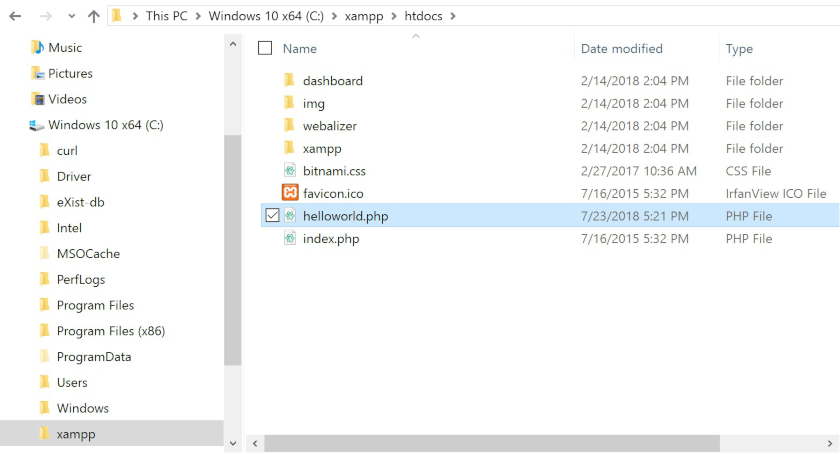
Put all the files in htdocs folder (e.g. C:\xampp\htdocs)
As you may have heard, it is a developer’s tradition to display "Hello World" when learning a new programming language for the first time. Open the helloworld.php in your text editor, and type (or copy and paste) the following and save it.
<?php
print 'Hello World';
?>
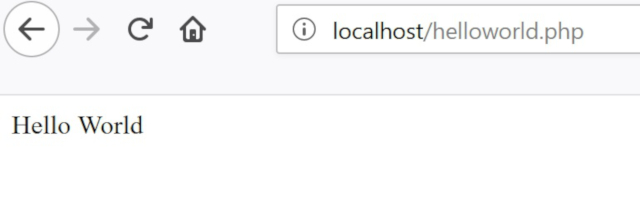
Open your web browser and type http://localhost/helloworld.php in the address bar. When working on PHP code, I suggest keeping the browser open to the web page you are editing, so as soon as you save the file, you can see the outcome.
You should see “Hello World” on a white background in your browser window. Congratulations. You have just made your first PHP program. PHP code should always start with <?php and end with ?>. Just like JSON, those lines declare that the file is PHP. print means display the following code 'Hello World' as text. In PHP, you can use either '' or "" (single or double quotes) to indicate that the data type is a string (text) (There are other data types such as integer, Boolean, or array, but let’s focus on strings for now).
Your first PHP web page in a browser
The first go with HTML
In the example, PHP uses 'Hello World' as a normal text. But, PHP can also work with HTML very well. HTML is a markup language which creates web pages and applications.
(To view the HTML of a website with your web browser, right click in a text area on the home page (or go to the top menu bar of your browser), and select “view page source”).
So, let’s make a little change to try using PHP to write HTML. Change
'Hello World'
to
'<b>Hello World</b>'
Re-save the file. Now, refresh the same page on the browser. It is a good idea to get used to frequently reloading/refreshing a web page when developing a website. The change you made with HTML may not be visible until the page is refreshed.
"Hello World" should now become in bold. This is because the HTML tags <b></b> makes the texts, sandwiched by the enclosing tags, bold. HTML basically adds an annotation to the content in-between (<b> means bold).
Be careful that most HTML tags need to have an opening tag (<b>) and a closing tag (</b>). If you mistype or omit them, your web browser may not be able to display the information properly.
In programming in general, you may need to be patient and be precise. Computers may not understand your requests or intentions, if you mistype or forget something. So, look at your code very carefully.
HTML images and links
Before moving on to APIs, we would like to do an exercise to create a simple website with some basic HTML and PHP coding. The first exciting stuff is to display an image on a PHP web page. Modify the previous example as follows and save it. Be aware that the first line has changed slightly, adding <br> at the end, which is a line break.
<?php
print '<b>Hello World</b><br>';
print '<img src="https://upload.wikimedia.org/wikipedia/commons/thumb/7/79/Ramesses_Vi_closeup.jpg/242px-Ramesses_Vi_closeup.jpg">';
?>
When you view the above file in your web browser you should be able to see “Hello World” in bold and an image on the following line. The new third line prints the HTML code for inserting an image
<img src="URL TO IMAGE">
It does so by putting the whole HTML tag in single quotes.

Hello World in bold and an image from Wikipedia
In HTML, (enclosing) tag names are called elements. Within an element, there are also attributes which are additional values that configure the elements or adjust their behavior. Normally attributes appear as name-value pairs, and separated by =. For example, <img> is an element, and src="" is an attribute.
If you put an image in the “htdoc” folder, you can also specify it using the format IMAGE FILE (eg, “MyImage.jpg”) instead of http://...
Now let’s make a real website. The real power of Internet lies in hyperlinks, so we add a link to Wikipedia. Copy and paste the following code and replace with the entire previous example.
<?php
print '<h1>My website about Ramesses VI </h1>';
print '<p>Ramesses VI image (public domain) is below</p>';
print '<a href="https://en.wikipedia.org/wiki/Ramesses_VI">Go to Wikipedia page of Ramesses VI</a><br>';
print '<img src="https://upload.wikimedia.org/wikipedia/commons/thumb/7/79/Ramesses_Vi_closeup.jpg/242px-Ramesses_Vi_closeup.jpg">';
?>
Now, it really looks like a website, doesn’t it? <h1> is a heading tag in HTML (the biggest size), while <p> is an HTML paragraph (i.e. normal text). <a> is the hyperlink tag and href= specifies the URL, in this case: a Wikipedia article. As attributes often contain extra information about the element that you don’t want to appear in the actual content, the texts "Go to Wikipedia page of Ramesses VI" is displayed in place of the lengthy URL (https://en.wikipedia.org/wiki/Ramesses_VI).
What you have just created is the essence of all the websites on the Internet, containing texts, hyperlinks, and media (image). The only difference is that most websites have a better layout, more decorations, and perhaps interactive functions. Well done. You have just become a webmaster.
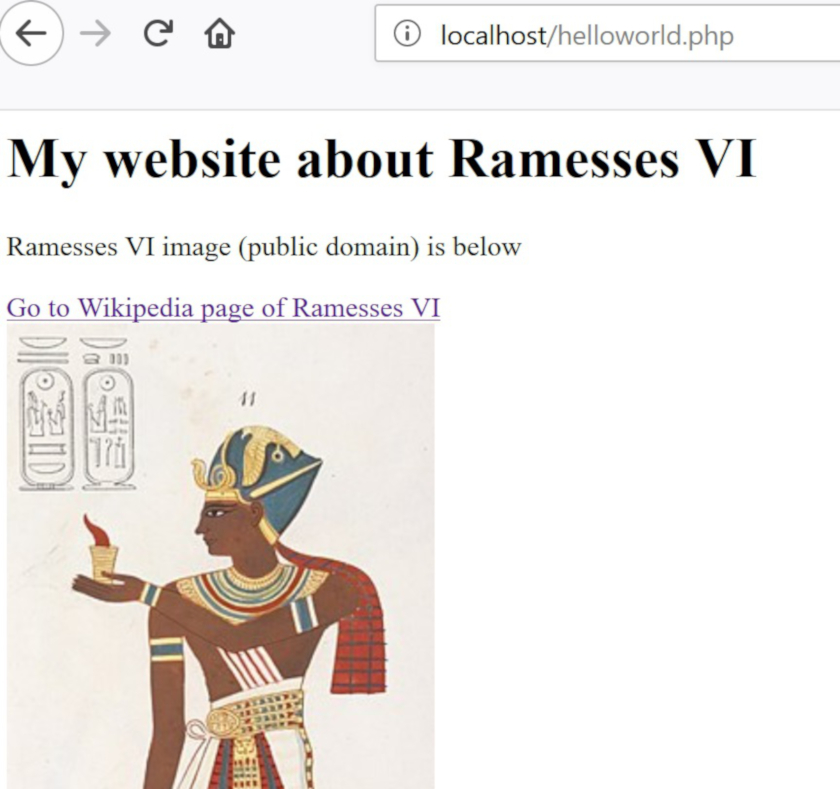
Complete web page with an image and a hyperlink
Using PHP with the Europeana API
Finally, we would like to work on the API, using what we have learned about PHP. We will not go into details of programming, but you have to know one important thing.
In programming, we use a lot of variables. They are basically references. In a way, they are similar to the names in name-value pairs of JSON. They name a location where values are stored, so that an unpredictable or changeable value can be accessed through predetermined names. When you need to use a value, you can simply refer to the variable that contains that value.
In PHP, variables are represented by the prefix $. Let’s assume the author often says “floccinaucinihilipilification”, one of the longest English words, meaning the act of something unimportant. For example:
$it = 'floccinaucinihilipilification';
print '<p>I think he is doing '.$it.' again</p>';
Don’t worry about the detail of the syntax. It is enough for you to understand the core concept here. First, we put this long word in a variable called “it” ($it). Then, we can use $it to refer to the long word in the second line. The result is an HTML paragraph that reads “I think he is doing floccinaucinihilipilification again”. It is like a mathematical formula. You probably understand the following without explanation. x and y are variables containing numbers.
x = 10

y = 5

x + y = 15
Variables are also useful when numbers are assigned, so the calculation of formulae would become simpler. Let’s say, you specify a population of a country in 2018 in a variable, and use it for different statistical calculations in your code, but later you need to update the information with the population in 2019. All you have to do is to change the variable. All calculations based on it will be automatically updated. So, the code is very flexible and reusable.
Now, let’s create a new PHP file called europeana_api.php.
Copy and paste the following code (replace YOUR_API_KEY, but do not remove ' before and after YOUR_API_KEY. It is important that the variable is a string (Remember PHP data types?)) and save it. Navigate your browser to the URL localhost/europeana_api.php.
<?php
$apikey = 'YOUR_API_KEY';

$contents_europeana = fopen("http://www.europeana.eu/api/v2/search.json?wskey=$apikey&query=London&reusability=open&media=true", "r");
$json_europeana = stream_get_contents($contents_europeana);
fclose($contents_europeana);

print $json_europeana;
?>
JSON data from Europeana API on your local web server
The data look familiar, don’t they? It is the same JSON data we saw in a web browser earlier. But the big difference is we see it on our web server (localhost), not on the Europeana server.
Let’s consider how the code works, line by line. The first line defines the variable $apikey and stores the value of YOUR_API_KEY. By doing so, we will not need to type YOUR_API_KEY every time we need it. Although we did not use it often this case, it is a good practice, as you never know what will happen in future. The next line also defines another variable $contents_europeana, which we use to store data from the Europeana API.
fopen() means please open data from "http://www.europeana.eu/api/v2/search.json?wskey=".$apikey."&query=London&reusability=open&media=true", and it is reading content only ("r"), not writing it to the file. The URL includes $apikey, thus, it is equivalent to "http://www.europeana.eu/api/v2/search.json?wskey=YOUR_API_KEY&query=London&reusability=open&media=true".
The next line declares another variable $json_europeana and assign stream_get_contents($contents_europeana) as a value. It obtains the data you just opened. Just as we open the data, we close it with fclose. Here, $contents_europeana is starting to do a good job of not repeating things. Up to this point, everything happens behind the scenes and you don’t see anything on your browser. Only print $json_europeana; enables us to display the value of the variable $json_europeana, namely the JSON data you already know.
In order to manipulate the JSON data, we need to use it in PHP format. Please add three lines at the end of europeana_api.php, but before closing of PHP (?>), and save it.
$data_europeana = json_decode($json_europeana);
print '<hr>';
print $data_europeana->totalResults;
Refresh your browser. You see the same JSON data on your browser, but if you look at the bottom, you find a horizontal line and numbers:

Retrieve a part of JSON data (total Results)
json_decode converts the value of $json_europeana (in the JSON format) into PHP code. HTML hr tag makes a horizontal line to distinguish JSON data above and below. This is not absolutely necessary, but it is helpful for readability purposes. $data_europeana->totalResults; displays the totalResult data. With ->, we can refer to a particular position of data hierarchy and obtain the data value, in this case, totalResults. In this way, we can specify a part of data we need to display.
The next step is the final approach to the Europeana search API in this tutorial. We will create a table view of the same data we have been using so that you have experience customizing the way the data is displayed.
Building a Table View of Europeana Data
So far, the data we have accessed are not easy to read. So, we will re-organise them to build a table view. We will add code to the work you have already done. Delete print $json_europeana; and print $data_europeana->totalResults; and add the following lines of code at the end of europeana_api.php, but, again, before closing of PHP (?>). Have a look at the file in the browser. You should see a table with a header row. We just need to put data in the table later.
print '<hr>';
// Table view of Europeana data
print '<table border=1><tr><th>Title</th><th>Data Provider</th><th>External Link</th><th>Thumbnail</th></tr>';


print '</table>';
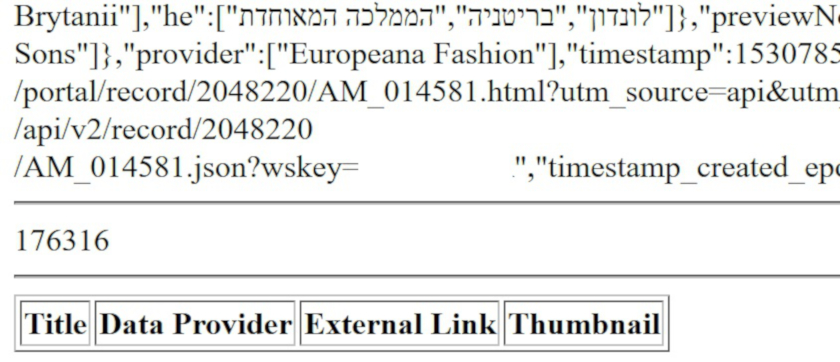
Table header is created
In the above code, the hr tag is to visually separate the previous outputs from the table we are working on now.
On the second line, // signifies a “comment”. It tells the computer to ignore this line, so “Table view of Europeana data” is skipped. Developers use comments to document their code, so that they can understand what the code is for and what it does in the future, as can other developers who need to work on the same code. People often forget what they have done, so it is the best practice to record the history of the code.
On the third line, we set up a table with HTML code. Full explanation can be found in a HTML tutorial, but the first line <table border=1> defines a table with a single width border line. Note that print "</table>"; at the end of the example is a closing HTML tag. While <tr></tr> (table row) generates a header row in a table, <th></th> (table header) provides columns and heading names within.
Next, we will manipulate Europeana data which now should be stored in the variable $data_europeana. In the space between the table and /table tags, add the following code:
foreach($data_europeana->items as $item) {
    print '<td><a href="'.$item->guid.'">' .$item->title[0].'</a></td>';
    print '<td>'.$item->dataProvider[0].'</td>';
    print '<td><a href="'.$item->edmIsShownAt[0].'">View at the provider website</a></td>';
    print '<td><a href="'.$item->guid.'"><img src="'.$item->edmPreview[0].'"></a></td></tr>';
}
Re-save your file and refresh your browser. What you see now is what text data of JSON actually contains. As it has URLs that point to images, we can display the images in the table.
The table now includes the title, data provider, external link, and thumbnail. Don’t worry if you see errors in front of the table (we will fix them later). Just explore the web page you created to get a sense of what you can do.
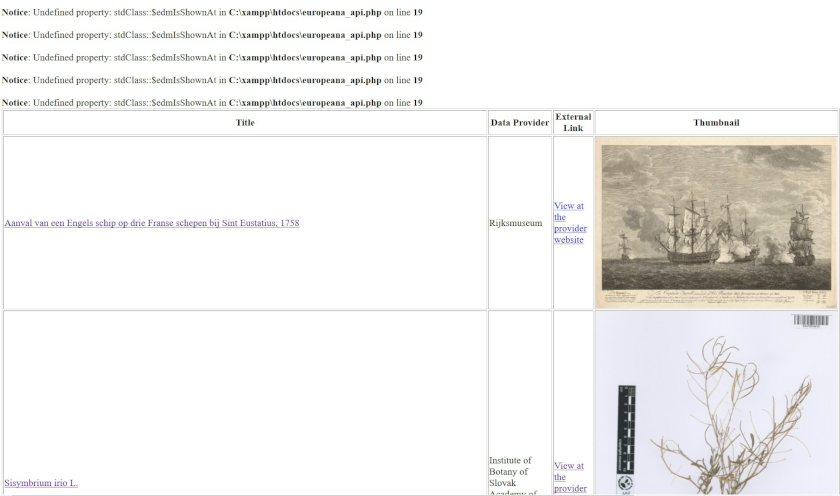
Table shows Europeana data
Let’s try to understand the logic behind what we have created. As mentioned earlier, Europeana records are stored in an array called items. Within it, each piece of data is stored in order and can be accessed by the number corresponding to its place in the array, from [0] to [11]. In order to manipulate data within an array, we need to use foreach(){}. It’s a “Foreach loop” - a function that repeats a task for items in a sequence. In our case, within the round brackets, we assign a new variable called $item for each record of the array ($data_europeana->items as $item). In other words, we can access each record from [0] to [11] with the variable $item. The loop will be specified within curly brackets {}. It is easier to understand when looking at the following lines, so leave it for now. We have to print the datasets, so print is used many times in the table. <td></td> represents a row in the table.
Now, we would like to scrutinise Europeana’s JSON data, because we have to specify what data should be displayed, as we don’t need all of them. Open a new window/tab and visit http://www.europeana.eu/api/v2/search.json?wskey=YOUR_API_KEY&query=London&reusability=open&media=true, remembering to swap YOUR_API_KEY with the appropriate string. You should use the JSON viewer to identify the data you would like to fetch.
Let’s take a look line by line inside the foreach loop. Each print line corresponds to a column in the table. The first line makes the first column: “Title”. The row has <a></a>, implying it is a link. href specifies the target URL to which the user jumps when they click on the link, and between <a></a> will be the text that becomes clicakable. You can ignore the detail of the syntax for now, but in our case, $item->guid is the URL and $item->title[0] is the text.
While guid is the URL of the item page in Europeana, title is the title of the item. We use [0] after title, because it is stored in the first name/key in an array (sometimes there is only one name/key in an array). As a result, the link and texts works as we intended in the first column.
For the second column, there is nothing more than <td></td>, implying only a textual data will be inserted. The content is dataProvider[0], which is understandable, as we have already created the header “Data Provider” in the previous section. The third column has again link elements. edmIsShownAt[0] is specified for the link, and simple sentence: "View at the provider website" is used for display. The last column also has a link for guid, but additionally, an image is created in-between. When an image is sandwiched by a link, the former is linked and clickable. Thus, the image specified at edmPreview[0], will have a link to the web page specified at guid, when it is clicked. You can double-check if it is working, or not in your browser.
To sum up, foreach loops a task over an array. The repeating element is defined in () and the task is defined in {}. In our case, we display the data values of each item (from [0] to [11]) repeatedly, without writing [0] to [11] one by one. Code normally consists of a lof of functions like foreach to execute different types of tasks. That’s why users can do many things with software.
Error handling
Finally, let’s try to make it tidy. It is not 100% satisfactory, because we may have error messages. They basically tell you that PHP cannot process Europeana data, because the data values we requested don’t exist in the Europeana records.
So, if you click the image of a record, you are directed to the correct website, but if you do the same for another, you may not reach the website, simply because there is no link. Actually our web site still works, but, due to the absence of data, the error messages may be displayed.
As written earlier in this tutorial, data structures and values may not always be consistent, therefore, we have to do something when data values are not available. This is called “exception handling”, and it means specifying what should happen if an operation fails.
In order to fix the bugs, we should implement the following: “display data only when they are available and ignore if they are not”. To this end, we can replace our most recent code additions with the following:
foreach($data_europeana->items as $item) {
    print '<td><a href="'.(isset($item->guid)?$item->guid:'').'">' .(isset($item->title[0])?$item->title[0]:'').'</a></td>';
    print '<td>'.(isset($item->dataProvider[0])?$item->dataProvider[0]:'').'</td>';
    print '<td><a href="'.(isset($item->edmIsShownAt[0])?$item->edmIsShownAt[0]:'').'">View at the provider website</a></td>';
    print '<td><a href="'.(isset($item->guid)?$item->guid:'').'"><img src="'.(isset($item->edmPreview[0])?$item->edmPreview[0]:'').'"></a></td></tr>';
}
The above is almost identical to the previous example, but isset is added. It is a PHP function that checks if data is set (exists) or not within brackets (). In addition, the following makes a conditional task:
isset($data)?’$data is set’:‘$data is not set’;
In this case, if $data is available, the text "$data is set" will be used, and if $data is not available, the text "$data is not set" will be used. We can execute a task based on this code for a condition. For example, in the first column of our table, if $item->guid is set, we use it. Otherwise empty text ("") is used. So, the links will work properly. We use this pattern of code every time data is called from the API (each time $item-> appears). As a result, hopefully error messages should disappear.
Unfortunately, there is no good way to know in advance, if the data we need are available or not, because all we can do is ask Europeana for it and wait to find out if it is there. This configuration is an advantage that, if there is a little mistake in the request, something works at least, without breaking everything else, but a disadvantage in that we need manage exceptions and errors.
Note that we don’t handle all error scenarios in this tutorial. For example, we didn’t consider the potential situation whereby the data ($item->edmIsShownAt[0]) isn’t an URL. This is because this tutorial is NOT a programming lesson, but an introduction. To develop a proper application, you need to delve into more PHP programming.
Big congratulations! You have just made a simple but nice web page within a short space of time that structures API data from Europeana in a customized way.
API template
Generalising API Calls in PHP
The last section attempts to create an API template, based on the code we created. The following code is a core part of what we just produced. You only have to change some parameters in the template. As usual, YOUR_API_KEY should be changed. It is recommended that you replace the name of VARIABLE1, VARIABLE2, and VARIABLE3 with more meaningful names. HTTP (data type is string) is the URL of an API. Most APIs require you to insert $apikey within HTTP, as you have seen before. But, other parts should remain the same.
$apikey = 'YOUR_API_KEY';

$VARIABLE1 = fopen('HTTP', 'r');
$VARIABLE2 = stream_get_contents($VARIABLE1);
fclose($VARIABLE1);
$VARIABLE3 = json_decode($VARIABLE2);
In addition, you would need to adjust what you would like to do with the actual data. For example, the following code generalises the data retrieval part, only consisting of foreach to cope with arrays and print the data values in a loop.
foreach($data as $item) {
    print 'WHATEVER YOU WANT TO DISPLAY';
}
By combining these two above snippets of code, you would be able to manipulate various types of JSON data.
Try the template with Harvard Art Museums
Let’s check if the API template actually works with other APIs. For this, we will use the Harvard Art Museums API. Please have a quick look at their API documentation. As usual, you need to get an API key first.
Once you get it, let’s quickly check their object search API on a web browser to understand the data structure: https://api.harvardartmuseums.org/object?apikey=YOUR_API_KEY&keyword=andromeda
Records are present in the form of an array within a records element. This gives you an idea what data you would like to fetch. Guess what running the following code actually shows in your browser:
<?php
$apikey = 'YOUR_API_KEY';

$contents_harvard = fopen("https://api.harvardartmuseums.org/object?apikey=$apikey&keyword=andromeda", 'r');
$json_harvard = stream_get_contents($contents_harvard);
fclose($contents_harvard);
print($json_harvard);
 // For display purposes, <hr> are added several times in this file
print '<hr>';
$data_harvard = json_decode($json_harvard);
print $data_harvard->info->totalrecords;
print '<hr>';

//the next block of code will go here

?>
Apparently, new names were assigned as VARIABLEs. For instance, $contents_harvard and $json_harvard are used. But, all others should look the same.
If you are ready, you can add the following code below the comment in the previous example:
foreach($data_harvard->records as $item) {
    print '<td>'.(isset($item->title)?$item->title:'').'</td>';
    print '<td>'.(isset($item->dated)?$item->dated:'').'</td>';
  print '<td>'.(isset($item->creditline)?$item->creditline:'').'</td>';
    print '<td><a href="'.(isset($item->url)?$item->url:'').'">View at the website</a></td>';
    print '<td><a href="'.(isset($item->isShownAt)?$item->primaryimageurl:'').'"><img src="'.(isset($item->primaryimageurl)?$item->primaryimageurl:'').'" height="100" width="100"></a></td></tr>';
    print '<br>';
}
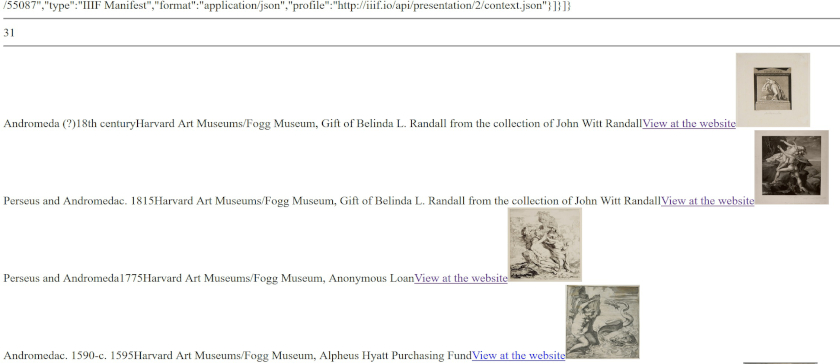
Outcome of harvard_api.php
Hopefully, you see something very similar to europeana_api.php. This time, we simply present each record separated by <br> (line break), and do not create a table on purpose. For this reason, our results look untidy, but that simply implies you can do whatever you want. One addition is the <img element specifies the size of the image as height="100" width="100", thus all images have the same size.
The point is the API template can be reused and customized, therefore, the most difficult part would be the examination of the underlying data model of a given API, and the handling of data structures. To manage that, you need to read an API’s documentation carefully. It should also be noted that this template is not a magic template. It merely provides a shortcut for beginners which can be applied for typical query APIs. As there are different types of APIs, you may need another approach and you should always consult an API’s documentation when in doubt.
API for everybody
If you can learn a bit of programming, you are no longer restricted by what a website offers by default. You are now free to build your own tool or system, for example, to select, filter, compare, process, analyse, visualise, and share data in new ways. So, what are you waiting for? Be brave and start your new project.
Useful APIs
- The New York Times
- The Digital Public Library of America
- VIAF
- GeoNames
- Wikipedia
- The Open Library
- List of useful APIs for museums
Author’s Project Using APIs
- James Cook Dynamic Journal (JCDJ)…Contextualisation of a book from The Open Library
- WiQiZi…Gamification of Wikipedia/DBpedia
- CAROL…Exploring the books from the Open Library in context