Contents
- Introduction
- Step 1: Set Up Your Host
- Step 2: Install Your Server and Database
- Step 3: Download and Install Omeka.
- Step 4: Configure Omeka to Use Your Database.
Introduction
Omeka.net, as described in the previous lesson, is a useful service for Omeka beginners, but there are a few reasons why you might want to install your own copy of Omeka. Reasons include:
- Upgrades. By installing Omeka yourself, you can use the latest versions of Omeka as soon as they’re released, without having to wait for Omeka.net to upgrade their system.
- Plugins and themes. You can install any plugin or theme you want, without being restricted to those provided by Omeka.net.
- Customizations. You can buy a custom domain name, and customize your code to achieve your desired functionality.
- Control. You have control over your own backups, and you can update the server yourself so that its security is always up-to-date.
- Price. There are many low-cost Virtual Private Servers (VPSs) now, some of which cost only $5 per month.
- Storage. Many shared hosting providers now offer unlimited storage. This is useful if you have a large media library.
In this tutorial, we’ll be entering a few commands on the command line. This tutorial assumes no prior knowledge of the command line, but if you want a concise primer, consult the Programming Historian introduction to BASH. There are other ways of installing Omeka, of course, some using exclusively GUI tools. Some hosting providers even offer “one-click installs” via their control panels. Many of those methods, however, will install older versions of Omeka which are then harder to upgrade and maintain. The method outlined below may not be the easiest way to install Omeka, but it will give you some good practice with using the command line, which is a skill that will be useful if you want to manually upgrade your install, or manually install other web frameworks. (For example, this installation method is very similar to WordPress’s “Five-Minute Install”.) There are four steps to this process, and it should take about an hour.
Step 1: Set Up Your Host
First, sign up for an account with a hosting provider that gives you SSH access. There are two main types of hosting providers: VPS and shared. A VPS host gives you root access, which means you have more control over the server, but your storage space is often limited. For small archives of 20GB or less, this is the best solution, but for large archives, shared hosting plans might be better suited. DigitalOcean is an easy-to-use and inexpensive VPS host, and Amazon Web Services (AWS) hosts similar virtual servers on their Elastic Computing (EC2) platform, geared more toward advanced users. Both HostGator and DreamHost offer inexpensive shared hosting with unlimited storage.
If you open an account with a VPS provider, you’ll first want to create a virtual server with their interface. (If you’re using shared hosting, this is already done for you.) On DigitalOcean, VPS instances are called “droplets,” and you can create one by simply logging in and clicking “Create Droplet.” On AWS EC2, a VPS is called an “instance,” and you can create one by logging into your EC2 console and clicking “Launch Instance.” In both cases, choose an Ubuntu system to install, since we’ll be running Ubuntu Linux commands below. For more detailed help with these steps, check out Digital Ocean’s guide How To Create Your First DigitalOcean Droplet Virtual Server, and Amazon’s guide Launch an Amazon EC2 Instance.
Now that you have a running server, connect to it with an SSH client. This is sometimes as simple as opening a terminal and typing ssh user@hostname, where user is the username provided by your VPS and hostname is your server address. Consult your host’s documentation for instructions for logging on via SSH. Here is a sampling of guides for VPS hosts:
- Digital Ocean: How To Connect To Your Droplet with SSH
- Amazon Web Services: Connecting to Your Linux Instance Using SSH
- Google Cloud: Connecting to Your Linux Instance
And here are a few guides for shared hosts:
When you’re connected, you should see a prompt that looks roughly like this:
user@host #
This is where we will be entering our commands.
Step 2: Install Your Server and Database
The commands we’re about to run are a little different for VPS and shared hosting providers, so if you have a VPS, follow step 2A below, and if you have shared hosting, skip to step 2B.
Step 2A: for VPS Hosting
First, we’ll need to install a LAMP software stack. LAMP stands for Linux, Apache, MySQL, and PHP, and it’s the set of software that runs Omeka. Linux is the operating system that runs the server, Apache is the web serving software, MySQL is the database, and PHP is the language in which Omeka is written.
Make sure you’re logged in as the root user first. (The root user is a super-level user that has permission to run any command.) If you’re root, typing whoami should return root; if it returns something different, switch users (su) to the root user with su root or sudo su root. Enter the root password you set up when you created your VPS, if asked. Now let’s update our system:
apt-get update && apt-get upgrade
Now that our system is up-to-date, let’s install the server stack:
apt-get install lamp-server^
Be sure to include the caret (^) at the end. This should install a LAMP server, prompting you to enter a root MySQL password. Enter a secure password here, and write it down, because we’ll be using it later.
At this point, your web server should be serving web pages. If you can open your VPS public IP address in a web browser and see the Apache2 Ubuntu Default Page that says “It works!” then everything is running correctly. If not, you might need to take extra steps to ensure your ports are forwarding properly. On Amazon EC2, for instance, ports aren’t automatically forwarded, so you have to add HTTP ports to the allowed inbound traffic for your current security group. Navigate to Network & Security -> Security Groups, select the security group you’re using, select the “Inbound” tab, and click “Edit,” adding HTML ports.
Let’s get the Apache module mod_rewrite enabled now, which allows Omeka to let you use custom URL paths:
a2enmod rewrite && service apache2 restart
Now let’s set up the database. First, log in to the MySQL database program as the root user, by entering this command:
mysql -u root
The -u flag allows you to specify the user, and the -p, when not followed by a password, will prompt you for the root password. Enter the MySQL password you created when you installed the LAMP server. You should now see a mysql> prompt. Now let’s enter a command to create the database. I’m going to call my database jonreeve_omeka, but you can call yours whatever you like.
CREATE DATABASE jonreeve_omeka CHARACTER SET utf8 COLLATE utf8_general_ci;
Here, CHARACTER SET utf8 COLLATE utf8_general_ci ensures that you can use the full character set in your web site, and not just the Latin character set. If the command succeeds, MySQL should tell you Query OK, 1 row affected (0.00 sec). For the following commands, you should see Query OK, 0 rows affected (0.00 sec) if all goes well.
Next, let’s create a database user account, so that Omeka can talk to the database:
CREATE USER 'jonreeve_omeka'@'localhost' IDENTIFIED by '%8)&2P^TFR2C';
I’ve given my user the same name as my database for convenience, and I’ve chosen %8)&2P^TFR2C as my secure password. Now we can allow our new user to access our newly-created database by typing these commands:
GRANT ALL PRIVILEGES ON jonreeve_omeka.* TO 'jonreeve_omeka'@'localhost'; FLUSH PRIVILEGES;
Your database should now be set up for use with Omeka. Type exit; or press Control+C to exit MySQL and return to your command line.
Step 2B: for Shared Hosting
Follow this step if you’re using a shared hosting provider. If you’re on a VPS, you can skip to step 3.
Log into your hosting provider’s control panel and find an item called something like “MySQL Databases.” If your hosting provider uses cPanel, it looks like this:
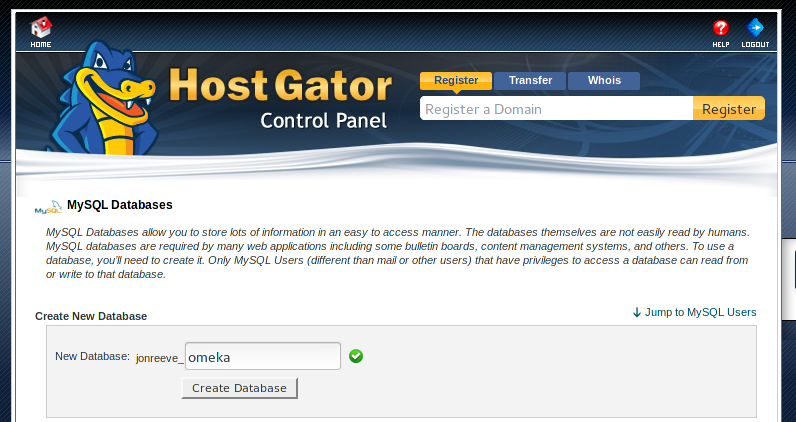
Install a New Database
In the box labeled Create New Database, enter a database name. On shared hosting providers, the prefix will typically be your user name (mine is jonreeve), and you’ll enter the rest. In this example, I chose to call my database omeka, so my full database name is jonreeve_omeka. Click “create database.”
Once you’ve done that, click to go back to the previous screen. Below the Create New Database box you’ll see an area for creating new MySQL users. It looks like this:

Create a New User
In the box labeled Username, enter the same thing you entered for your database name (this is just a convention, and will help you to keep everything organized). I’ll enter omeka again, so that the full user name reads jonreeve_omeka. It’s a good idea to click “generate password” here, since that will make a very secure password. At this point, write down the database name (jonreeve_omeka), the user name (which should be the same as the database name), and the generated password, since you’ll need these later.
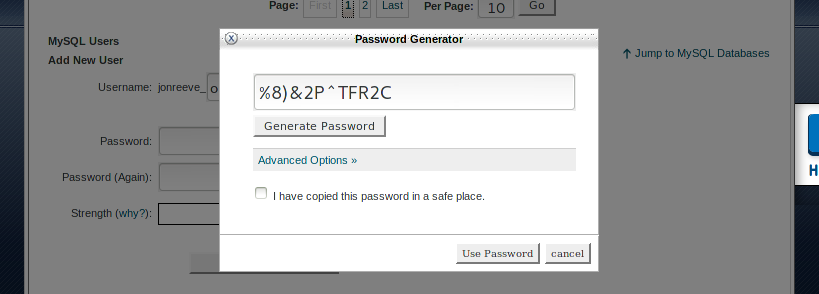
Generate Password
Next, add the user you just created to the database. Just select the user and the database you created in the dropdown menus and click “add”:
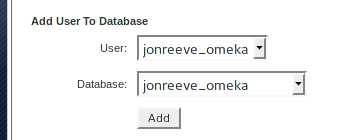
Add User to Database
Your database is now set up, and you’re ready to install Omeka.
Step 3: Download and Install Omeka.
Now let’s download Omeka directly to the server. This will allow us to avoid the process of downloading it locally, unzipping it there, and uploading it to the server, and we’ll save a lot of time. To do this, let’s first get to the public HTML directory. This is usually /var/www/html, but could also be /var/www, or, on some shared hosts, ~/public_html. If you’re unsure, check with your host about where it keeps its public HTML directory.
cd /var/www/html
If you get a permissions error here on a VPS, make sure you’re logged in as the root user with su root. Now let’s download Omeka with command wget like this:
wget http://omeka.org/files/omeka-2.7.zip
Now let’s first make sure we have the unzip command:
apt-get install unzip php-xml
And now we can unzip the Omeka zip file:
unzip omeka-2.7.zip
(If you get an error here on a VPS, you may need to install the unzip command with apt-get install unzip first.) This will unzip Omeka to a subdirectory on your website. Presuming you don’t want your Omeka web site to have the URL http://your-domain.com/omeka-2.7/, let’s change the name of the directory:
mv omeka-2.7 omeka
(Instead of omeka-2.7, substitute the version you downloaded.) Now you have an Omeka install which is ready to connect to the database.
Step 4: Configure Omeka to Use Your Database.
First, go into the directory where your Omeka install lives, using the command cd. On a VPS, that’s probably /var/www/html/omeka, and on shared hosting, ~/public_html/omeka.
cd /var/www/html/omeka
If you get a permissions error here using a VPS, make sure you’re logged in as the root user first by running su root.
Now let’s edit the db.ini file. Unless you’re already comfortable with a power editor like Vim, we’re going to use the editor Nano:
nano db.ini
That will give you something that looks like this:
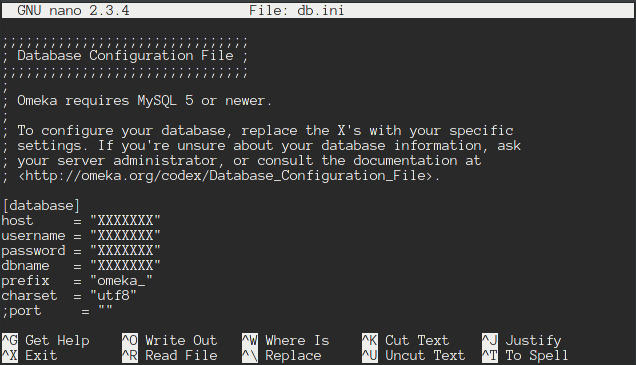
Db.ini, Before
Now you can edit your file, changing the XXXXXXXX values to the appropriate values for your system, but keeping the double quotes (") intact. The field host should be localhost, since the database is on the same server. For username and dbname, enter the user name, password, and database name you generated in step 2. For my setup, these values are:
host = "localhost"username = "jonreeve_omeka"password = "%8)&2P^TFR2C"dbname = "jonreeve_omeka"
The file will end up looking like this:
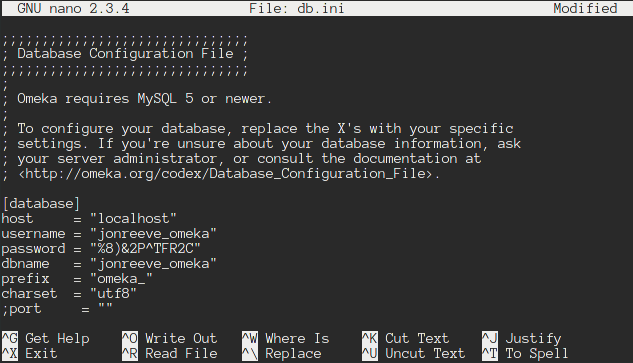
Db.ini, After
Exit (Control+X) and when asked, save your changes by pressing Y. Now let’s change the owner of our Omeka installation, so that it’s readable by the Internet:
chown -R www-data:www-data .
chmod -R g+w files
Now you should have a working Omeka install. You can access your installation script at http://your-domain/omeka/install/install.php, replacing your-domain with your domain name or IP address, and omeka with the name you gave your directory above. Fill out the form there to get started configuring your Omeka install. If you run into any trouble along the way, consult the Omeka Installation Guide or the Omeka Troubleshooting Guide.